
Ruby on Rails is one of the most popular frameworks for developing web applications. If you're looking for an easy and reliable way to deploy your Rails application to production on Hetzner Cloud, you're in the right place.
Last year we announced our partnership with Hetzner Cloud, and it has proved to be a popular choice for many developers. In this guide we're going to show you how to deploy a Rails project on Hetzner Cloud using two of our services: Cloud 66 for Rails and Cloud 66 Maestro.
Two ways to deploy a Rails app with Cloud 66 on Hetzner Cloud:
Based on your infrastructure requirements you can deploy your Rails application in two ways: natively, or deploy a containerized Rails application.
A few words about each method:
- Cloud 66 allow you to deploy your Ruby on Rails (or any other Rack-based) applications natively to any cloud with ease of management and reduces the load on your DevOps resources.
- Cloud 66 can also help you build a Kubernetes cluster on your servers. It builds your code into Docker images. It takes care of databases, firewalls, and network for your applications on any cloud. It's a great way to deploy any application (any language, any framework) that has a Dockerfile. In our case that means a containerized Rails application.
Checklist before we get started:
Before we get started building and deploying your Rails application you need access to the following:
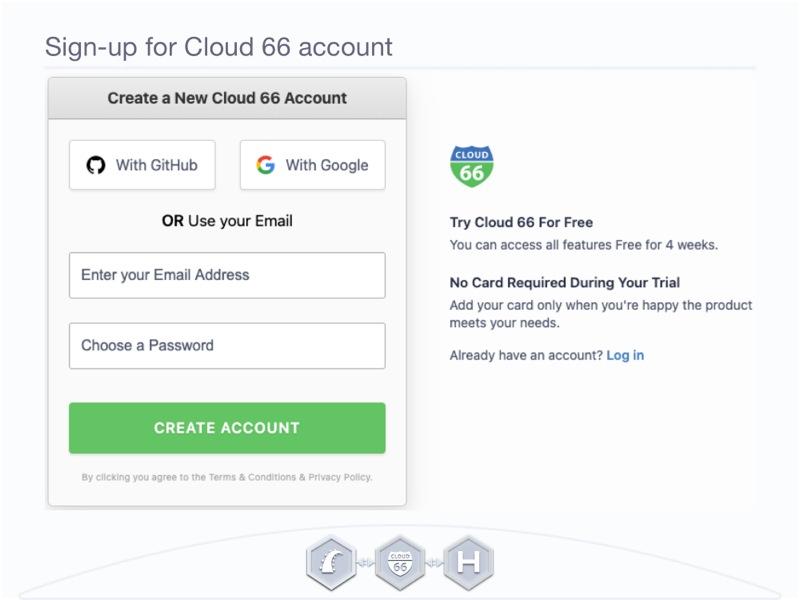
- A Cloud 66 account - If you don’t already have one, sign up for a Cloud 66 account. You can sign up with your GitHub or Google accounts, or use your email and create a password. To get you started we offer a free plan (with no credit card required).
- A git repo containing your application code - This can be a public or private repository. For the purposes of this guide, we're going to use one of our Cloud 66 samples.
- A Hetzner Cloud account - If you don't have an account yet, choose your hosting plan, hit the sign-up button, and create your Hetzner Cloud account. For more information follow Hetzner Cloud getting started guide.
Deploying your Rails app to Hetzner Cloud with Cloud 66
As mentioned above, we are going to use a Rails sample for this tutorial. Our sample contains a basic Rails application with MySQL database on the backend.
Cloud 66 Rails sample: https://github.com/cloud66-samples/rails-mysql
Of course, if you don't want to use our sample, you can follow this guide and deploy your own Rails project.
Let's get started and deploy our production-ready Rails application on the Hetzner Cloud. This guide included a step-by-step tutorial on how to deploy with Cloud 66 for Rails (Scenario 1) and Maestro (Scenario 2).
Scenario 1: Cloud 66 for Rails on Hetzner Cloud:
For those who prefer watching rather than following the guide, our 2 min video demo will get you started with Cloud 66 for Rails on Hetzner Cloud.
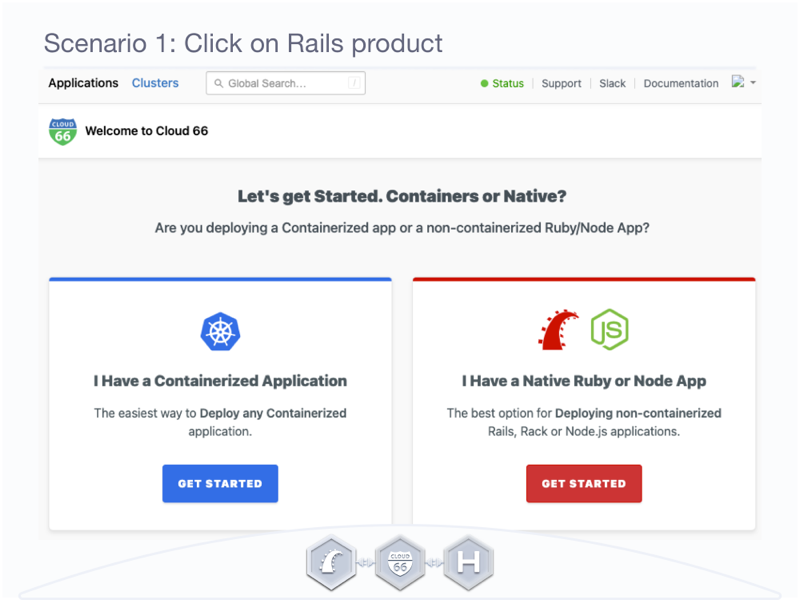
Once you have signed up for Cloud 66 account, log in and choose the product that you would like to use. In scenario 1 we are going to deploy our sample with Cloud 66 for the Rails product.
Connect Git Repo with Cloud 66 account:
Let's connect your git repo to your Cloud 66 account. You can use any git provider like GitHub, BitBucket, or use your own privately hosted repo. For a private git repo, you'll need to add and approve the Cloud 66 public SSH key with your git provider.
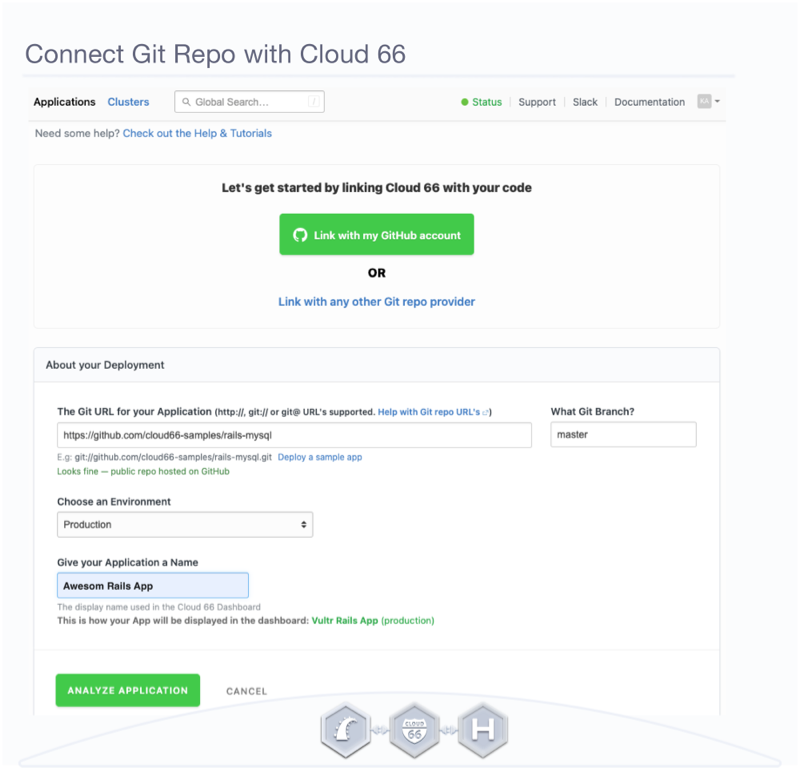
Start by connecting your Git repo with your Cloud 66 account. You can link Cloud 66 with your GitHub account with the click of the button “Link with my GitHub account”. It will take you to the next page to and ask you to authorize Cloud 66 access to your code.
Our Rails sample is hosted in GitHub. Paste the sample URL in the Git repo URL field. Next, define the deployment branch ("master" in our case). Choose the environment variable (production) and give your application name (Awesome Rails App).
Click Analyse.
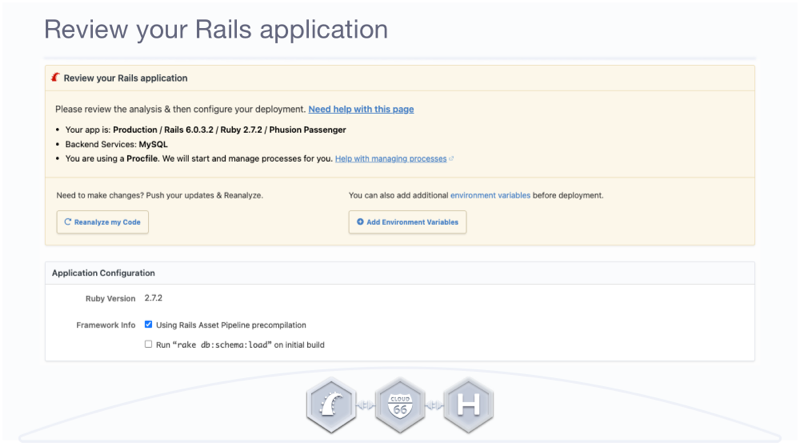
Cloud 66 will pull your code from your repo, analyze your app and suggest a configuration. If you think there is something missing you can always commit any change to your git repo and click on Reanalyze your Code. Also, you can add another environment before deployment.
So what do we know about our sample app?
We know the versions of Ruby (v.2.7.2) and Rails (v.6.0.3.2) it is using. We know we're using Phusion Passenger as our application server and MySQL as our database. We've also confirmed that our application will be set up in a production environment.
Connect Hetzner Cloud with Cloud 66 account:
Now that we have analyzed our code, we need to add our deployment destination. It's time to add your Hetzner Cloud account to Cloud 66.
Simply, select Hetzner Cloud from the drop-down list, and add your Hetzner Cloud API Key to confirm the access. You can give a new name or leave it as a default.
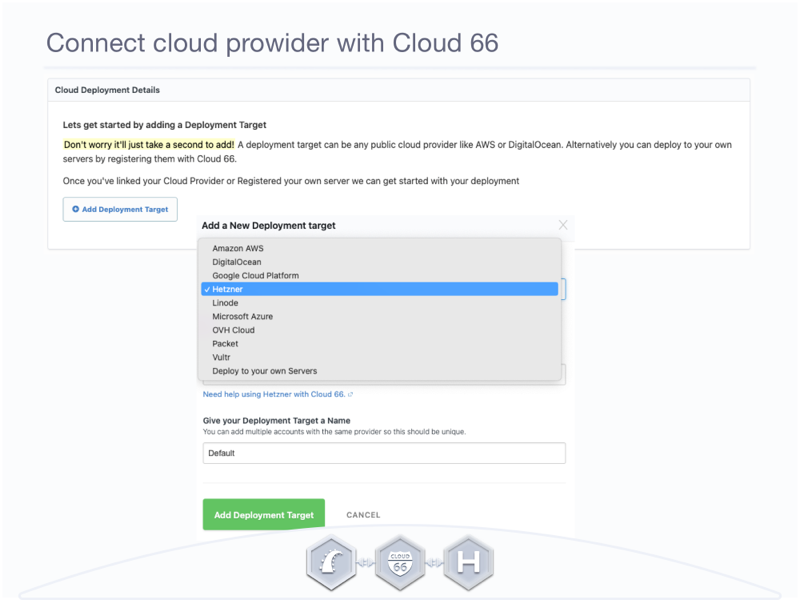
Once your Hetzner Cloud and Cloud 66 accounts are linked we can get started with our deployment.
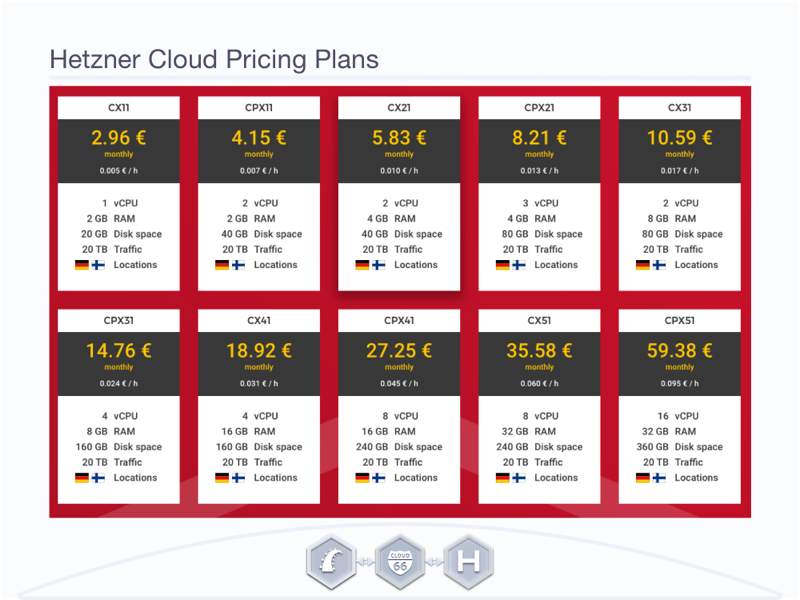
Provide more detail on Hetzner Cloud. From the drop-down select a server region (Falkenstein). Then the server size (Local storage - CX41-4 vCPUs- 16.0 GB RAM- 160 GB disk).
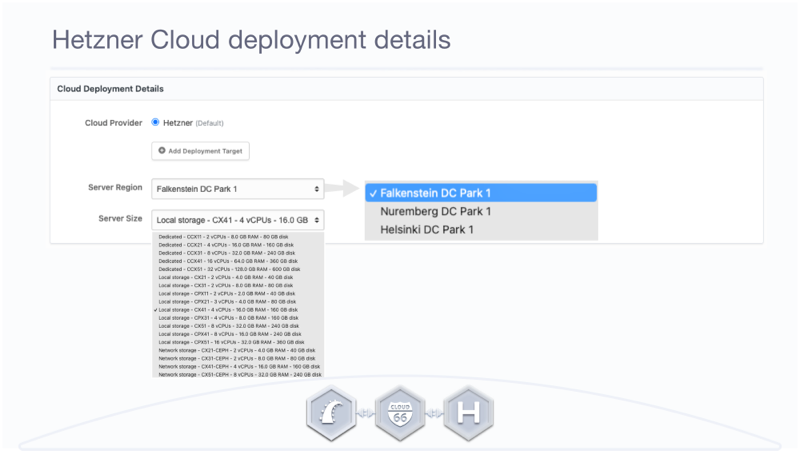
Lastly, as a good practice, we would recommend selecting a separate server for your database in production. However, as this is a demo we can share the Rails server with MySQL.
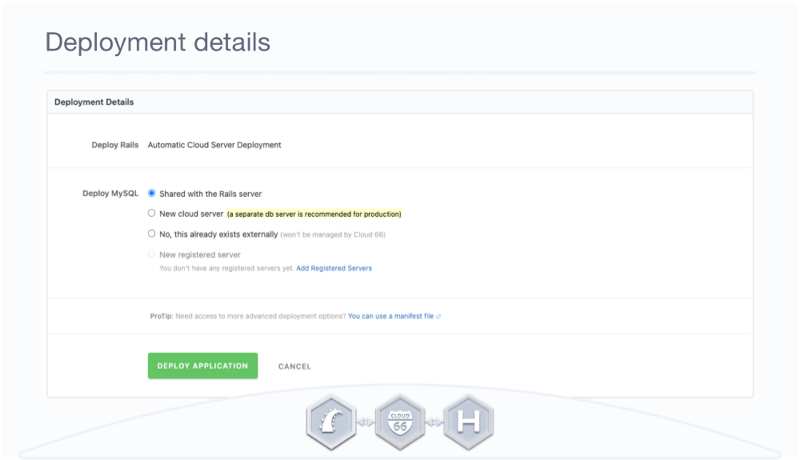
All done! Click Deploy Application button and deployment will start.
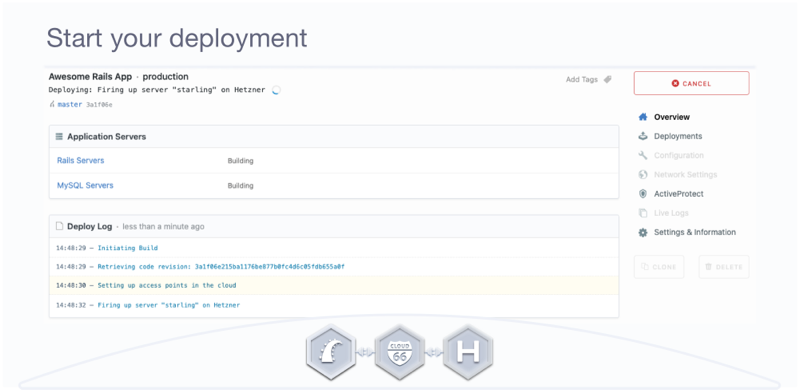
Deploy production Rails app to Hetzner Cloud with Cloud 66:
We will now provision servers and then deploy your Rails application to them. Depending on the size of your application, it can take some time to complete the deployment. You can see what is happening in the Deploy Log. But you don't have to stay here and watch the deployment.
We will send you an alert email when the deployment starts and another one when it finishes.
Congratulations! We have successfully deployed the Rails application on Hetzner Cloud in production.
Manage your Rails application:
Now, we can help you manage and secure your application. You can start by clicking on the stack score icon ("F") to visit the Stack Score dashboard.
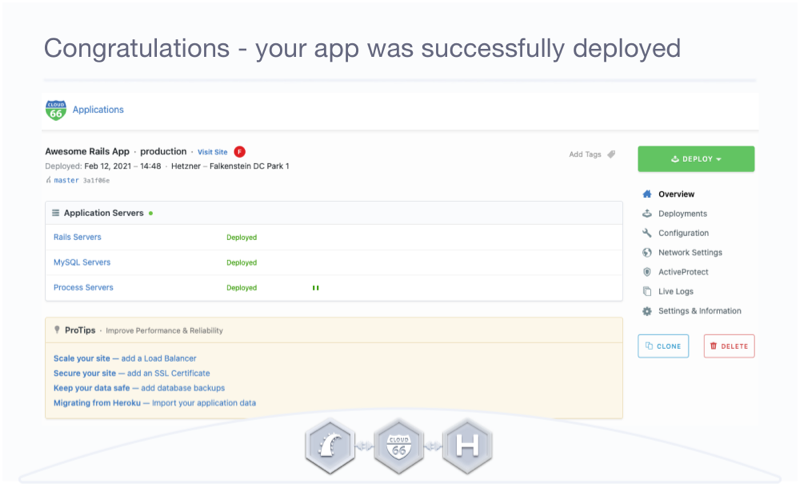
The dashboard displays a list of suggested actions needed to improve your score by closing application vulnerabilites and improving resilience. For example setting up regular backups, adding load-balancers and creating a failover group.
Note: You can see that we have been scored "C" for sharing our Rails and MySQL server.

Use the menu on the right-hand side to manage your application:
- Deployments shows you a timeline of your deployments. Who deployed what and when and which commit of the code they deployed.
- Configuration allows you to edit environment variables, Config Store, and configuration files. E.g. manifest, MySQL and Nginx.
- Network Settings helps you manage your firewalls, traffic, and redirects.
- ActiveProtect protects your application and servers against denial of service and brute-force attacks.
- LiveLogs collects and displays real-time logs that can help you find and eliminate bugs in your Rails app.
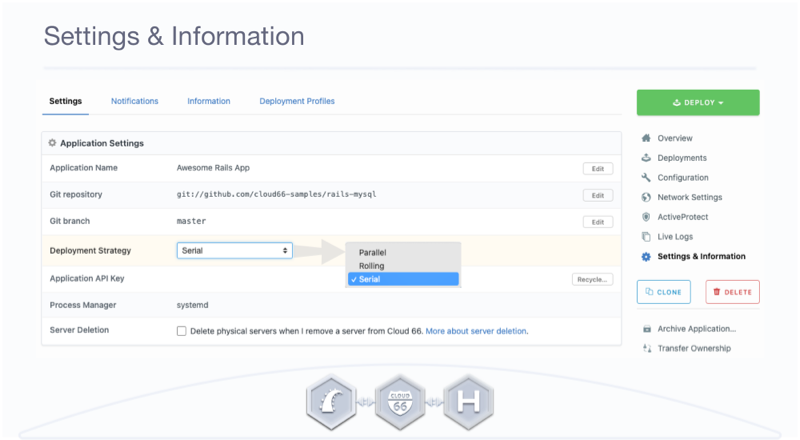
- Setting & Information allows you to edit your application settings e.g. change a deployment strategy. You can also set up your notifications, and choose what you would like to be informed about, and via which channel.
At the bottom of the menu, you can take advantage of the following features: Archived Application and Transfer Ownership. Both features are great for web development agencies, to help you easily manage multiple projects.
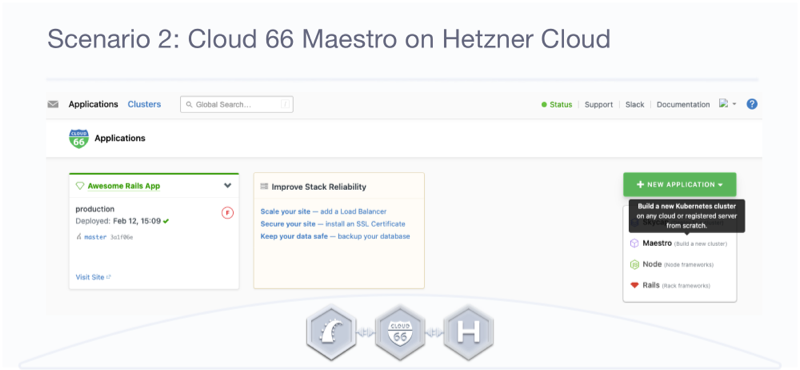
Scenario 2: Deploy Containerized Rails App on Hetzner:
In scenario 2, we are going to deploy a containerized Rails app on Hetzner Cloud. First, your application has to be containerized.
If you are planning to create a new containerized project, or move your existing application to containers, have a look at setting up RoR with Docker talk or read deploying Rails to Kubernetes guide. You can also read our resources on how we containerized Cloud 66 application a few years ago, and how to deploy Rails 6 Asset with Docker and Kubernetes.
Connect Git Repo with Dockerfile and Cloud 66 account:
If you ignored scenario 1, and you are a new user then click on the I have containerized application box and then on I need to build Kubernetes cluster to get started.
However, if you followed scenario 1 and now you want to see how easy it is to deploy containerized project. Navigate to the dashboard and click on the +New Application button, on the right-hand side menu and click on Maestro.
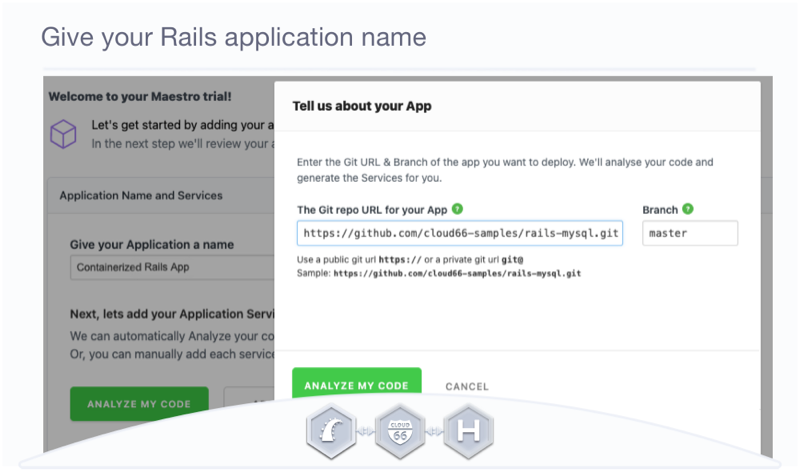
Containerized Rails sample: https://github.com/cloud66-samples/rails-mysql
Start by giving your application name (e.g. Containerized Rails App). Follow by entering our Rails sample GitHub URL in the box provided, or any git repo with a Dockerfile and choose a branch for your application.
We'll analyze your code from git repo and return to you what we have found.
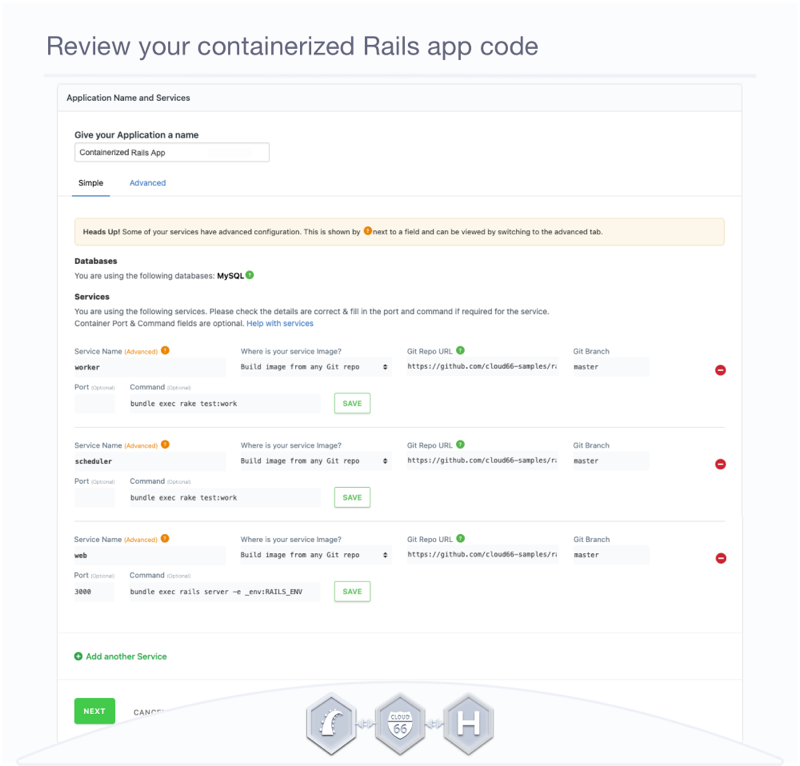
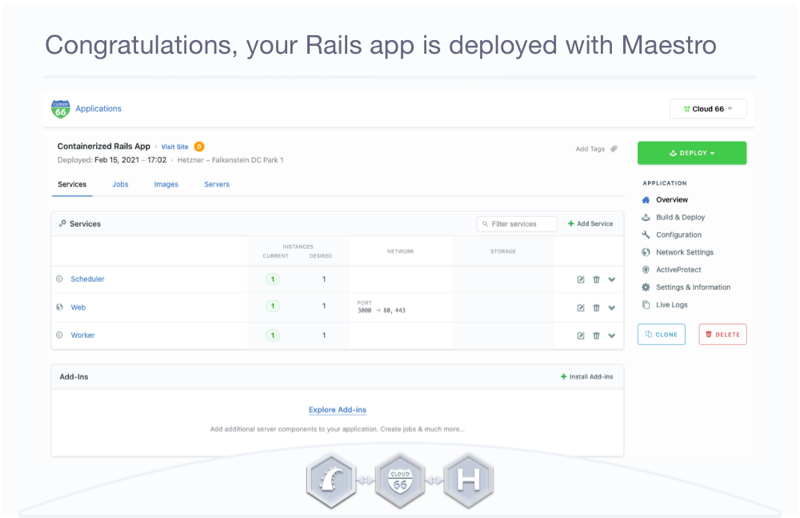
So what do we know about our sample?
This application uses a MySQL database and has three services: worker, scheduler, and web. For each service you can choose;
- a name,
- the source of the image (git repo),
- the branch (maser) and port (3000).
Once you are happy with the configuration, click Next. You can also commit new code changes and reanalyze, or add another service, before building the images.
Building images for your Rails application:
Before we can deploy the Rails application we need to build our services into container images. We will automatically pull and build your code into images. Each service will be built as a separate image.
After reviewing all the components click on the Build Application Images button.
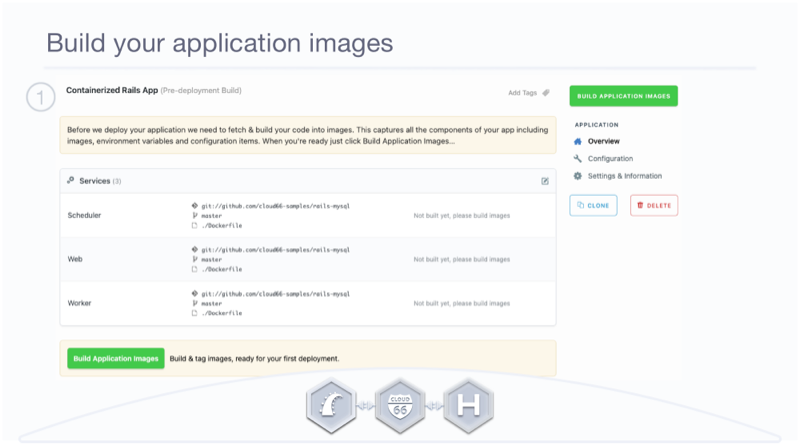
This will take some time, so feel free to put the kettle on. We'll alert you via email when it's done.
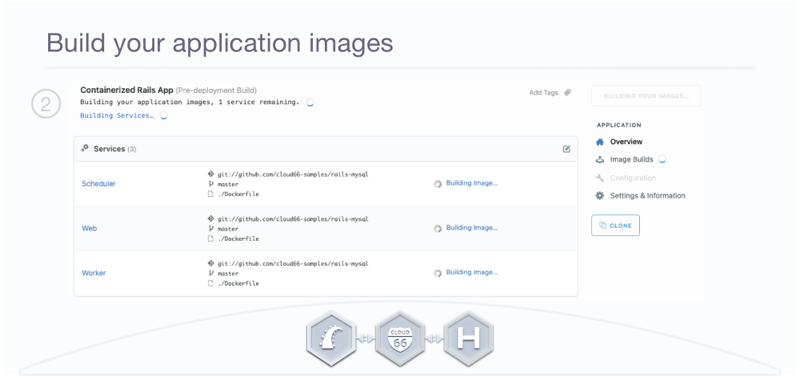 _Images for your Rails application are building. _
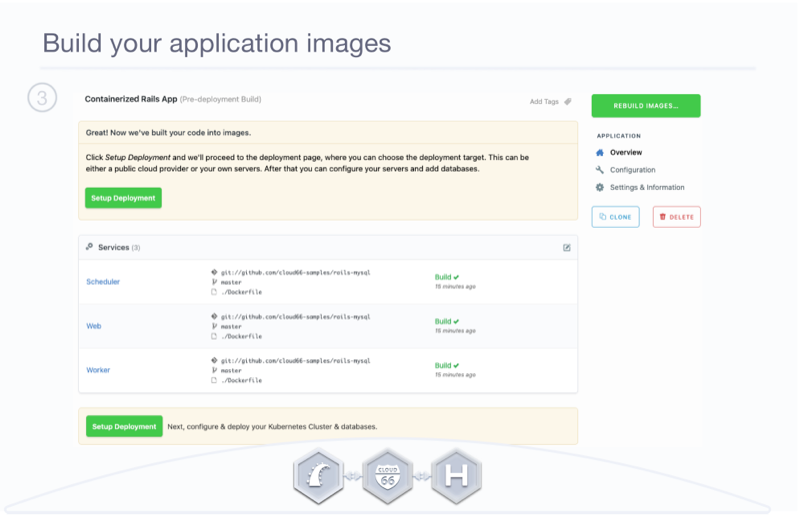
Now that you have built your code into images, you're ready to deploy your app. Click Setup Deployment.
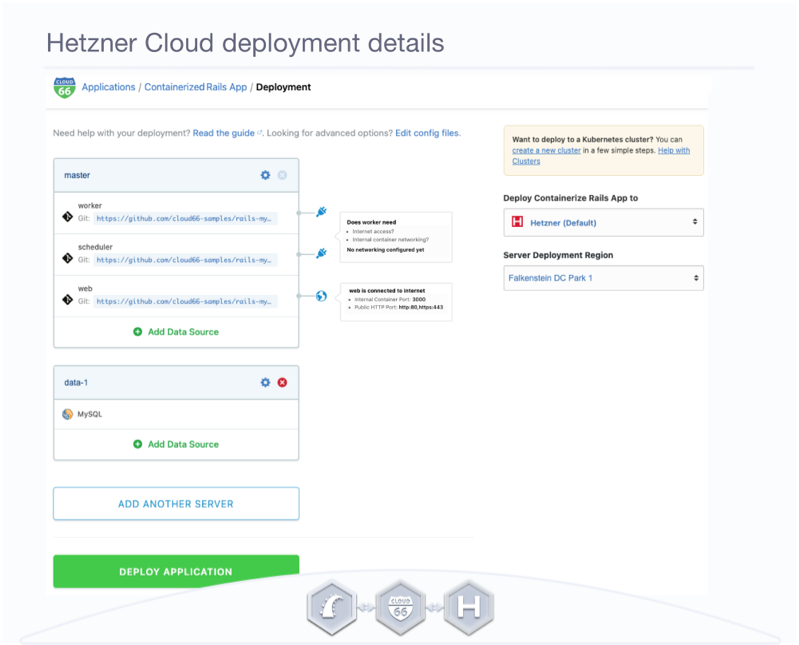
Deploy containerized Rails app on Hetzner Cloud with Cloud 66:
On the deployment dashboard, you will find the list of your services on the left-hand side. You can still add another service if needed.
On the right-hand side of the screen, you can choose your deployment target from the dropdown list. As we have already connected Cloud 66 with Hetzner Cloud account in scenario 1, there is no need for the Hetzner API Key. We can selected Hetzner Cloud, in the Falkenstein region. Once the cloud is selected, hit the Deploy Application button.
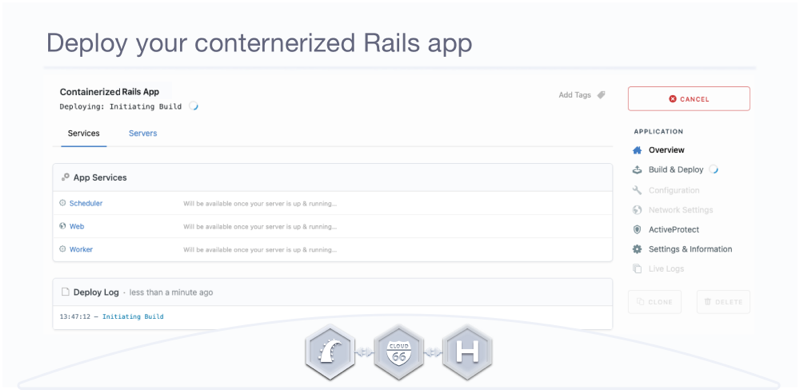
Now, we are deploying the Rails app on Hetzner Cloud. The kettle is boiled, so make yourself a nice cup of tea. We'll email you once the deployment is completed.
Manage your application with Cloud 66:
Using the menu on the right-hand side, you can now manage your newly deployed Rails application. Click on the stack score icon (D) to get started improving your application. Learn more by following links from the Pro Tip box.
The Application menu on the right-hand side is explained in the Manage your Rails Application section of this article (above).
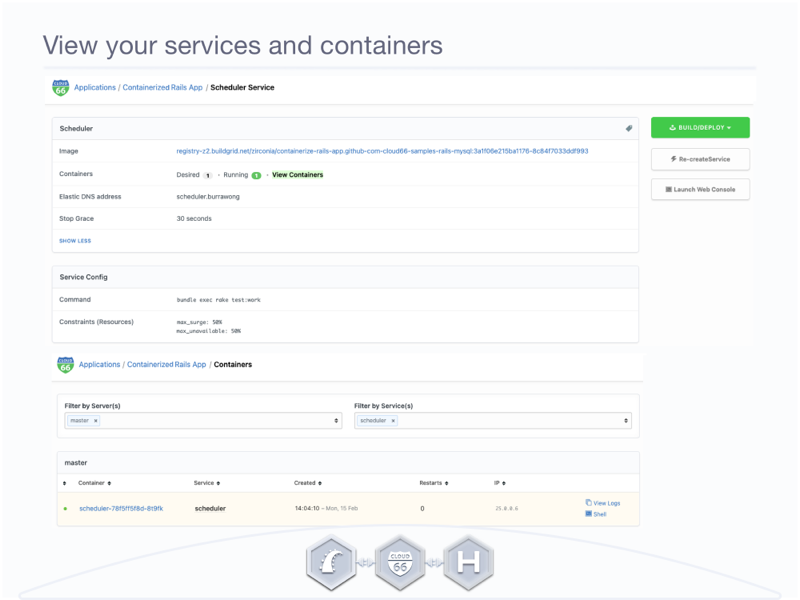
Additionally, by clicking on each App Service name. You are able to see more details on services and view your containers.
Finally, you can see a Cloud 66 dashboard below with both of the applications: Cloud 66 for Rails and Maestro.
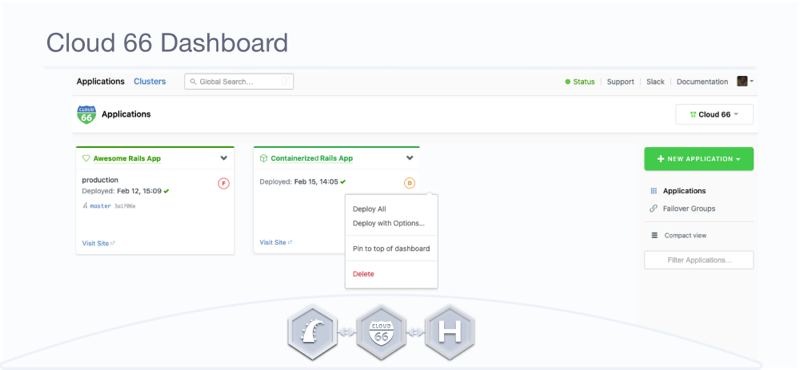
Just a side note. Click on the application drop button and you will be able to:
- deploy,
- deploy with options,
- pin the application to the top of the dashboard, or
- delete your stack.
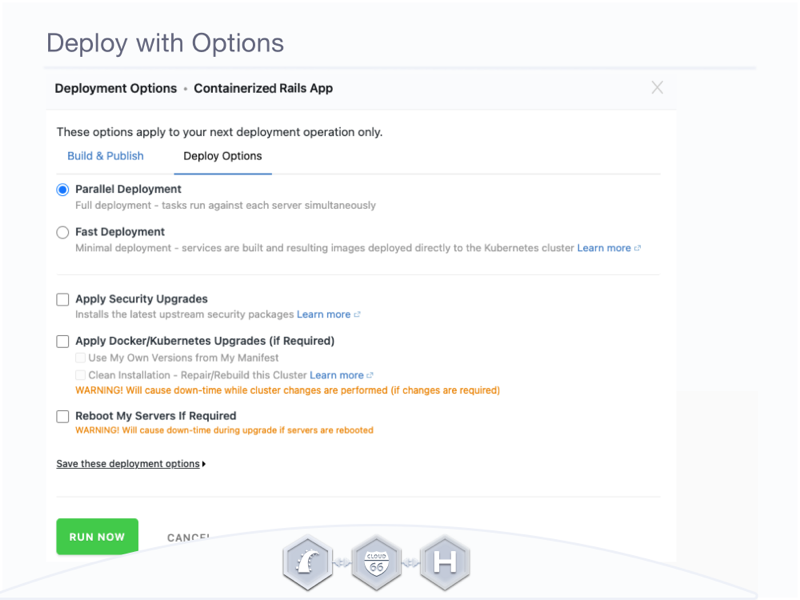
If you click on deploy with options. You can choose a different deployment strategy for your next deployment.
Bonus feature: Autoscale Hetzner servers with Cloud 66
In our continued exploration of optimizing your Hetzner Cloud deployments, we dive deeper into the dynamic world of auto-scaling. Picture this: your Rails application has been flawlessly deployed on Hetzner Cloud, delivering a seamless experience to users who are now recommending it to all their friends. As your user base surges, how do you ensure your infrastructure keeps up with real-time demands without manual intervention? This is where Cloud 66's AutoScaling shines. Check out our Scaling documentation, where we demonstrate how AutoScaling uses key metrics to intelligently adjust your server resources. From Nginx response time, CPU and memory usage to custom-defined rules, it dynamically adapts to ensure optimal performance and cost-efficiency.
These are two ways to deploy Rails applications on Hetzner Cloud with Cloud 66. Please, get in touch and let us know about your deployments to Hetzner Cloud with Cloud 66. We'd love to hear from you.
Deploy Happy!