
Making infrastructure secure is difficult. Let's rephrase that; building a secure infrastructure needs time, experience and can be expensive. There are however some best practices that can help get there quicker and cheaper. Using Bastion servers is one of them.
What is a Bastion server?
A Bastion server (sometimes called a gateway server - not to be confused with an AWS Internet Gateway) is a server that sits between the public internet and your servers behind a firewall. It protects and controls access to your servers. All SSH access will go through this server via a tunnel, allowing you to control admission to all your servers, by controlling access to only the Bastion server. You can read more about Bastion servers here.
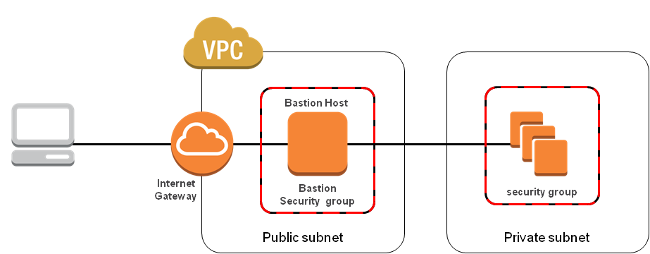
In this example, we're going to use AWS VPC (Virtual Private Cloud), however it's worth noting that Cloud 66 support for Bastion servers works with all of our cloud providers.
Using AWS VPC as an example
If your application lives on Amazon EC2 and you haven’t yet used VPC, I’d suggest you spend your next geeky weekend playing with the basic concepts of its security model.
Until five years ago, most medium-sized tech companies had a network admin in their team to deal with cryptic routing tables and VLANS.
Nowadays, we enjoy fancy web dashboards and wizards, that build you a network with public/private subnets on the Amazon cloud, with just a couple of clicks!
Far from the SDN (Software Defined Networking) approach of old school in-house infrastructures, AWS VPC works great, is the best out there and is cheap.
Once convinced that moving your application into a DMZ is the right thing to do, you won’t need to worry about your DevOps. Cloud 66 will deploy your application into your DMZ and maintain it for you.
Getting started
First thing to do is to define a deployment gateway in your Cloud 66 account and add some information about your Bastion server.
Once you've got your Bastion servers defined in your Cloud 66 account, you need to just open the Bastion for Cloud 66 during deployment by calling a single Toolbelt command.
Lets go through the process step-by-step and see it in action:
I have a VPC with two Subnet and a NAT instance (as the Bastion server) in my AWS account:
1. Define deployment gateway
I can use cx to add the new gateway to my account:
Now, if I list my deployment gateways I can see aws_bastion there:
2. Open deployment gateway
To be able to use the gateway, I first need to open it for a set amount of time:
You will see the change in status:
3. Deploy stack
Now I can use the above information to deploy my stack through the Bastion server. First I should add the configuration information into the stack manifest:
As you can see, I specified the VPC and subnet I want my server deploys in and added aws_bastion as my gateway name.
Note: Bastion servers are supported for both Cloud 66 for Rails and Cloud 66 for Docker stacks. Read more about Cloud 66 manifest file.
4. Closing the deployment gateway
We had opened the gateway for an hour, therefore the gateway will close automatically after the specified period. You also have the option of manually closing the gateway like this:
Note: Once you close a gateway, Cloud 66 cannot access your servers unless you open it again.
And that's it. My servers are deployed behind the Bastion server!
Bonus point: SSH servers behind a Bastion server
As the last tip, if you need to connect to your server via terminal, you can still use the cx ssh command by providing the key of your Bastion server :
Here gateway-key is represented by your private SSH key for the Bastion server.