
We are going to deploy a Go application directly from your repo to AWS with Cloud 66. Any application using any language on any framework can be deployed with Cloud 66 as long as it has a Dockerfile. Note: Rails applications are exceptions as we deploy them natively.
If your application does not have a Dockerfile, we will suggest one for you based on your code. However, we would recommend reviewing what we have suggested and making sure the Dockerfile meets your requirements.
Have a look at the following resources on how to create a Dockerfile for Go applications:
Go App Overview
We are going to use a simple 'Hello World' single web application written in Golang. This application already contains a Dockerfile.
Sample: https://github.com/cloud66-samples/helloworld
Deploy a Go App on AWS
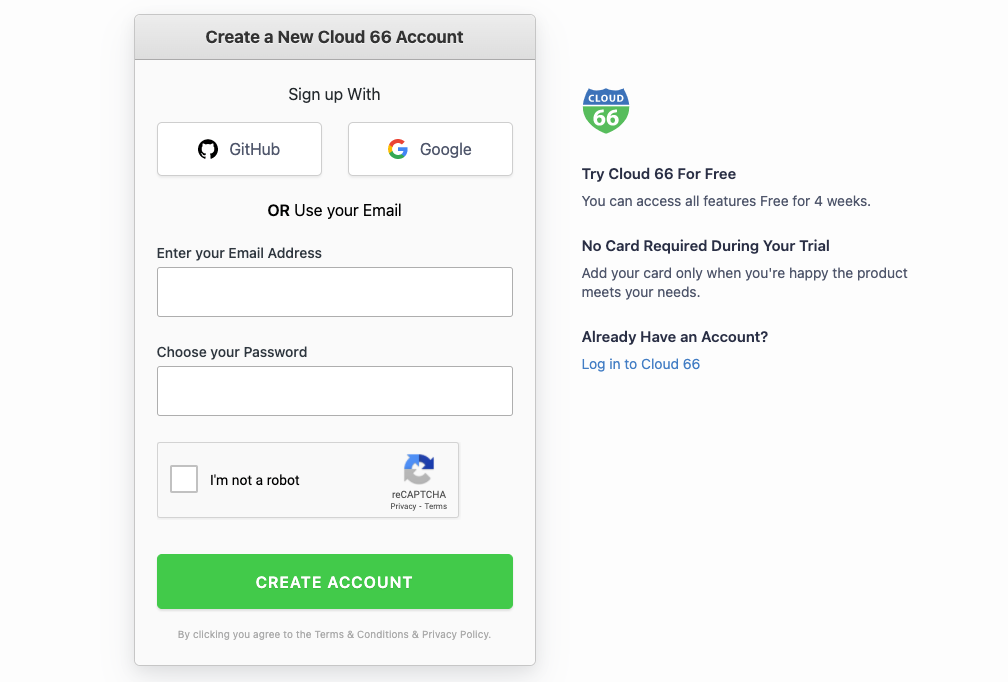
To get started sign up for Cloud 66 account, with a four-week free trial. You can sign up using your GitHub or Google accounts, or use your email and create a password. Once you have your account we will ask you for (read-only) access to your code repository so that we can build and deploy your application for you. You will also need access to your AWS account.
Step 1: Add Application Repo Details
If you signed up with GitHub, you can select your application repo from the drop-down. However, for the purposes of this post, you can use our sample app by clicking on the 'Enter the repo URL' link and pasting it in the Hello World app repo link: https://github.com/cloud66-samples/helloworld.
Next, choose the master branch, production environment, give your app a name, 'Hello World' and click the ANALYZE button.
Step 2: Add or Build Your Images from Scratch
If your application does not have a Dockerfile, this is the time to build one and add it to your code repository.
Since our Hello World sample has a Dockerfile already, all you need to do is validate your image. Click the "Validate Repo access and Dockerfile" link and we will analyze the image details to make sure there are no issues before moving to the next step.
In this step, you can also add additional Docker images to your application if needed.
Step 3: Configure Your Application Services
In this step, you can set up your application workloads, network, and storage. We will ask you to configure network access for each of your services.
- Ports - set your container port, HTTP port, and HTTPS port.
- Storage - you can configure storage volumes for each service. (Optional)
- Instances - you can specify how many instances of each service you’d like to run and a variety of other custom settings. (Optional)
Since our sample is a simple application, we only have one service to configure. You should use HTTP port 80 and container port 5000.
Step 4: Configure Servers and Add AWS for Deployment
Now, we are going to add AWS cloud as a deployment destination for our Hello World application. You can select AWS from the dropdown, next we will ask you to specify the region and the server size for the deployment. Just before deploying your application, we will ask you to connect AWS with Cloud 66 account, by asking you to enter your AWS API Key.
To get your AWS API key, log into your AWS console. Now click on "My Account" in the top right corner and select "Security Credentials". Under the "Access Credentials", click on "Access Keys" to get your AWS API key. For more information on how to set up an AWS API key, follow their documentation.
In this step, you can also add additional services like databases. We are going to add Redis.
Note: You can decide on how to deploy your databases. As this is a demo app we'll choose the 0ption to share the webserver. However, we do not recommend this option for critical apps or the production environment.
All done! Click the START DEPLOYMENT button.
Once, the application is deployed, use our application menu on the right-hand side to manage and secure your application. For example setting up regular backups, adding load-balancers, and creating a failover group.
In the dashboard overview, you can manage your application Services, Jobs, Images, Servers.
Deploy Happy!