

In this last article for our current microservices series, we'll examine how to combine our Ruby-based and Node-based microservice APIs, into a single Docker-based stack on Cloud 66. The stack will support both microservices and a front-end Nginx gateway to distribute incoming requests, all deployed within the same Cloud 66 stack.
Building a service gateway using Docker + Nginx
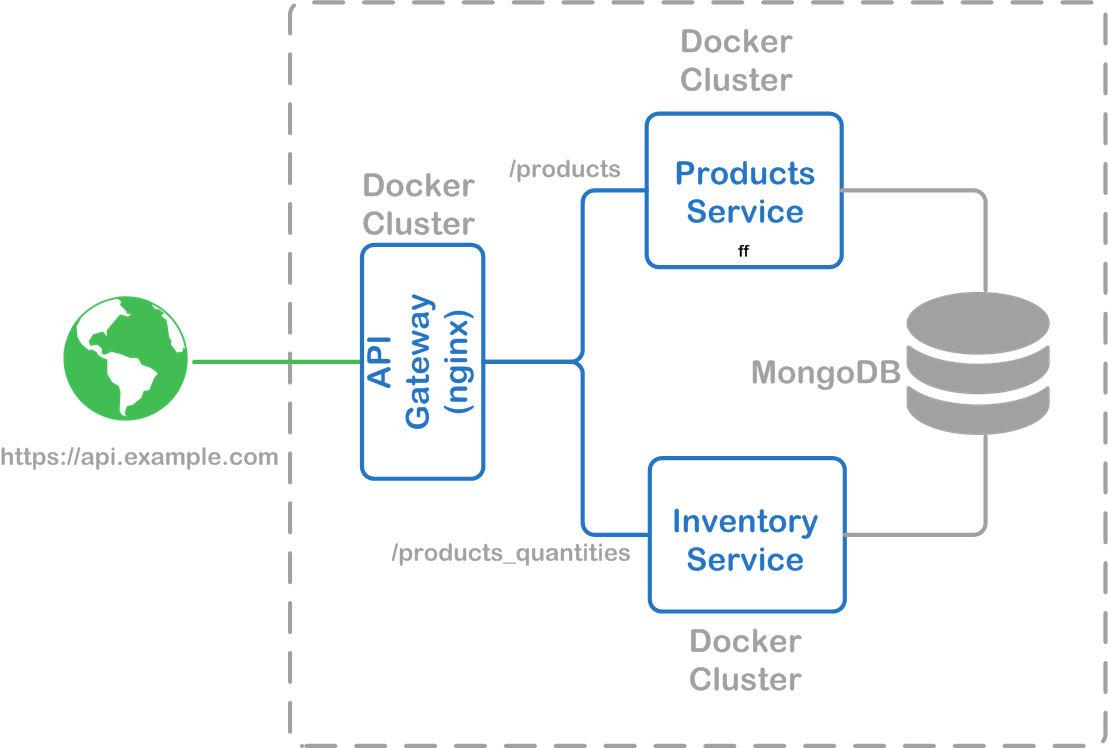
Since we already have our two microservices built, we need to put an API gateway in front, to distribute incoming requests to the right microservice based on the path requested. Below is a diagram of what this will look like when we're done:
Creating the Nginx gateway container
For our Nginx-based API gateway, we first need to setup the nginx.conf file that will send requests to the proper microservice:
daemon off;

worker_processes 1;

events { worker_connections 1024; }

http {

    sendfile on;

    gzip on;
    gzip_http_version 1.0;
    gzip_proxied any;
    gzip_min_length 500;
    gzip_disable "MSIE [1-6]\.";
    gzip_types text/plain text/xml text/css
                      text/comma-separated-values
                      text/javascript
                      application/x-javascript
                      application/atom+xml;

    # List of application servers
    upstream product_api_servers {

        server products.cloud66.local:4567;

    }

    # List of application servers
    upstream inventory_api_servers {

        server inventory.cloud66.local:8080;

    }

    # Configuration for the server
    server {

        # Running port
        listen 80;

        # Proxying the Products API
        location /products {

            proxy_pass http://product_api_servers;
            proxy_redirect off;
            proxy_set_header Host $host;
            proxy_set_header X-Real-IP $remote_addr;
            proxy_set_header X-Forwarded-For $proxy_add_x_forwarded_for;
            proxy_set_header X-Forwarded-Host $server_name;

        }

        # Proxying the connections connections
        location /product_quantities {

            proxy_pass http://inventory_api_servers;
            proxy_redirect off;
            proxy_set_header Host $host;
            proxy_set_header X-Real-IP $remote_addr;
            proxy_set_header X-Forwarded-For $proxy_add_x_forwarded_for;
            proxy_set_header X-Forwarded-Host $server_name;

        }
    }
}
Some notes on this Nginx config:
- We're using the
daemon off;directive to force nginx to run in the foreground, preventing the container from stopping after the process has spawned. This recommendation comes from a Digital Ocean article on containerizing with Nginx - We're enabling gzip for all browsers except older versions of IE
- We then declare both upstream API servers: one for each microservice. Since Cloud 66 offers DNS entries for each service in our stack (servicename.cloud66.local), we'll use this as the hostname for each microservice we're deploying. This also makes it is easy to point to the deployed service, while hiding the number of containers we may have deployed currently (and their individual IP addresses)
- Finally, we need to define the base URLs we want to route to each microservice, telling Nginx to use the upstream server to handle the request. For this example, we're routing /products to the Products microservice, and product_quantities to the Inventory microservice
The config file will be installed to /etc/nginx/nginx.conf as part of our Dockerfile. The Dockerfile uses the latest Ubuntu image, ensures all of the latest packages are installed, installs Nginx and then installs the config file using the COPY command:
FROM ubuntu:latest

# keep the container updated
RUN apt-get update -qq && apt-get install -y build-essential

# install the latest nginx
RUN apt-get install -y nginx

# Install a customized nginx config
ENV NGINX_CONFIG_HOME /etc/nginx
WORKDIR $NGINX_CONFIG_HOME
COPY nginx.conf $NGINX_CONFIG_HOME
Testing locally
Assuming you've cloned the two microservice repositories into the same root-level directory as this repository, we can define a docker-compose.yml that allows us to work with the environment locally:
products:
  build: ../microservices-sinatra-products/
  command: bundle exec ruby products_service.rb
  ports:
  - "4567:4567"
  links:
  - mongodb
  - mongodb:mongodb.cloud66.local
  environment:
    - RAILS_ENV=production
    - RACK_ENV=production
inventory:
  build: ../microservices-node-inventory/
  command: npm start
  ports:
  - "8080:8080"
  links:
  - mongodb
  - mongodb:mongodb.cloud66.local
  environment:
    - NODE_ENV=production
    - MONGODB_ADDRESS=mongodb
mongodb:
  image: mongo
nginxgw:
  build: .
  command: service nginx start
  ports:
  - "80:80"
  links:
    - products:products.cloud66.local
    - inventory:inventory.cloud66.local
  environment:
We can now use Docker Compose to build our 2 microservice images, the Nginx gateway image, and pull the mongodb image locally:
docker-compose build
Followed by running all of the containers:
docker-compose up
You should see the typical output to STDOUT indicating that all containers have started. To verify everything's working, you can try to reach the Products microservice by running:
curl -X GET http://127.0.0.1:80/products
Notice that we're going through port 80 so we're using Nginx to route the request, rather than 4567 as we would if we were going directly to the microservice.
When you're done running Docker Compose, press CTRL-C or run the following command to shutdown both containers:
docker-compose stop
Deploying the microservice architecture to Cloud 66
With everything running locally using Docker Compose, we'll now deploy everything using Cloud 66. First, we need to ensure that we have an accessible git repository with all of our Nginx gateway artifacts. For reference, I've setup a public Github repository with everything you need, including the files mentioned in this article, above. One of the files in this repository is a service.yml file that can be used to deploy to Cloud 66 using a Docker-based stack:
services:

  products:
    git_url: git@github.com:launchany/microservices-sinatra-products.git
    git_branch: master
    command: bundle exec ruby products_service.rb
    build_root: .
    ports:
      - container: 4567
    env_vars:
      RAILS_ENV: production
      RACK_ENV: production

  inventory:
    git_url: git@github.com:launchany/microservices-node-inventory.git
    git_branch: master
    command: npm start
    build_root: .
    ports:
      - container: 8080
    env_vars:
      NODE_ENV: production

  nginxgw:
    git_url: git@github.com:launchany/microservices-nginx-gateway.git
    git_branch: master
    command: service nginx start
    build_root: .
    ports:
      - container: 80
        http: 80
        https: 443

databases:
  - mongodb
Similar to Docker Compose, this configuration tells the Cloud 66 deployment system several important facts:
- How to build each service image using my public Github repositories for the sourcecode (Note: you can change the Git URLs to point to your own forked version of each repository if you wish)
- The ports exposed by each microservice container
- The port to externalize to the internet for our Nginx-based API gateway (in this case, port 80 and 443)
- The MongoDB instance that will be deployed to the host server, alongside our containers
With everything in place, it's time to login to the Cloud 66 dashboard and launch our stack:
- Login or Signup for Cloud66
- Create a New Stack, selecting the Docker Stack option
- Give your stack a name and select an environment (e.g. "Microservices Example" in production mode)
- Switch to the advanced tab and paste the contents of the
service.ymlfile (above) - Click the button to go to the next step
- Select your deployment target and cloud provider as normal
After a few minutes, your server will be provisioned and all three containers will be launched. You can then verify everything is working by finding your server's hostname and running curl:
curl -X GET http://your.host.name/products
Note: To find your server's hostname, you can use the Dashboard to browse to the stack, then select the Docker cluster, and view the server details provisioned to deploy the Docker stack.
Once deployed, you can redeploy all services through the dashboard with one click using the 'Deploy All' feature. Need to make a change to a microservice and redeploy it? Not a problem with Cloud 66.
Redeploying a single microservice
Most microservices are designed to be deployed in isolation. Cloud 66 supports deploying a single service, two or more specific services, or all services at once. Simply define a new Deploy Profile and you can redeploy them in any way you require.
Even better, setup redeployment hooks to automatically deploy the latest version of your microservice whenever you push your changes to git.
Alternative deployment options
While this example is simple and can share the same database, there is another approach you can take when using Cloud 66.
Rather than deploying a single application stack for all 3 services, each one could be split into separate stacks. Each stack could then have its own dedicated database, in isolation from other services.
Taking this approach requires you understand how to configure cross-stack security access. This article outlines the steps for how to do this, so that your Nginx service gateway will be able to route incoming requests across your microservice stacks.
Wrap-up
As you can see, Cloud 66 provides flexibility in how we can configure and deploy our applications. You may want to explore API gateway and management solutions such as Kong or Tyk to better secure and manage your APIs and microservices.