
When developers build a Rails application, they need to make several decisions: where will the application be hosted? How will they share it with the world? How much time do they have to maintain the app once it scales? And many more.
In this article, we are going to show how easy it is to deploy a Rails application to AWS with Cloud 66. We'll briefly explore Platform as a Service (PaaS) options like Heroku, before moving on to the step-by-step guide.
Heroku vs AWS vs AWS + Cloud 66
There are a number of ways to deploy your Ruby on Rails applications to AWS. You can do it manually, but your time is probably better spent on writing good code instead of fiddling with DevOps tasks. Or you could use a PaaS like Heroku. Heroku runs on AWS, so it's easy to set up but it quickly becomes expensive and inflexible once your traffic grows.
Many articles have already compared AWS with Heroku. E.g. 10 Most Important Differences You Must Know! by Guru99 or A Comparison of Two Popular Cloud Services by UpGuard. Both blogs give a good overview on Heroku vs AWS with a list of pros and cons of each platform.
So, where does Cloud 66 fit in?
Cloud 66 simplifies DevOps for developers by offering Heroku-like functionality with the flexibility and control of owning your own servers, plus full visibility and assess to your code. By using Cloud 66 for Rails you get the best of both worlds. You can easily deploy, manage and scale your Rails apps on AWS, or any other cloud, from one fully integrated tool that will keep your costs manageable and stable.
Get the tools ready
To get started on deploying your Rails application to AWS with Cloud 66 you need the following:
- A Cloud 66 account - sign up for a Cloud 66 account with your GitHub or Google accounts, or simply use your email and create a password. We offer free unlimited access to all products for 4 weeks with no credit card required.
- A git repo containing your application code. This can be a public or private repository. For the demo we will use our sample hosted on GitHub: https://github.com/cloud66-samples/rails-mysql.
- An AWS Cloud account. You can use your existing account or, hit the sign-up button, and create a brand new AWS account.
Link your Git and AWS accounts with Cloud 66
Let's get started by linking all these accounts together. This does not take long, and is done through an intuitive step-by-step process via the Cloud 66 dashboard.
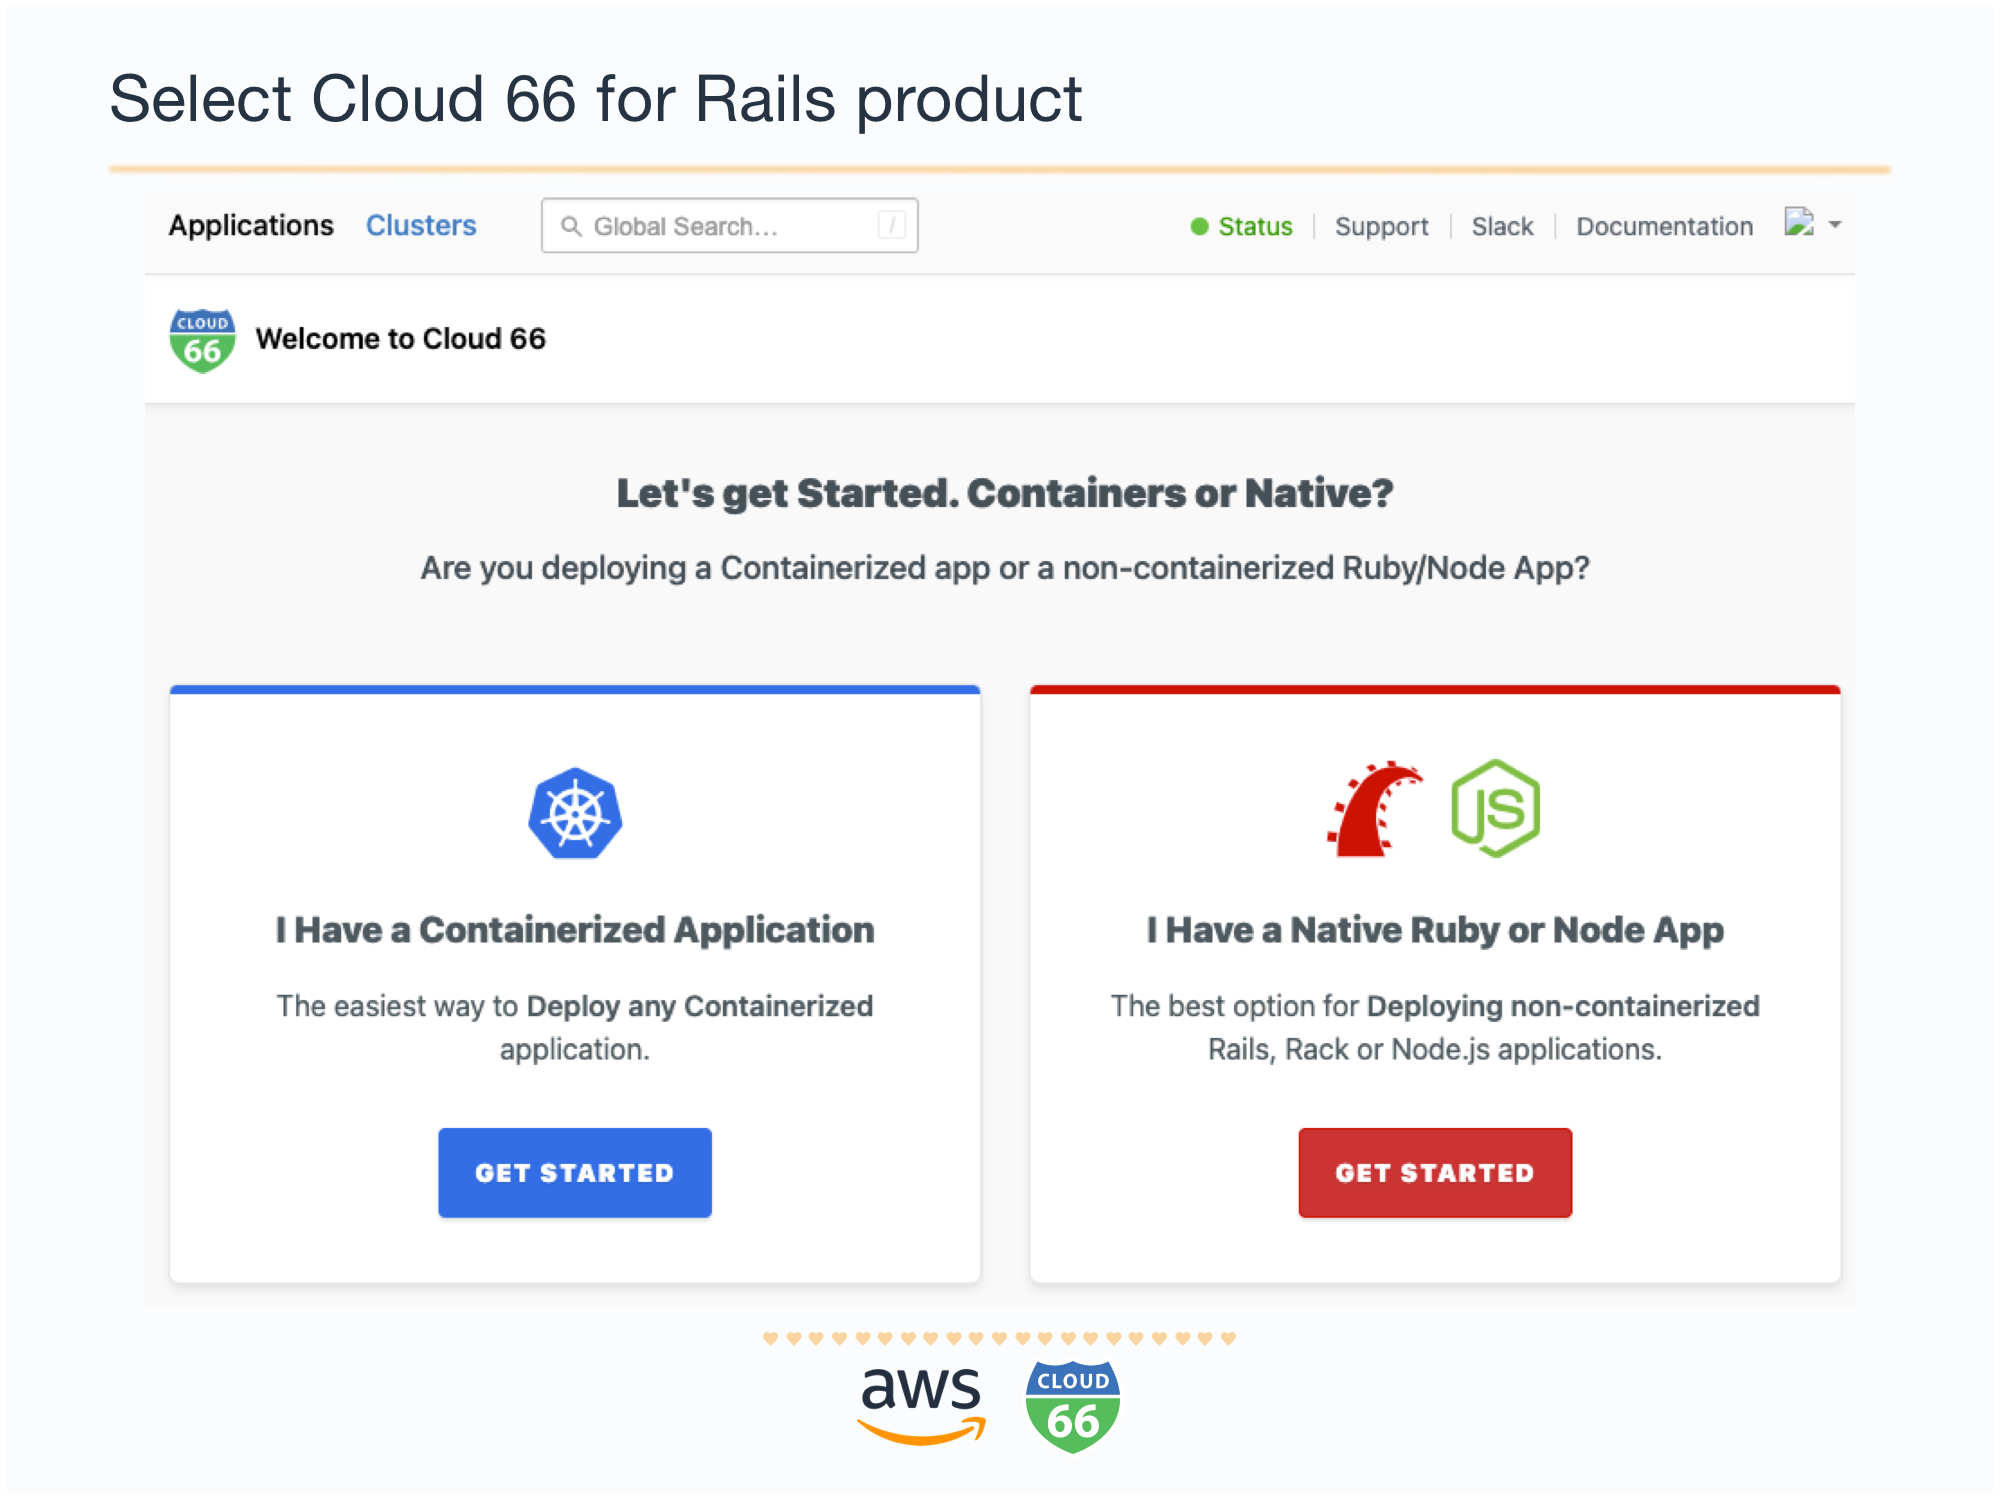
Log into your Cloud 66 account and select Cloud 66 for Rails. Click on the Get Started button on the "I have a Native Ruby App" option and follow the route.
Now your Git repository
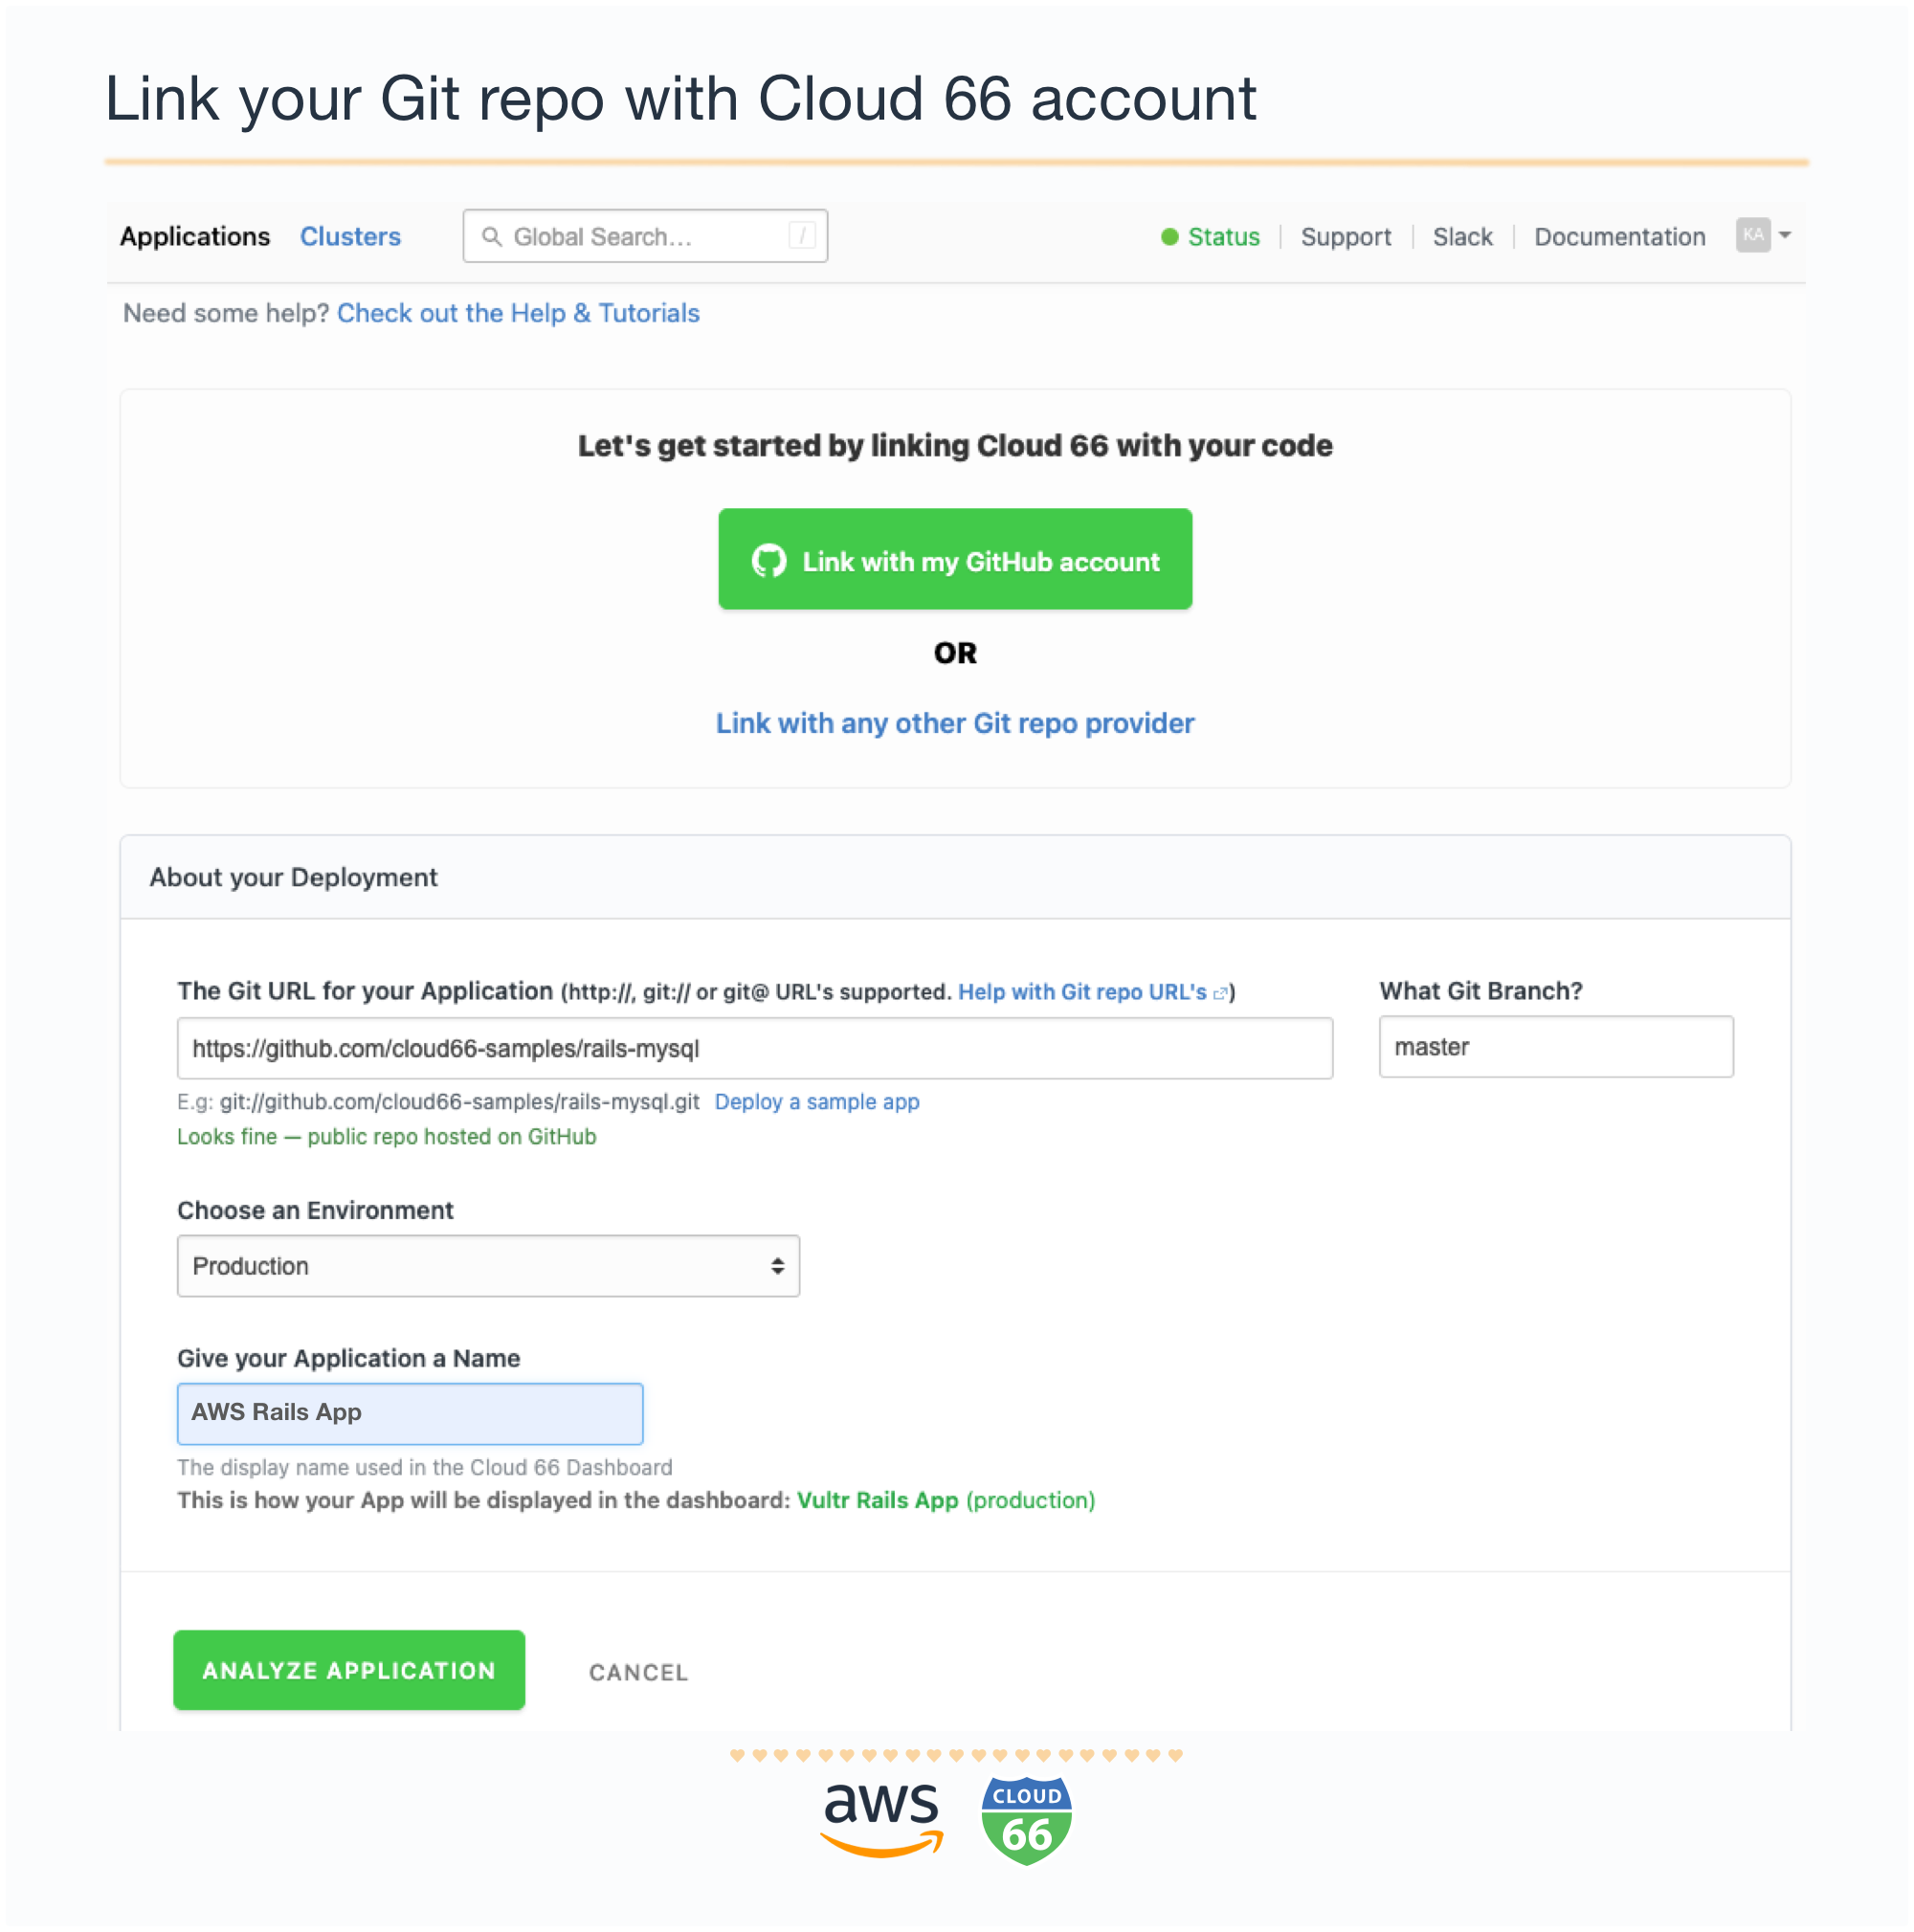
The next step is to connect the Git repo containing your application code with your Cloud 66 account. For the private Git repo, you'll need to add and approve the Cloud 66 public SSH key with your Git provider. Cloud 66 allows you to use any Git provider, such as GitHub, BitBucket, Assembla or you can use your own privately hosted repo.
You can link Cloud 66 with your GitHub account with the click of the button “Link with my GitHub account”. You will need to log in on GitHub to authorize Cloud 66's access to your code.
Now fill in the info about your application deployment. You can use the URL from our Rails sample if you'd like an easy demo: https://github.com/cloud66-samples/tickerizer.
Define the deployment branch (master in our case). Choose the environment variable (production) and give your application name ("AWS Rails App").
 Connect your GitHub account with Cloud 66.
_ Note: _ The code is yours. You always have a full access and transparency, and nothing is hidden by Cloud 66.
All done! Now click Analyse. Cloud 66 pulls your code from your repository and analyzes your application. We will then return a suggested configuration based on your code.
Reviewing your app configuration
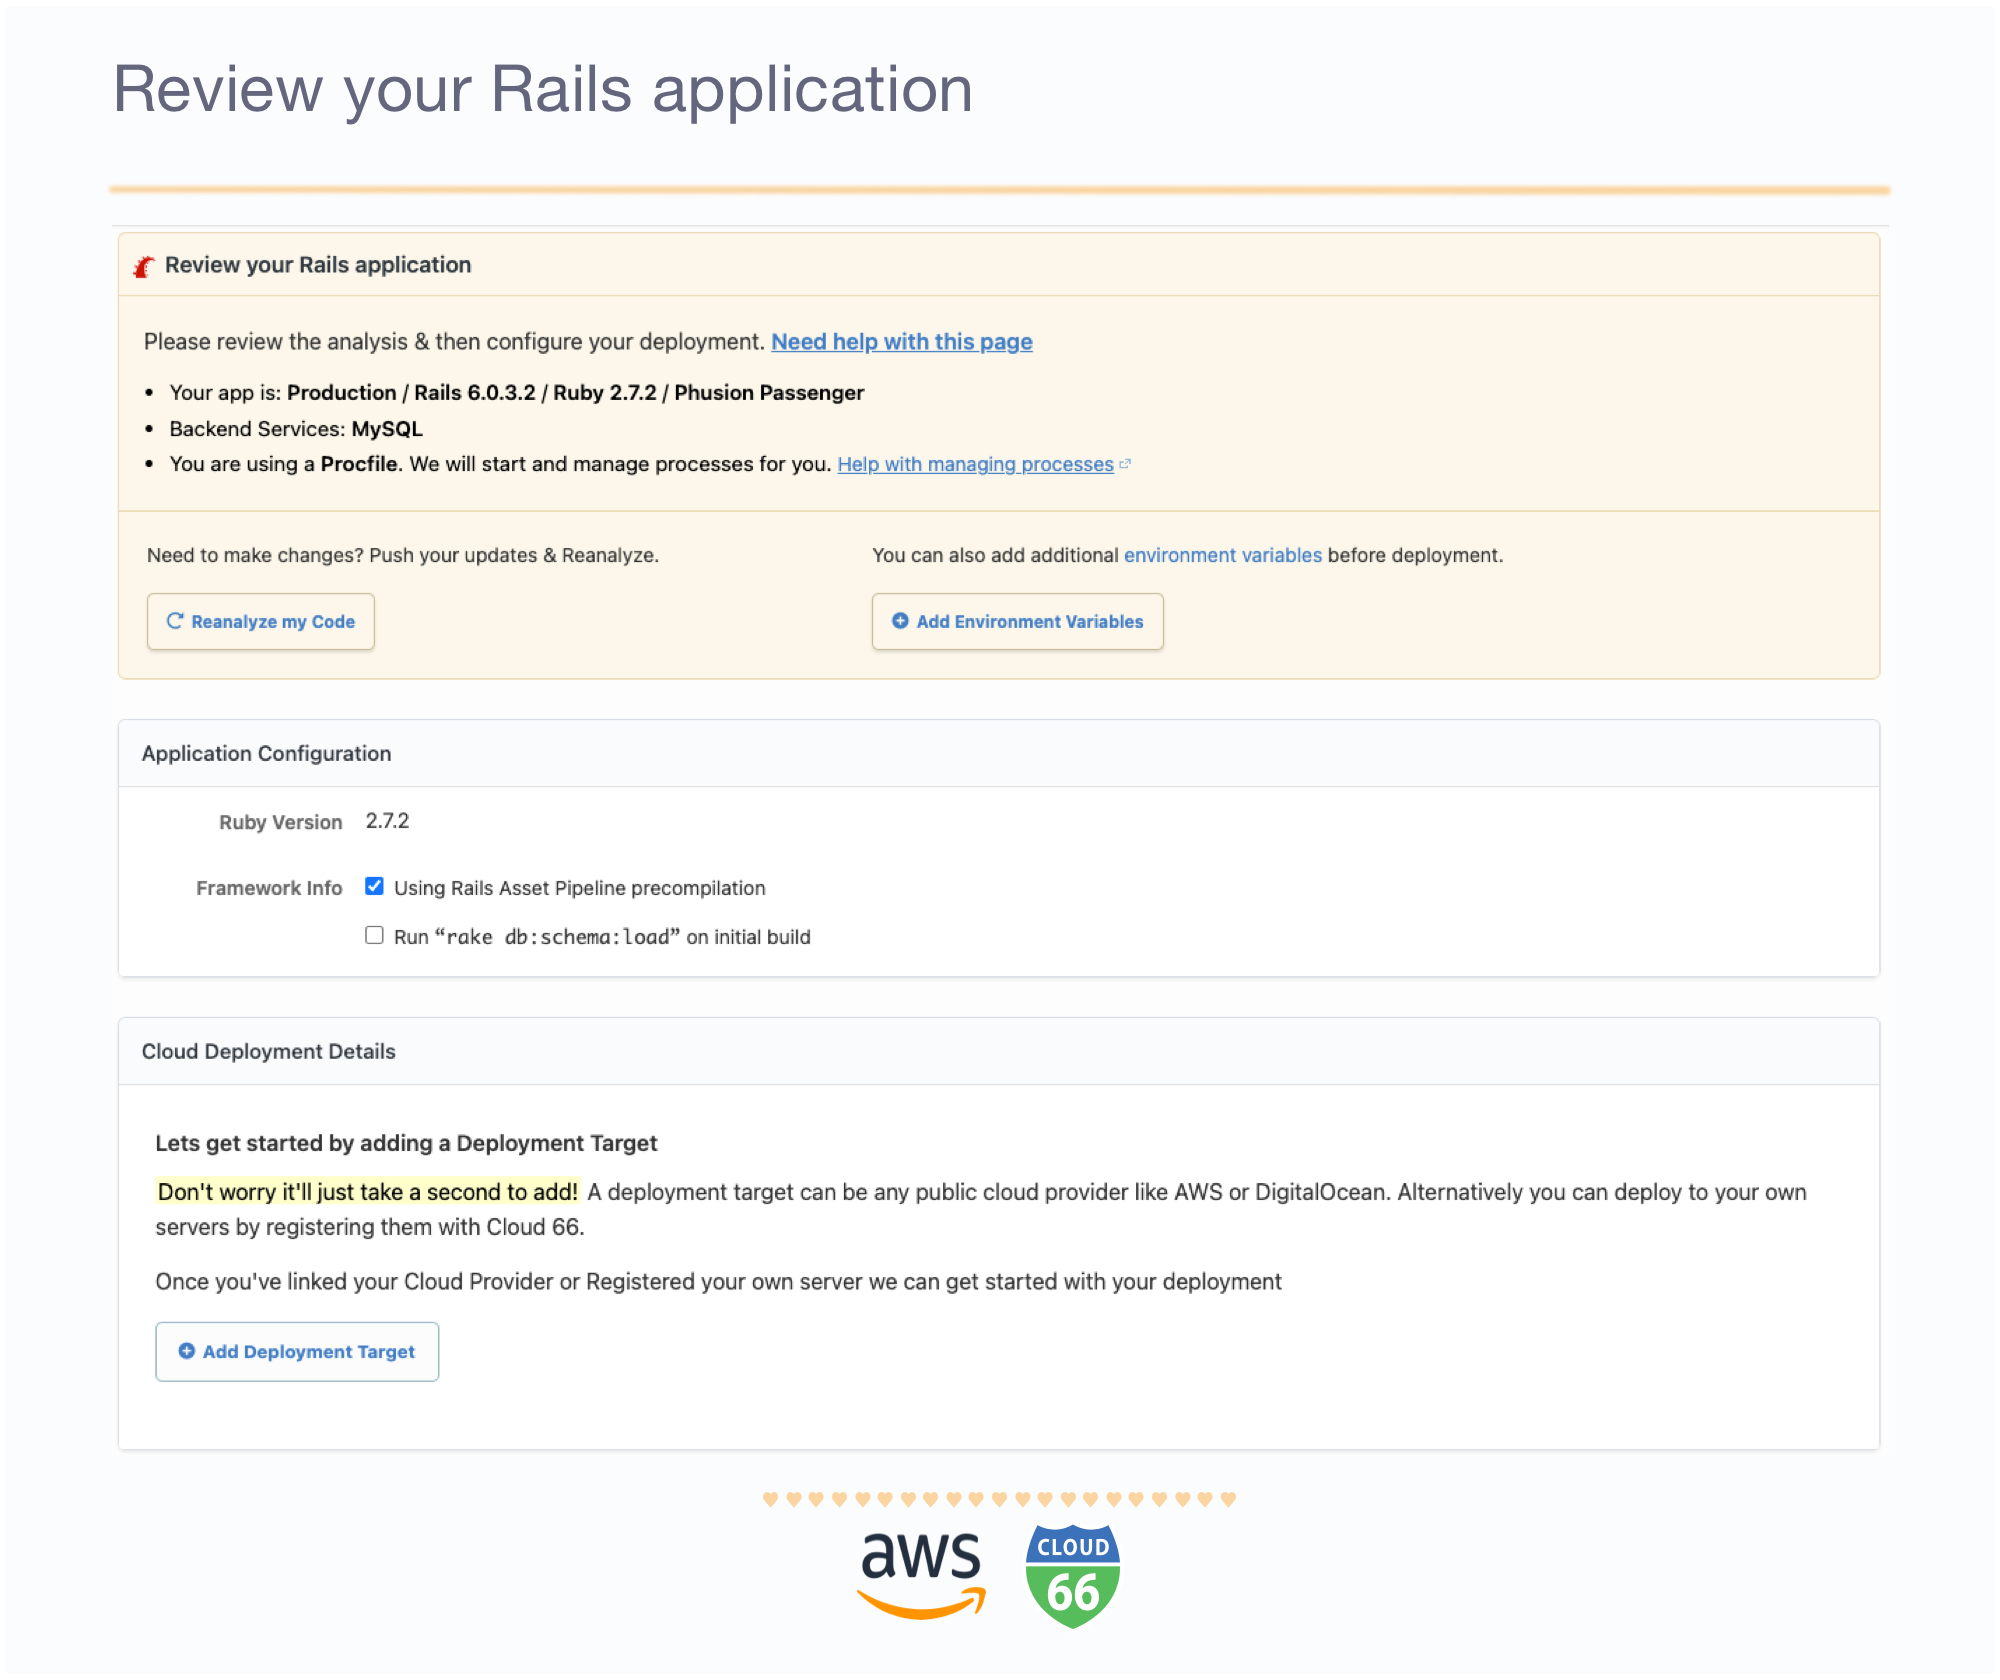
We've detected that the Rails sample app uses Ruby v.2.7.2 and Rails v.6.0.3.2. It will use Phusion Passenger as a webserver, MySQL for a database, and be deployed to a production environment.
If you need to change something about your app you can always update your code, commit it to your repo and click Reanalyze my Code and we will update your app.
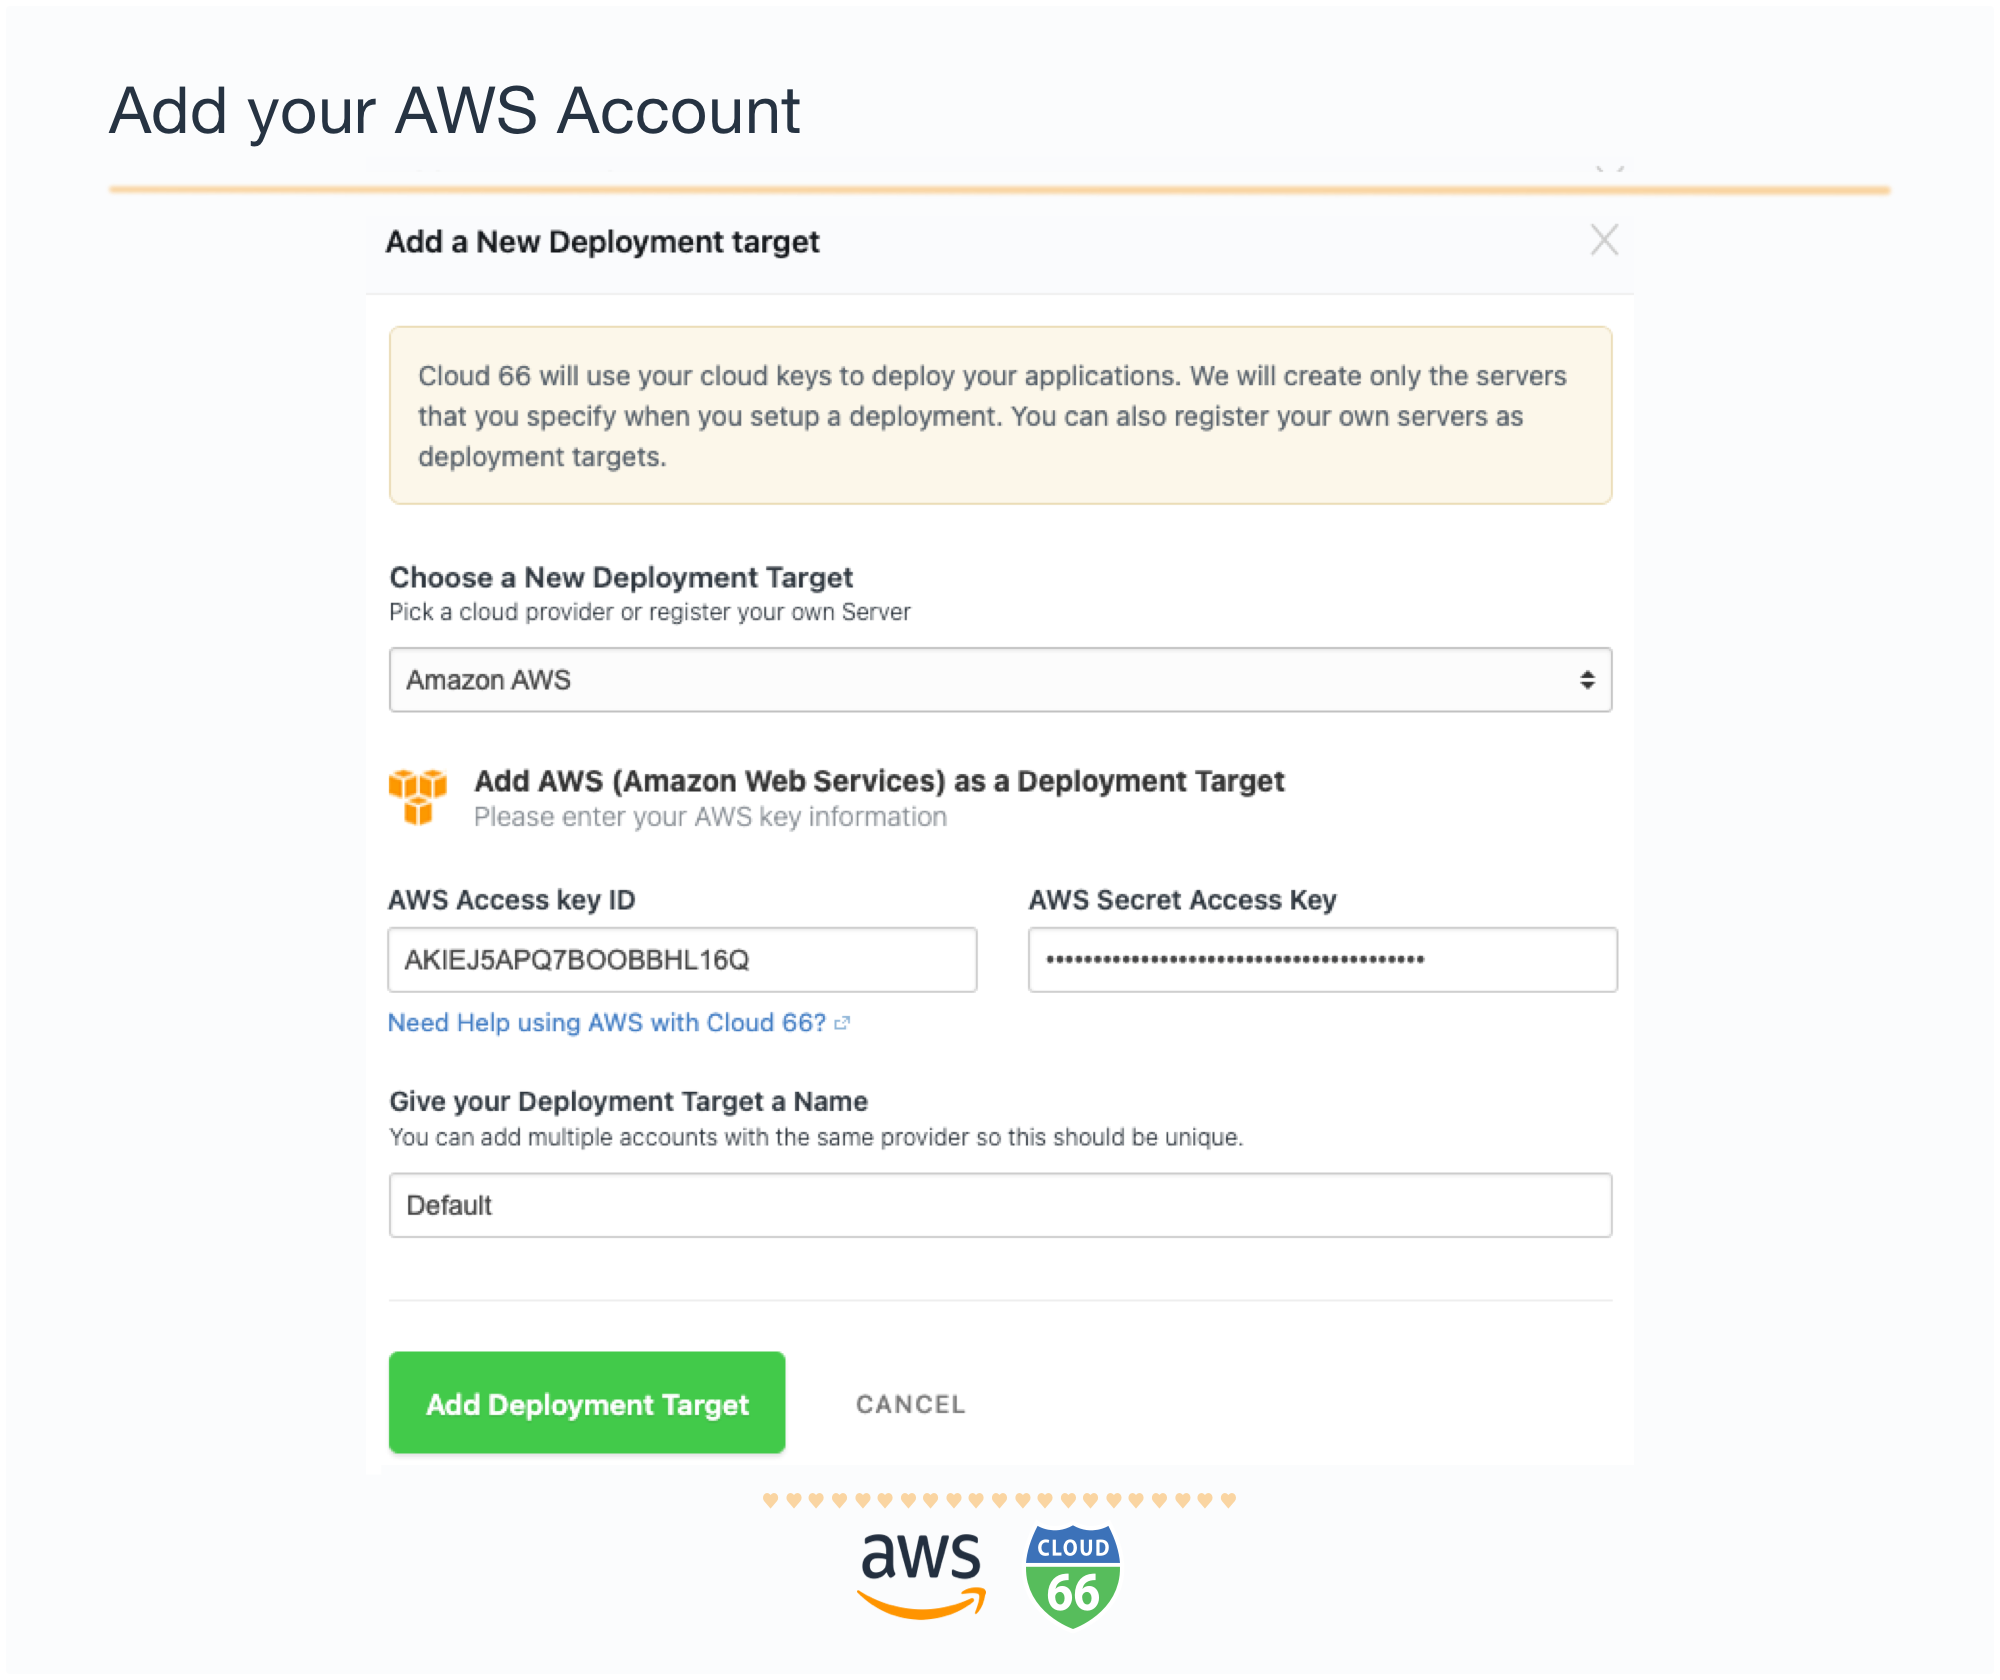
Add your AWS account with Cloud 66
Next, we need to specify where our app will be deployed. To link AWS with your Cloud 66 account, select "Amazon AWS" from the drop-down list, and add your AWS API Key to grant access.
Next, select the server region and size that best suit your app.
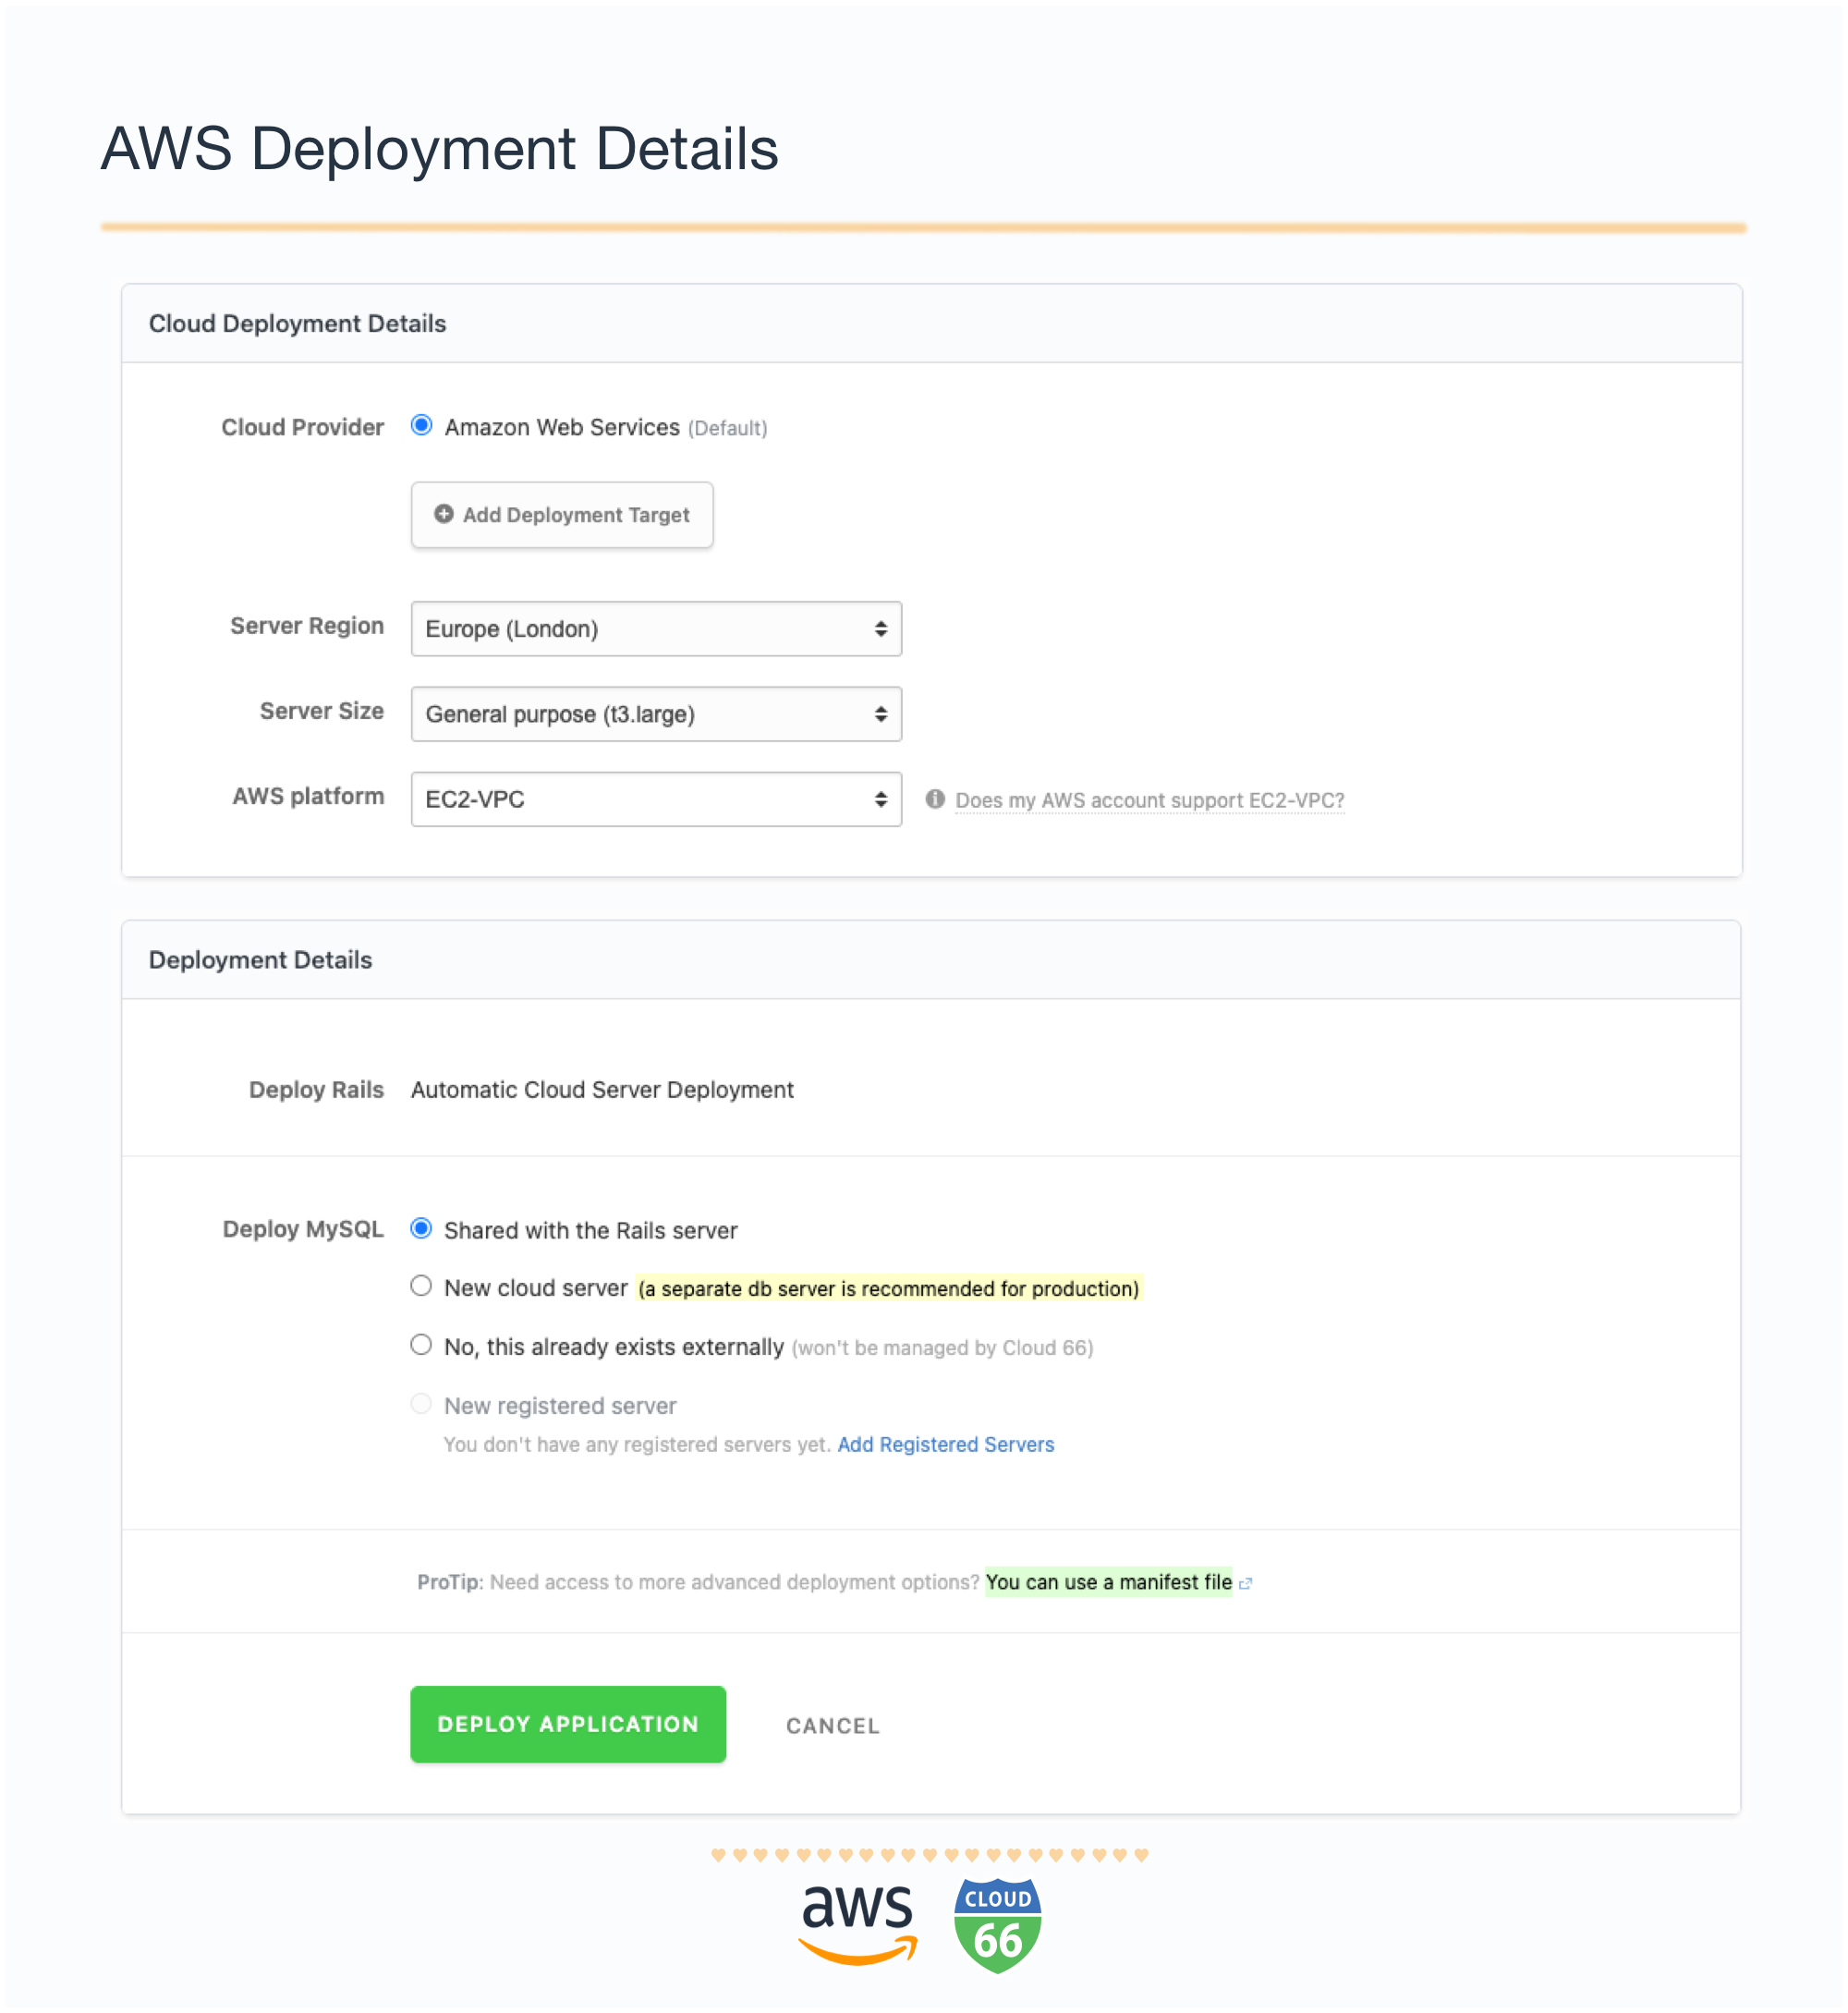
Lastly, decide where to deploy your database. We recommend having a separate server for your database in production. However, as this is a demo, we can share the server.
Which server size?
In general, Ruby on Rails applications tends to need a lot of RAM. Think about selecting the right server size for your database size (MySQL in our case). And remember to allow some space for Redis or ElasticSearch.
Note: You own the servers, not Cloud 66, so you are always in full control.
Where do I get my AWS API Key?
To get your AWS API key, log into your AWS console. Now click on "My Account" in the top right corner and select "Security Credentials". Under the "Access Credentials", click on "Access Keys" to get your AWS API key. For more information on how to set up AWS API key follow their documentation.
We are ready to go! Click on the _ Deploy Application _ button.
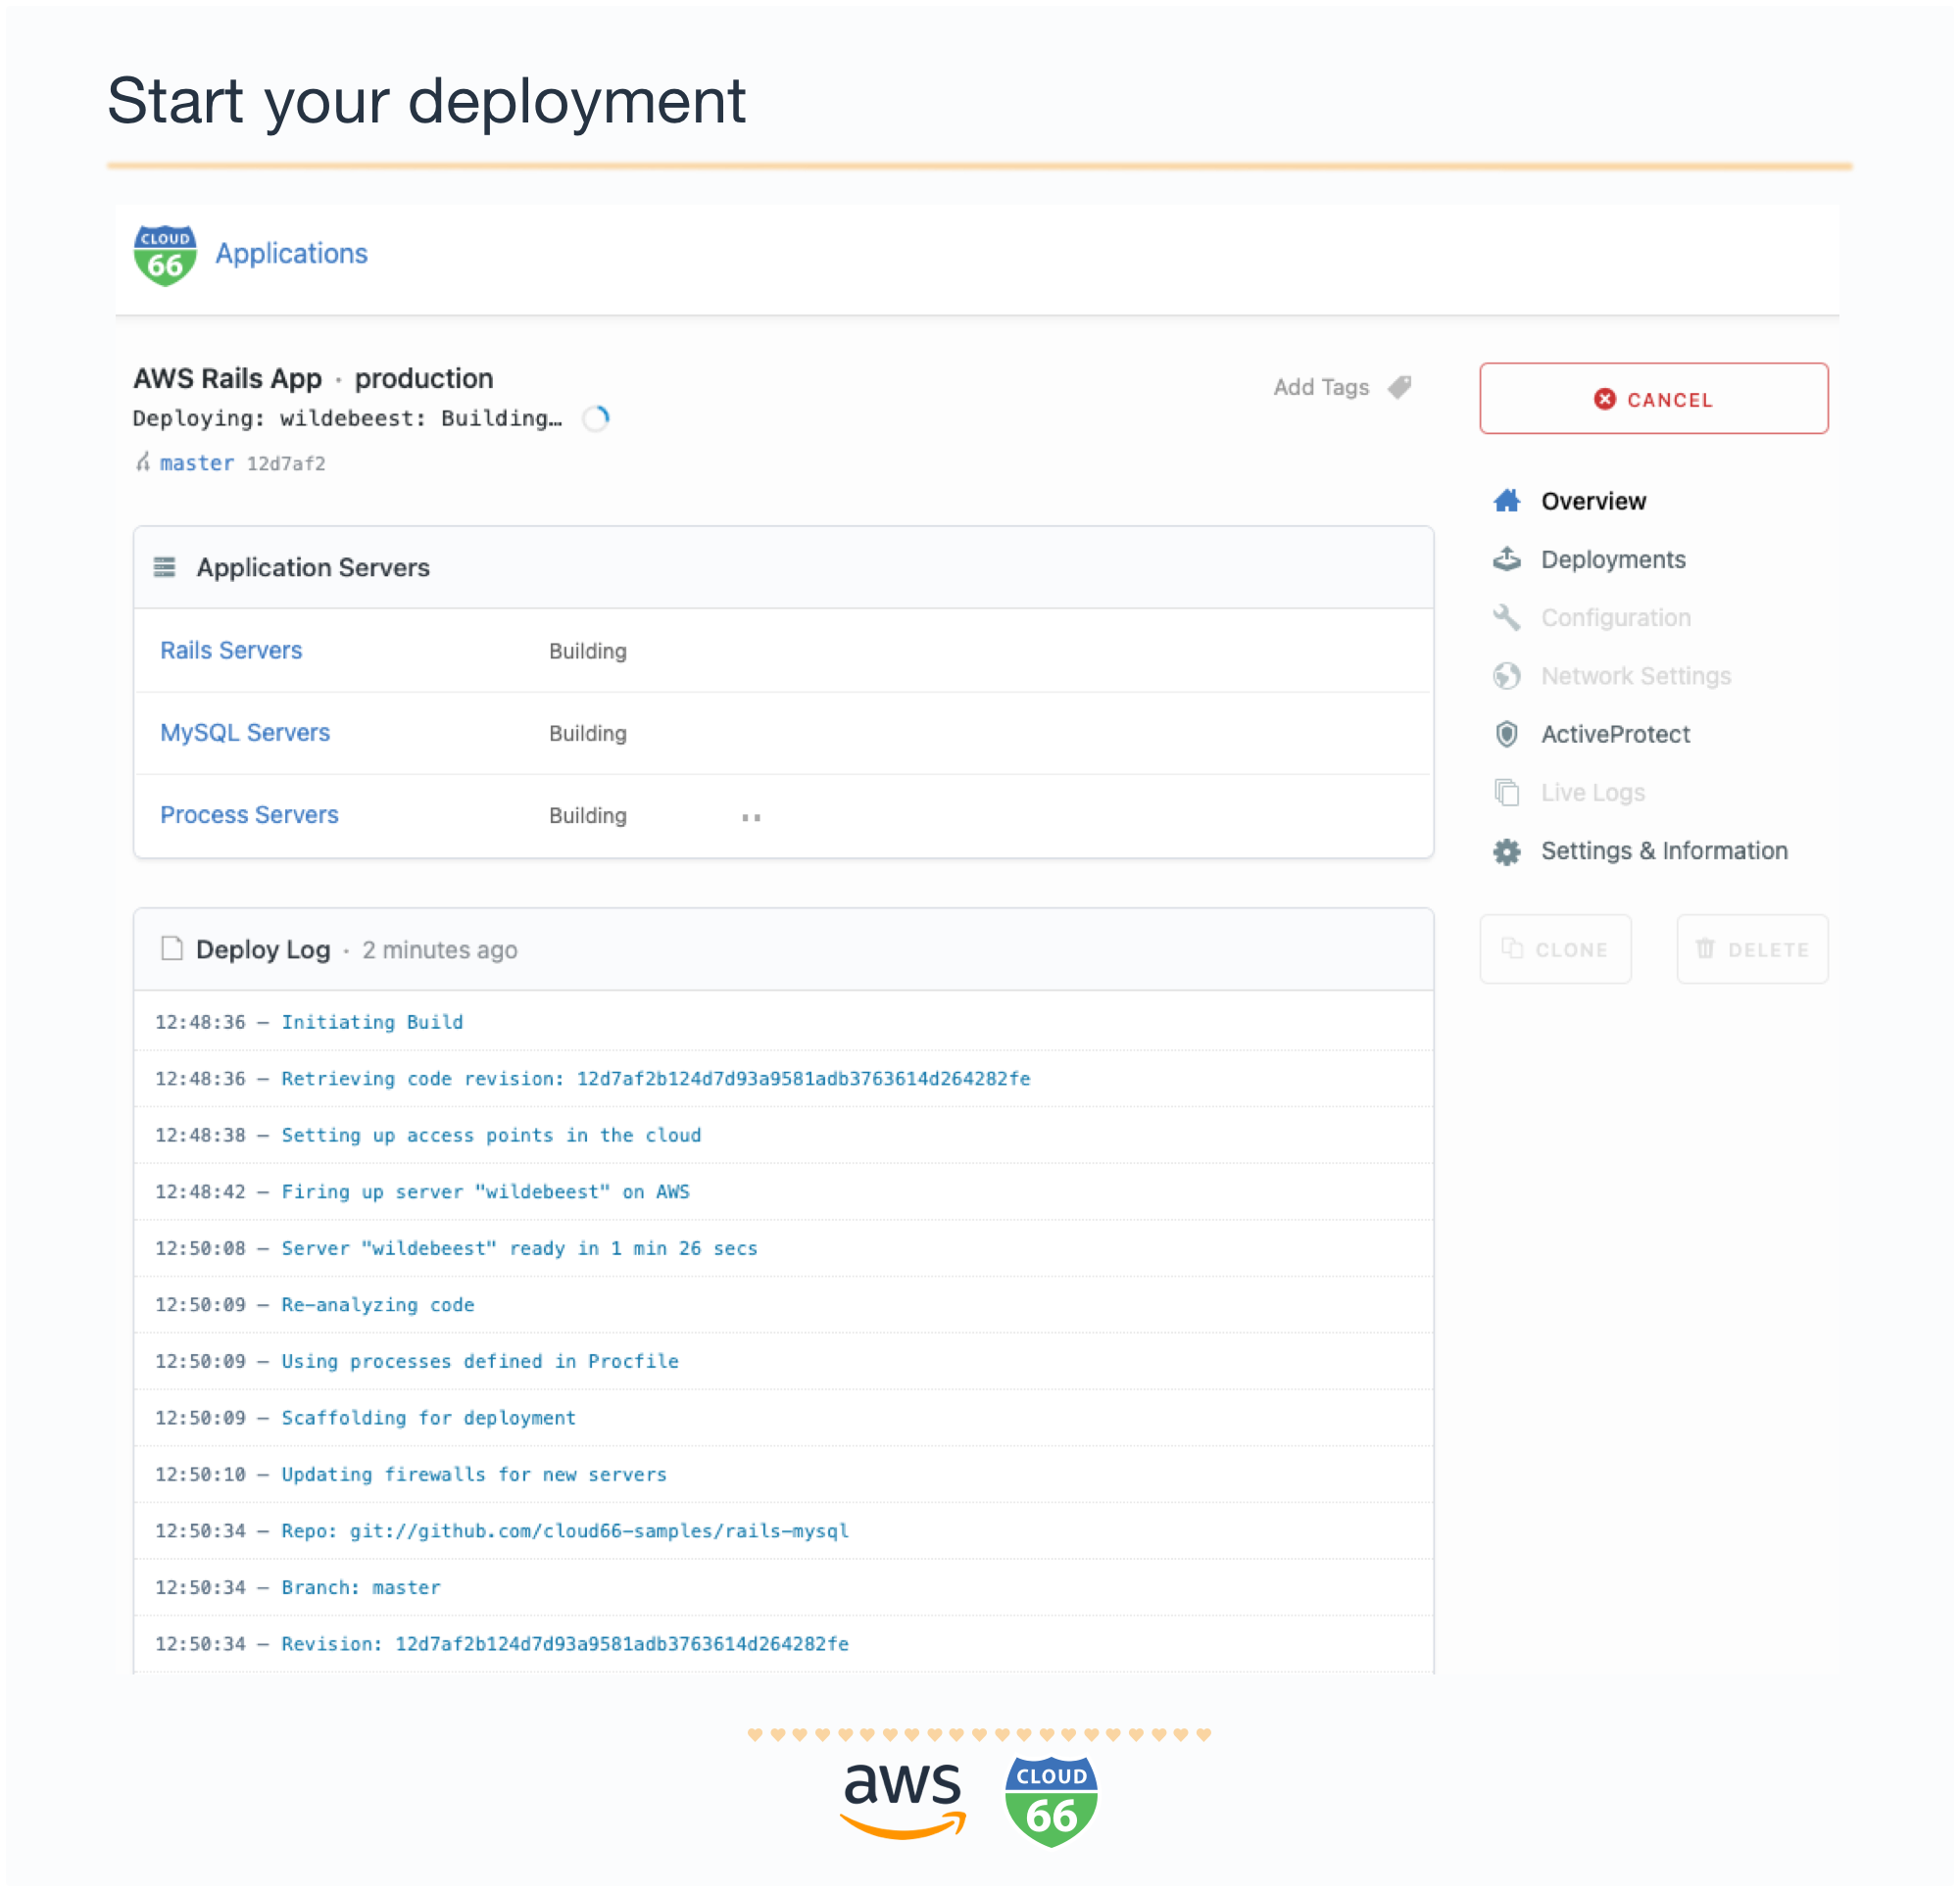
Deploy your Rails App to AWS
Now, take a short break while we deploy your Rails application to AWS. The deployment time depends on your application size. You can have a look at our LiveLogs to see what is happening under the bonnet, but if you are not interested you can close the window and we will email you once the deployment is completed.
Manage your Rails App on AWS
Congratulations! Now your application is shared with the world. Explore Cloud 66 dashboard and take the advantage of other Cloud 66 features to enhance your application. All features are included in your account. The menu bar on the right-hand side gives you access to many of our most useful features.
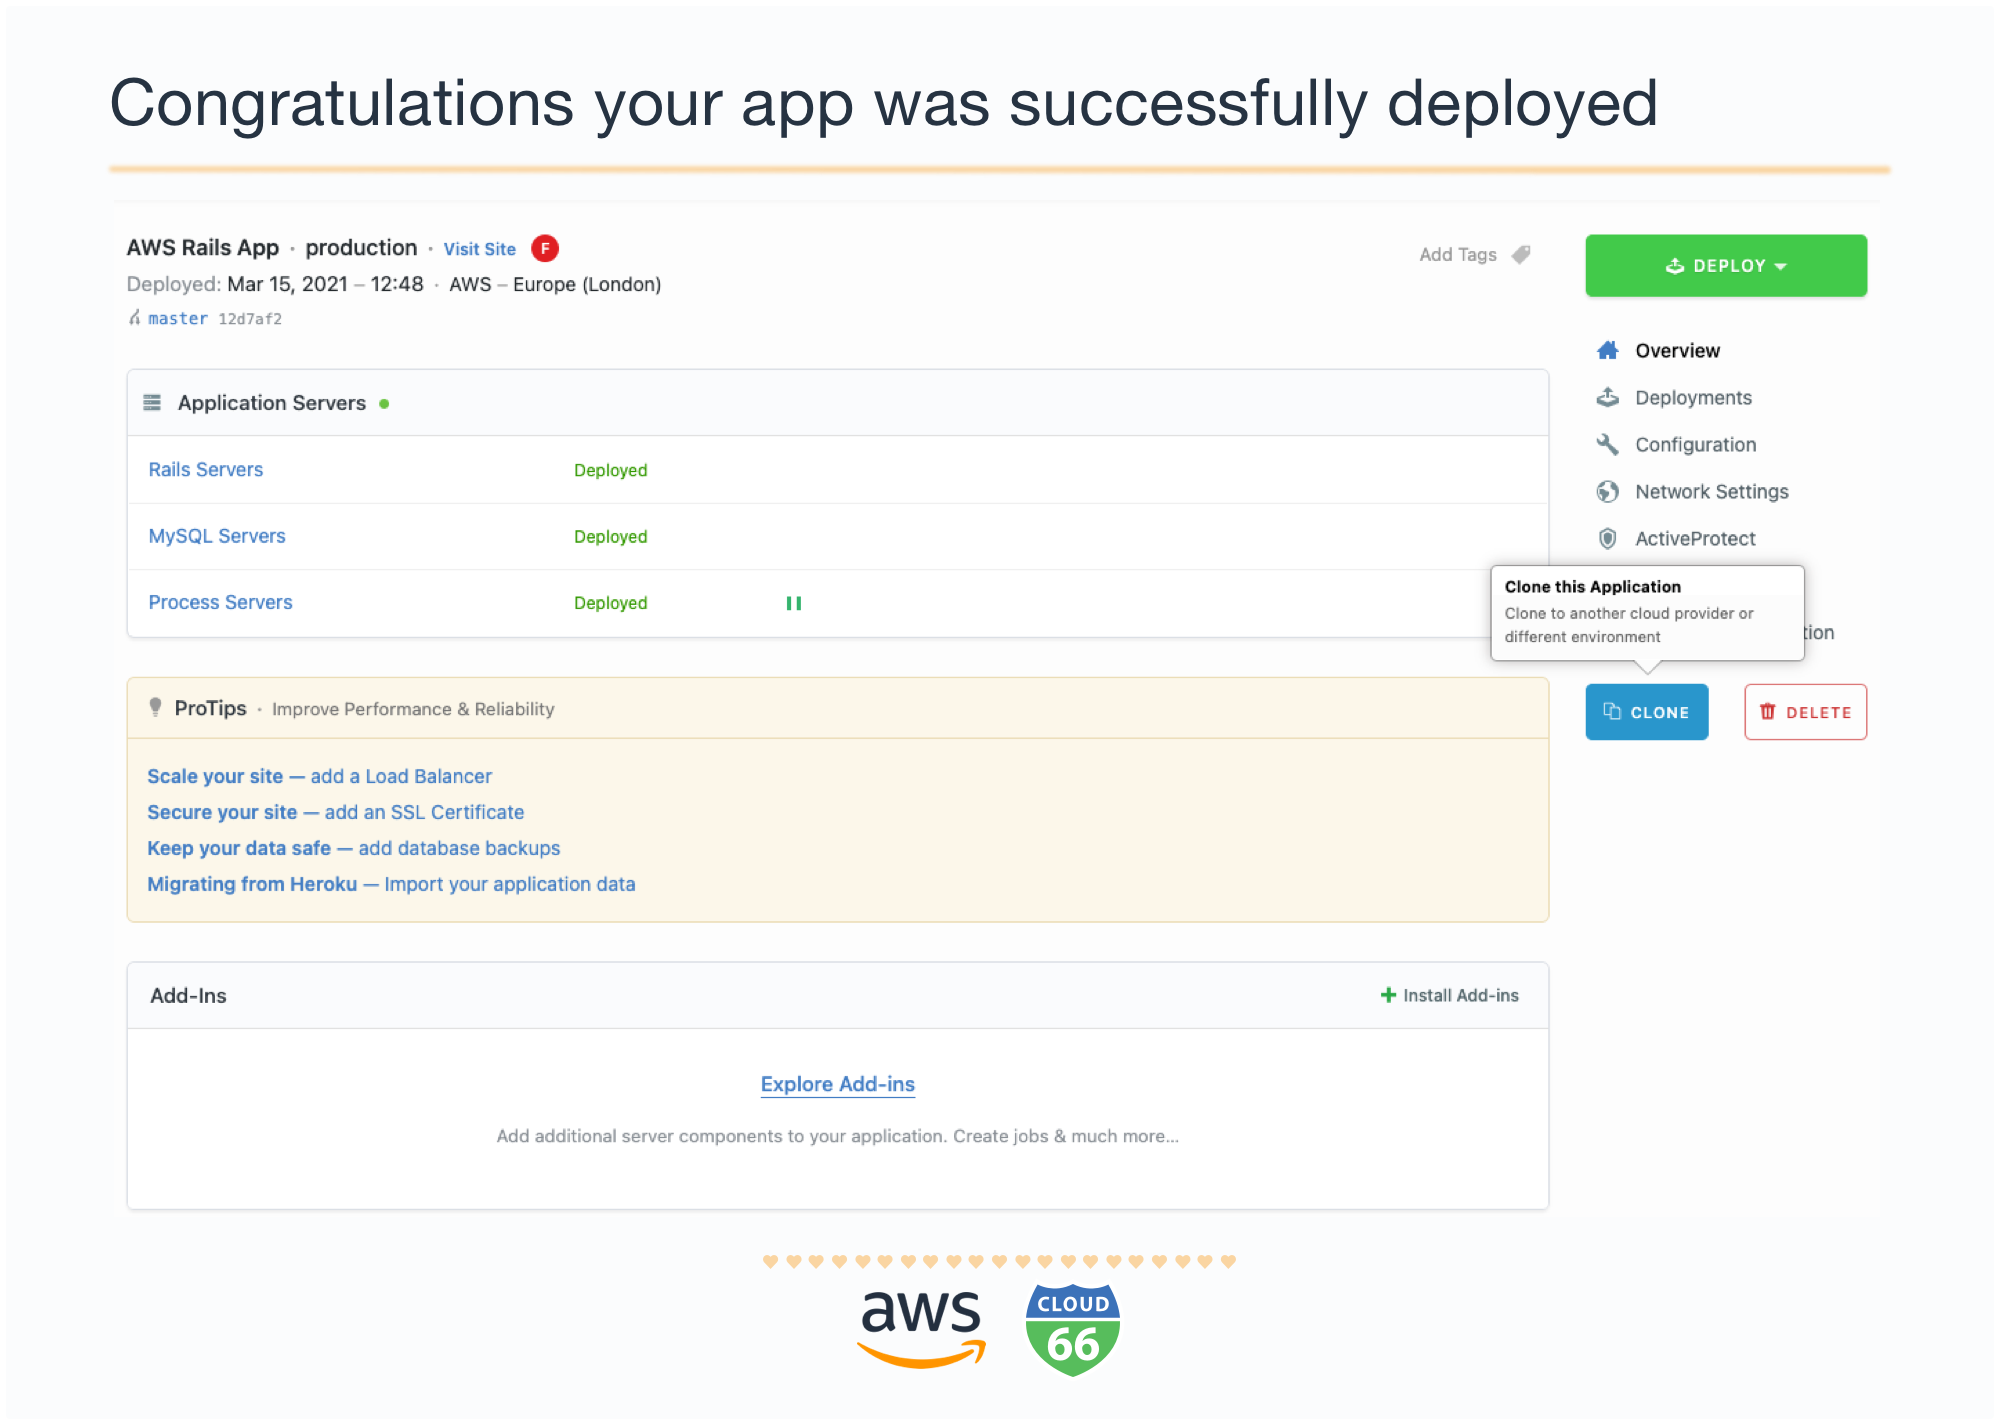
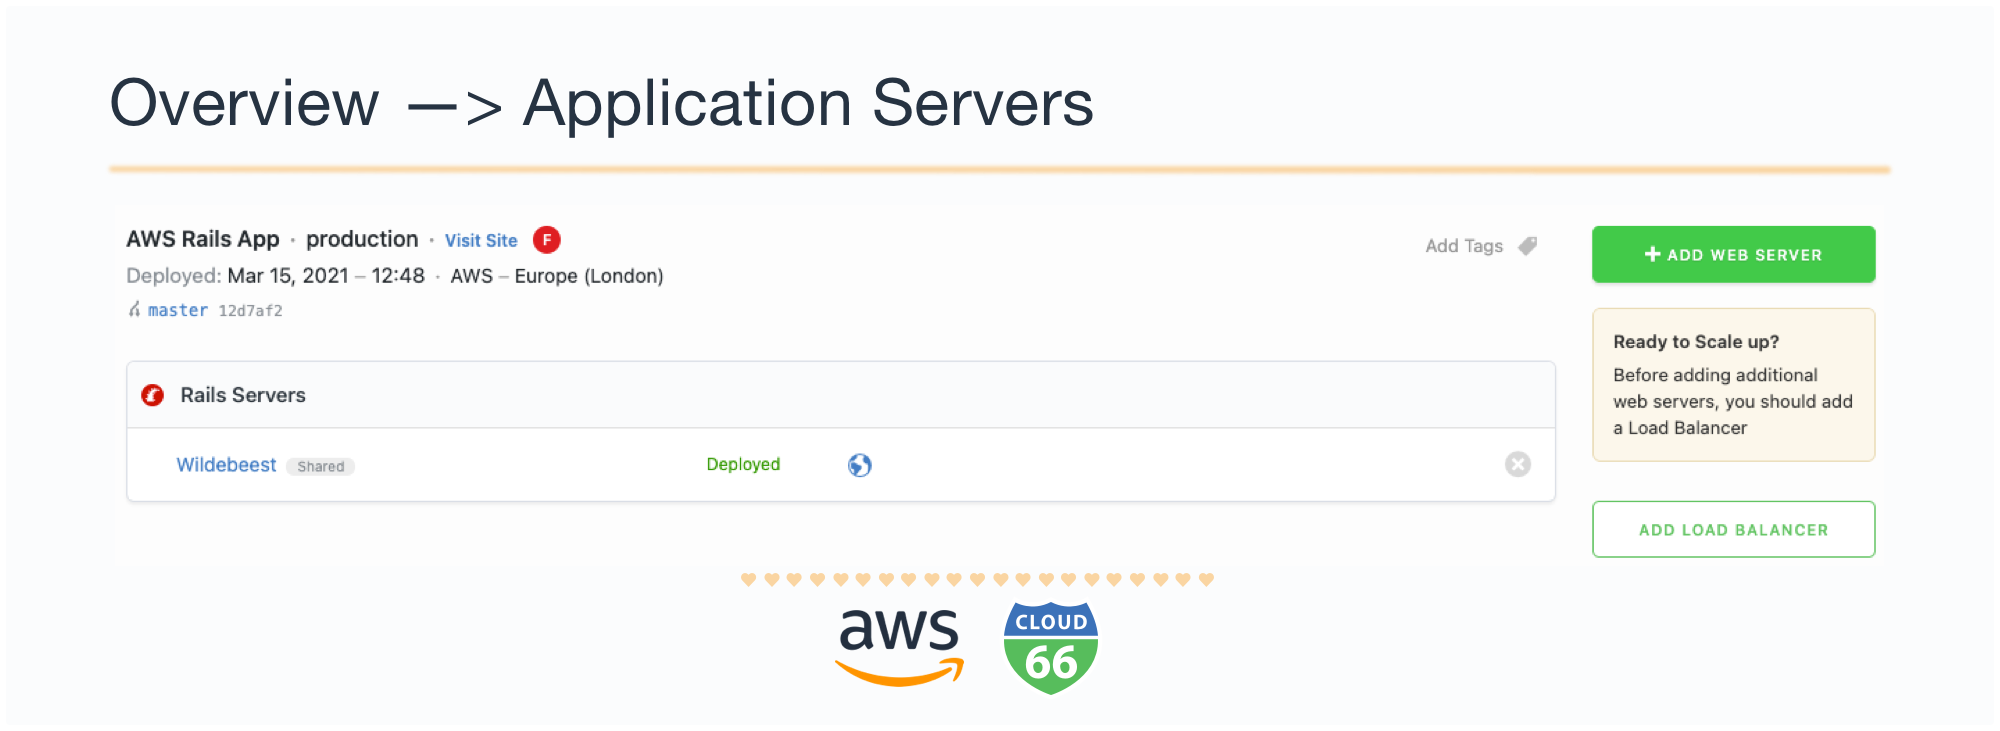
- Overview - this tab allows you to monitor your application components in the dashboard. You can click on each server, e.g. 'Rails Servers' for more detailed info.
- Deployments show you a timeline of your deployments. Who deploys what and when. You can view when all the code commits were deployed here.
- The configuration tab, allows you to edit environment variables, Config Store, and configuration files. E.g. manifest, MySQL, Nginx.
- Network Settings allows you to manage your firewalls, traffic, and redirects.
- ActiveProtect protects your application and servers against denial of service and brute-force attacks.
- LiveLogs collects and displays real-time logs that can help you find and eliminate bugs in your Rails app.
- Setting & Information allows you to edit your application setting e.g. change a deployment strategy. You can also set up notifications here.
- Clone your application : you can clone your application with a click of a button. You can change the deployment destination to a different region as needed.
Additionally have a look at our Pro Tip guides to improve your stack score. Or simply click on your stack score icon. It will suggest ways to optimize your application e.g. scheduling backups, adding a load-balancer, creating a failover group, etc.
Lastly, at the bottom of the right hand side menu you'll find two buttons: Clone and Delete your application.
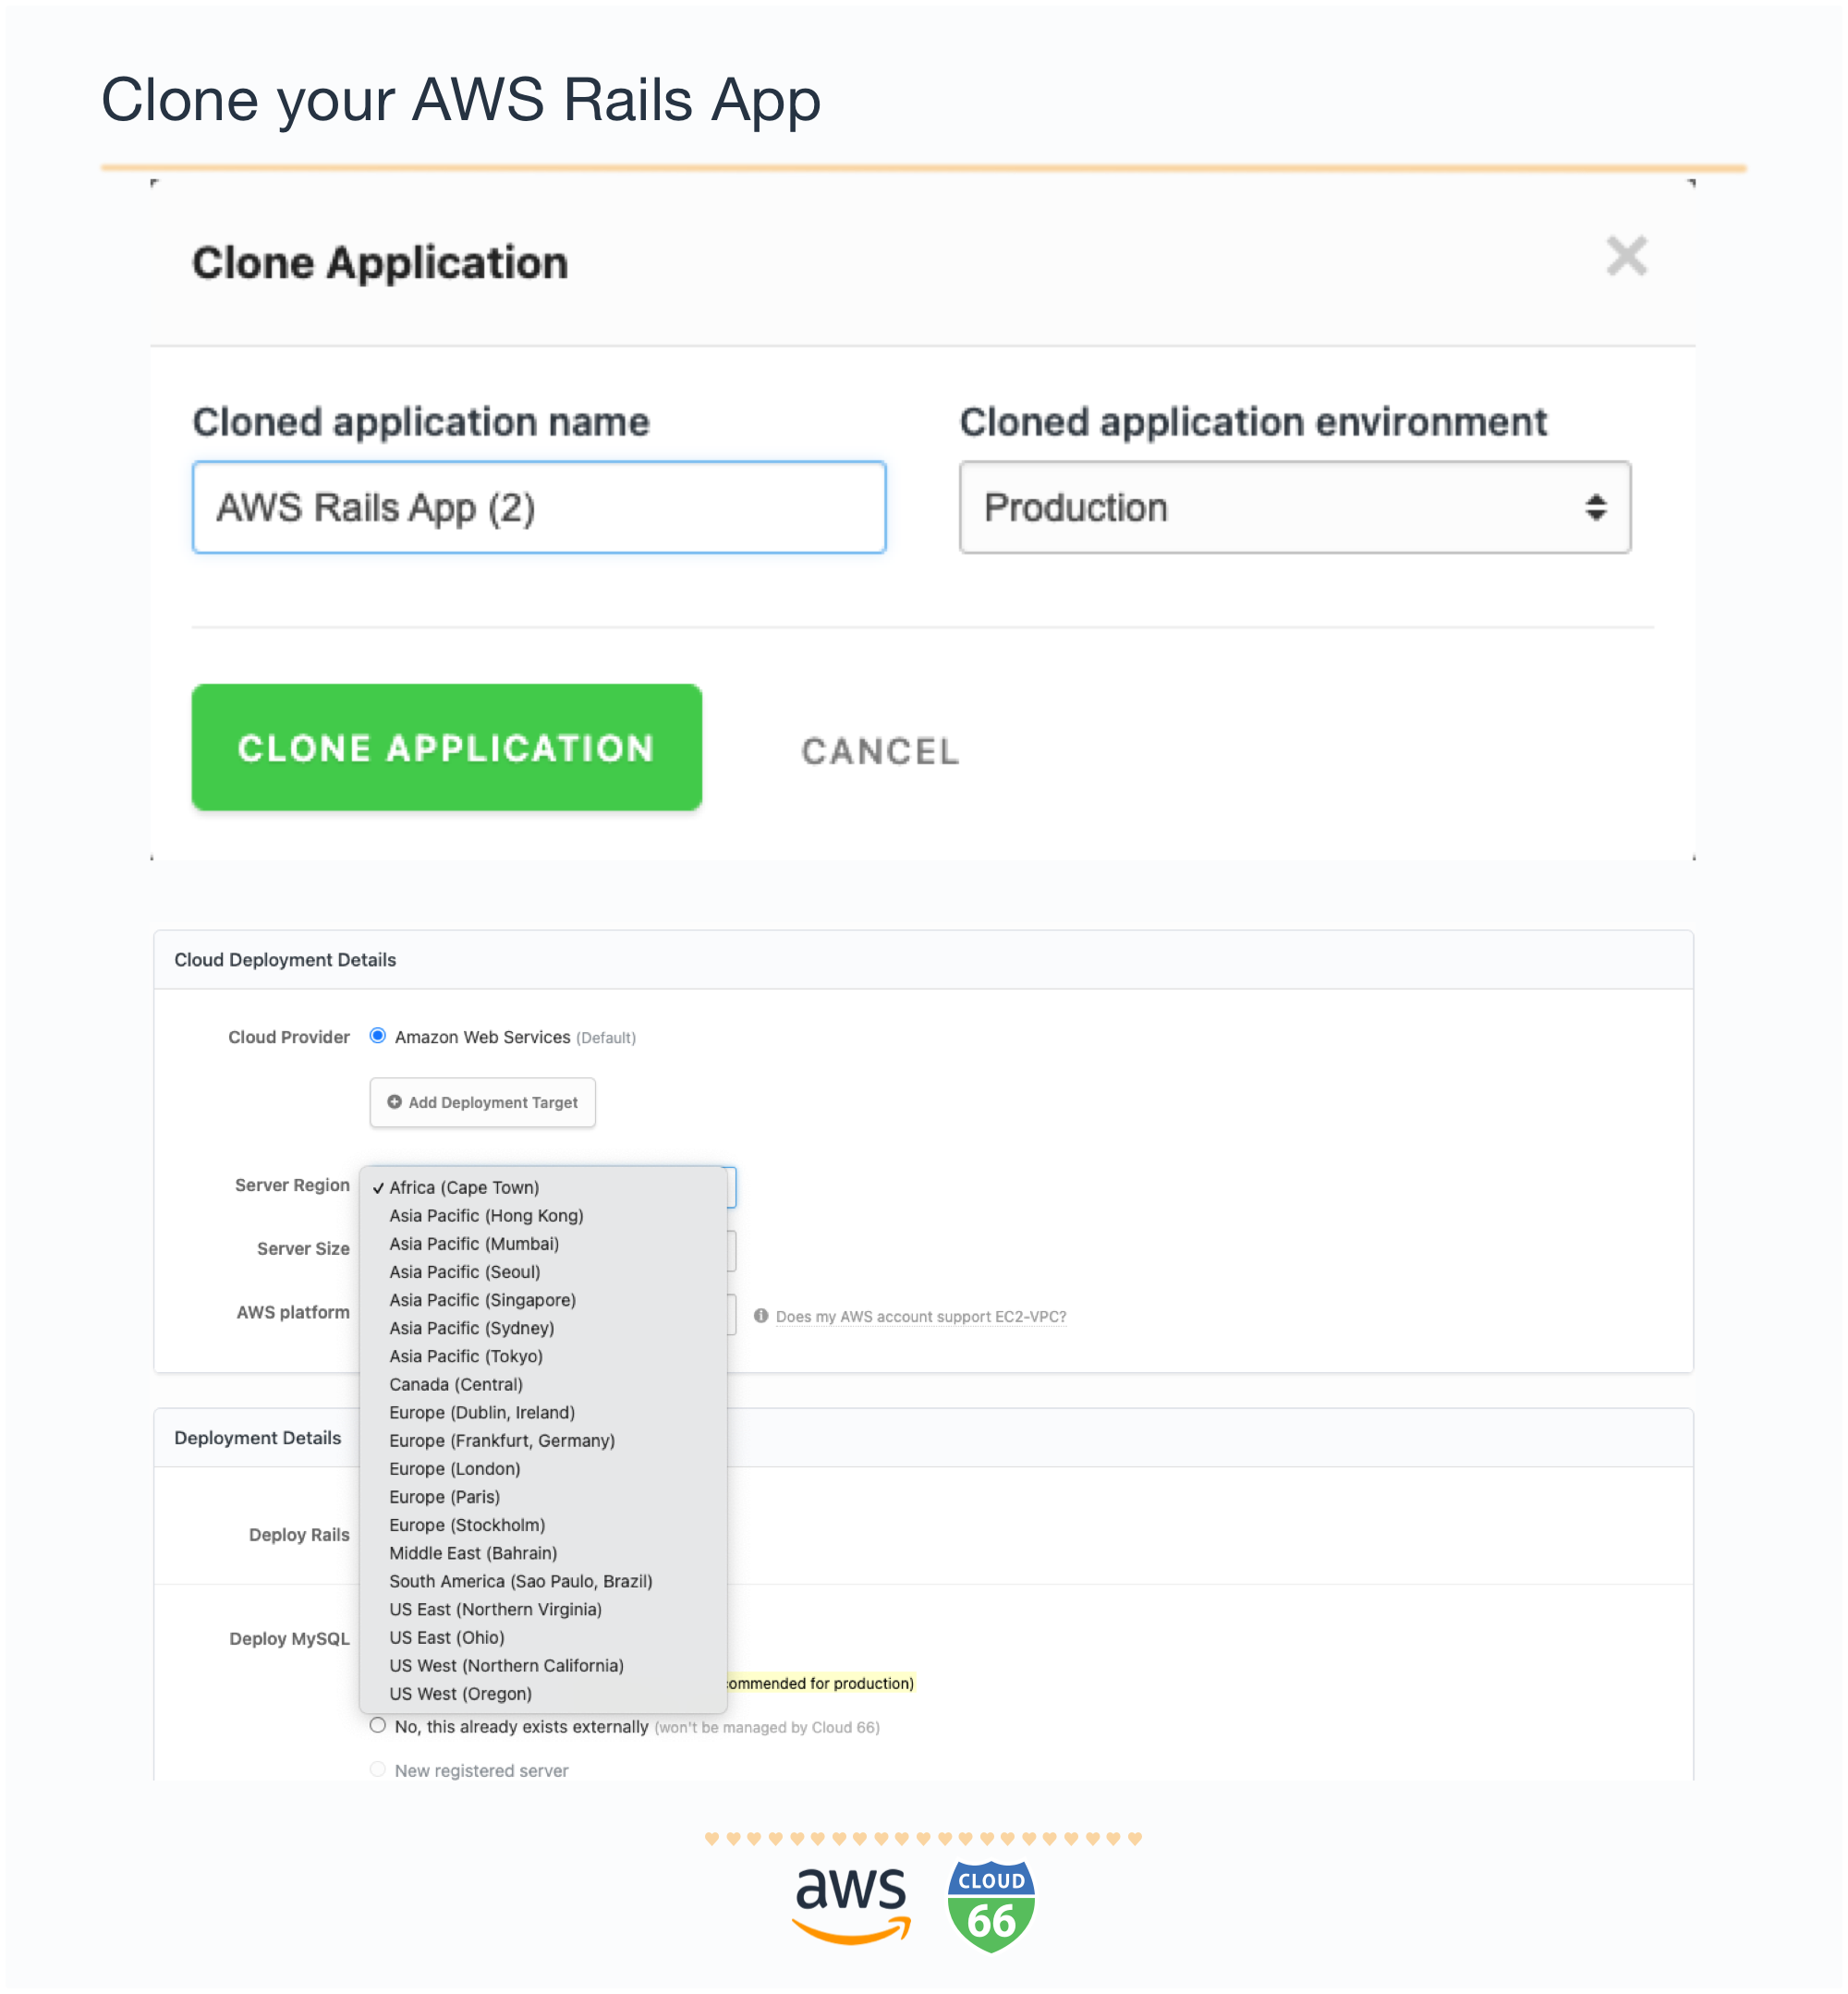
Clone your application:
If you click "Clone" you will need to name your cloned app (e.g. "AWS Rails App 2" ) and confirm the environment. Next, pick a deployment destination for the cloned app - it can be a different region of the same cloud e.g. AWS Cape Town or a different cloud provider.
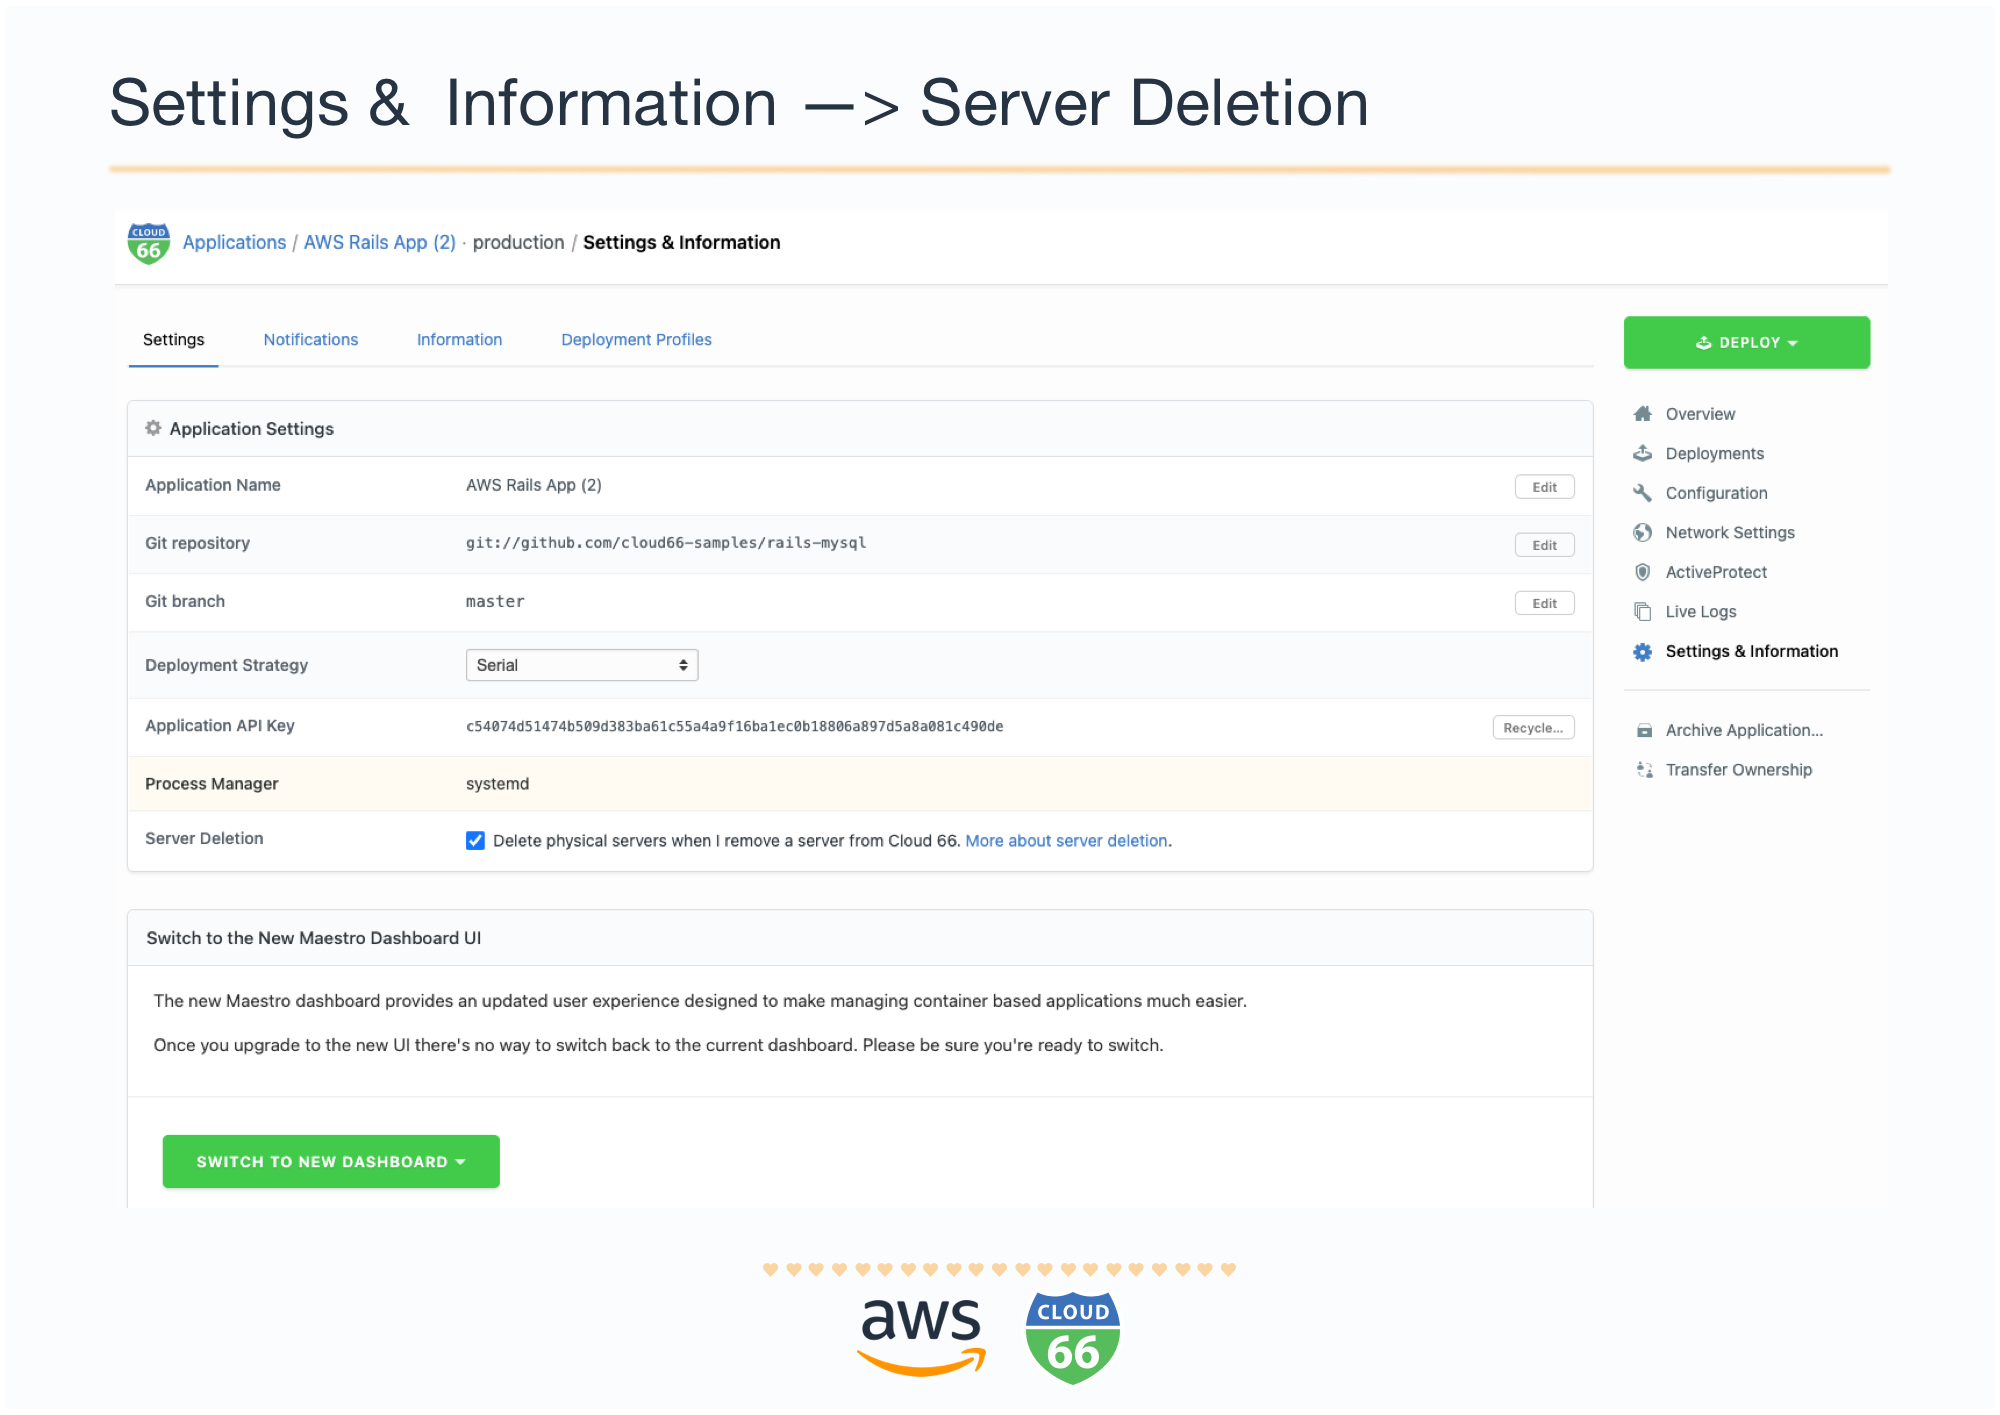
Delete your Application
If you would like to delete your application, and you would like to delete a physical servers when you remove it from Cloud 66 go to "Settings & Information" and tick the box next to Sever Deletion. Once that's checked you can hit the delete button.
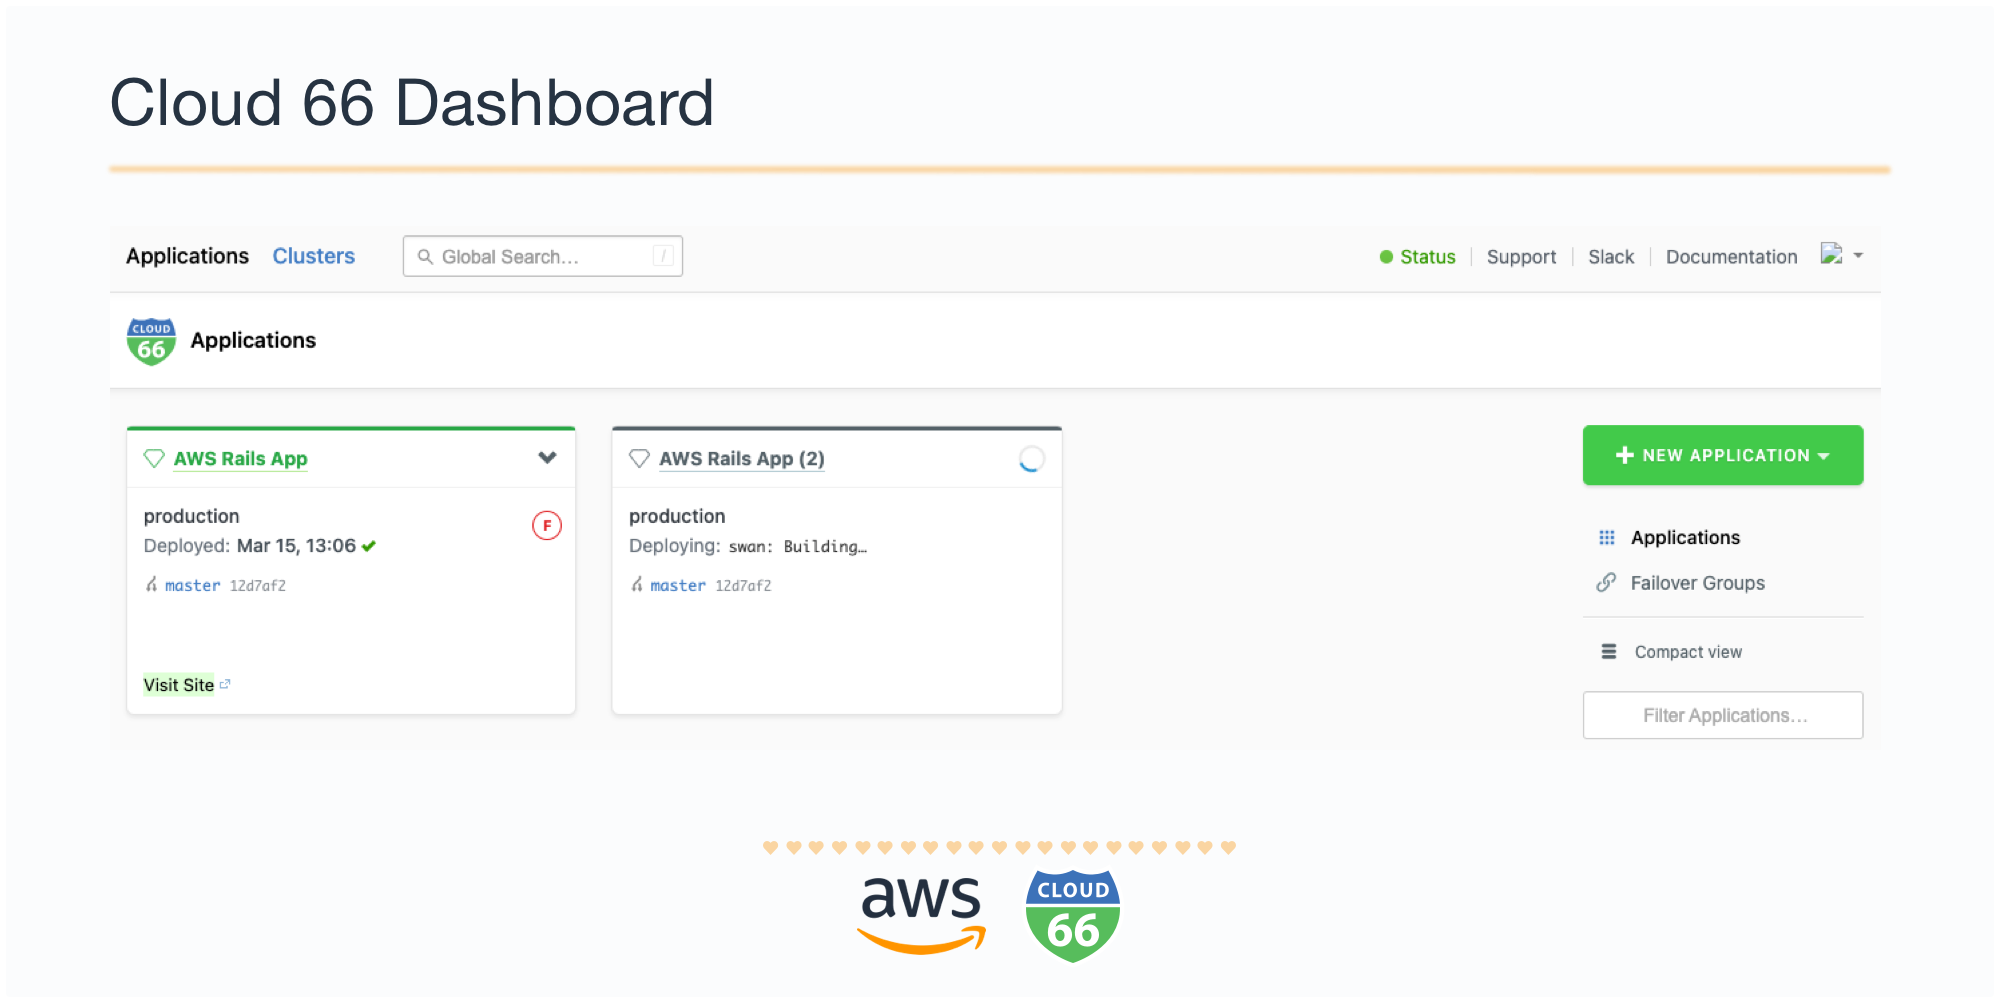
To sum up, once the application is deployed you can go to your application tab in Cloud 66 dashboard and you can see your applications there.
Happy Rails Deployments to AWS with Cloud 66!