This blog post is a brief introduction to our upcoming webinar hosted together with DigitalOcean. It includes a guideline of the demo on how to 'Deploy scalable Meteor and Node applications with DigitalOcean and Cloud 66'.
To find out more or to ask questions, join the Webinar on Thursday 26th January at 6 PM (UTC) OR 1 PM (EST).

Webinar content:
The webinar will take about 35 minutes and it will cover the following points:
• Introduction to DigitalOcean and Cloud 66 and what Cloud 66 tries to solve for developers.
• Showcase including a demo how to get started and deploy a Meteor application with DigitalOcean and Cloud 66.
• A short introduction to some useful Cloud 66 features including scaling, SSL and DB backups.
• Questions & Answers.
Why host your Node (Meteor) app on DigitalOcean with Cloud 66?
Why Meteor? The reason why developers are choosing Meteor for their project is real-time web attributes. It also allows to build and manage the front-end, the back-end, and the database with nothing but JavaScrip. Besides that, it is a very funky framework with the strong and diverse community support. :)
Why DigitalOcean? DigitalOcean offers a developer-friendly way to control the lifecycle of the virtual machine, allows rapid provisioning APIs, world-wide network connections, and competitive pricing. It is an ideal public cloud.
Why Cloud 66? Cloud 66 provides a complete set of tools to deploy Node, Rails and Docker applications in production on any cloud provider or your own server. It helps developers roll out software faster and more reliably to easily scale applications to simplify DevOps.
Combining the agility of Meteor, flexibility of Cloud 66 and the convenience of DigitalOcean allows developers to create solid apps.
How to deploy your Node application with Cloud 66 on DigitalOcean
Before you get started, you'll need access to:
- Cloud 66 account,
- Git repository with your Node (Meteor) application code,
- Deployment credential to DigitaOcean account.
Now let's build the Node stack:
When you connect with Cloud 66 via git repository, Cloud 66 analyze your application code and returns the configuration details detected. Once the analyzed are completed you can verify the configuration details and move to the next step or you can switch to Cloud 66 advance settings.
Next, you have the option to select the database. Cloud 66 natively integrates with the following data services, MySQL, PistgreSQL, MongoDB, Redis, Memcached and ElasticSearch. There are two options to add the database to your stack, during the build process of your stack or after your stack is build.
Now you can select and add the credentials for any cloud provider or your own server. To add your own server on a public or private cloud you can use our Registered Servers feature. For the purpose of this demo, we will use DigitalOcean and select the region and the size of the server.
Lastly, you can deploy your stack, sit back and Cloud 66 will take care of provisioning your server!
For more information visit our help page, 'Getting started with Node.js based stacks'.
How Cloud 66 works under the hood
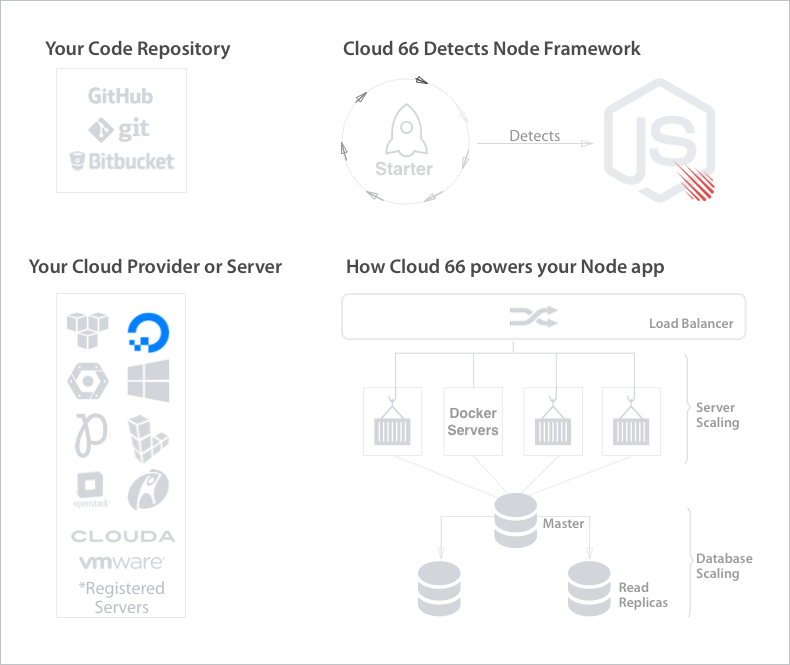
Below you can see a simple graph illustrating how Cloud 66 creates your stack from your code repository to your database management. Also, it is worth to note that open source project Starter detects your Meteor Node-framework.

Discover Cloud 66 management features
Once your Meteor app is set up and running you have access to a wide range of tools and features that support and maintain an end-to-end application, from code to deployment and application management. It's easy to scale and at the click of a button you can increase your backend Node application servers, add a load balancer to distribute traffic or a database backup for guaranteed availability.
To see some of the features in action and how to deploy Meteor application on DigitalOcean with Cloud 66 register for our Webinar on Thursday 26th January at 6 PM (UTC).
