Hotwire and Turbo have revolutionized how we build modern web applications with Ruby on Rails. By leveraging server-side rendering and minimizing JavaScript, Hotwire enables developers to create reactive, real-time user experiences without the complexity of a single-page application framework.
This comprehensive guide will walk you through implementing Hotwire and Turbo in a Rails application from the ground up. We'll cover core concepts like Turbo Drive, Frames, and Streams, explore advanced features like morphing and lazy loading, and build out a full example chat application to demonstrate these techniques in action.
Whether you're new to Hotwire or looking to level up your skills, this guide will provide you with a deep understanding of how to harness the power of Hotwire and Turbo to create fast, responsive Rails applications. Let's dive in!
Definitions
Let's start with a few definitions.
Hotwire is a set of technologies for building modern web applications without the need to write much JavaScript yourself. It includes Turbo, Stimulus, and Strada, focusing on server-rendered HTML.
Turbo is a part of Hotwire. It accelerates page loads and form submissions by using JavaScript to fetch and update only the parts of a page that have changed, providing a single-page app feel backed by server-rendered HTML.
We'll focus largely on Turbo as the main driver of the Hotwire philosophy. Let's start with examining the machinery that composes Turbo.
What Is Turbo Drive?
The fundamental principle to understand about Turbo Drive (formerly called Turbolinks) is that it intercepts...
- regular browser navigation (i.e., clicks on links), and
- state mutations (i.e., form submissions)
...and injects a layer to handle those more efficiently.
That layer is nothing extraordinary or overly complex - it's simply a combination of the browser fetch method and History API. In this section we're going to demystify what happens when a Turbo-Drive-enabled application receives a click on a link, or a form submission.
Turbo Visits
The entire premise of Turbo Drive is based on the fact that any assets referred to in the <head> tag of a page stay the same while you navigate and use the application. In a large majority of cases, only the contents of the <body>, as well as the <title> and some <meta> tags like description or OpenGraph attributes ever change.
During a Turbo Visit - that is, upon regular navigation (such as clicking on a link in the nav bar) - the HTTP GET request is transformed into a fetch call, and only the contents of the <body> is replaced (and <title>, <meta> etc. merged). The critical fact to comprehend here is that no assets (i.e. JavaScript and CSS code) are reloaded and reevaluated.
In other words: Global JavaScript objects like window or document remain entirely untouched, all event listeners are kept, etc. This is the reason, by the way, that when initializing third party libraries a regular DOMContentLoaded event won't cut it (remember $.ready()?). Unless you specify otherwise, the DOM is only ever loaded once. We'll examine the most relevant JavaScript events below.
Let's look at the different types of Turbo Visits now.
- Application Visits: These are initiated by clicking on a link on the page, but can also be programmatically invoked using
Turbo.visit(). Notably, before rendering the new page it is stored in Turbo Drive's local cache, so it can be reused for frequently visited pages. When there is a cached copy of the requested page, it will be shown as a preview. This is a powerful feature but can lead to inadvertently showing stale content if you're not careful. Butfetching the new page and replacing its<body>isn't the only thing that happens during an application visit. To maintain the "mental model" of a regular HTTP GET request, the browser URL (i.e. thewindow.location) has to be changed, too. This is done via the History API using two methods,pushStateandreplaceState. These are represented in Turbo Drive by visit actions. A regular visit occurs using the "advance" action and will push a new entry onto the browser's history stack. If you wish to replace the last entry in that stack, all you need to do is annotate the corresponding link withdata-turbo-action="replace", and a "replace" action will be triggered. - Restoration Visits: These happen when a visitor uses the browser's "Back" and "Forward" buttons. Turbo Drive will try to make use of cached copies of the requested pages without issuing a network request. The browser history stack is manipulated just as in the regular back/forward navigation case.
Handling Form Submissions
Consistent with how it wraps regular navigation in asynchronous fetch calls, Turbo does the same with form submissions. This requires form submissions to incorporate their own lifecycle and emit certain events (as detailed in the next section). This process is largely opaque to a Rails developer, but you could use these events to, for example, trigger certain Stimulus.js actions.
More central to understanding this process is the contract that Turbo expects from the backend in terms of possible HTTP responses. At the highest level, you can distinguish two types of responses:
- those containing the
Content-Type: text/vnd.turbo-stream.htmlheader. Turbo will then assume that the payload consists of Turbo Stream actions, and evaluate these. We'll cover them in detail later. - "regular" responses. Turbo will only accept the status codes:
- 303 (See other) in the case of a successful server-side state change. This will redirect the application to the specified page using a Turbo visit,
- 422 (Unprocessable entity) in case of a validation error, used to re-render the page with the payload of the response, and
- 500 (Internal server error)
Turbo Drive Events
Let's take a look at the most relevant JavaScript events emitted by Turbo Drive during page navigation (for a complete rundown refer to the Turbo documentation):
turbo:loadis more or less a stand-in forDOMContentLoaded. It fires upon loading the page, and then after every successful visit. It's the hook where you'd normally integrate third party libraries (if you don't do it in Stimulus controllers), especially if you are handling legacy JQuery plugins.turbo:before-fetch-requestis called just before thefetchrequest to retrieve the new page is issued. You can pause fetching here, for example to add custom HTTP headers to your request.turbo:before-cacheis invoked just before a fetched page is added to the local cache. You can use this hook to prepare the current page for caching. For example, you could manually remove any transient elements and replace them by placeholders, so no stale content is presented upon rerender.turbo:before-renderis called before the fetched page renders. You can pause rendering here to, for example, perform custom animations on elements of the old page. Before the official View Transition support landed, it was the only way to do custom page transitions.
Visit Confirmations
Sometimes you want to require a user's permission to proceed with navigation. You can do this effortlessly by adding a data-turbo-confirm attribute to your link:
<%= link_to sign_out_path, data: {turbo_confirm: "Do you really want to sign out?"} %>
Disabling Turbo for Specific Requests
Disabling Turbo for links or forms is easy: just add data-turbo="false" to the link or form tag, or any enclosing ancestor:
<%= form_with ... data: {turbo: "false"} do |f| %>
  ...
<% end %>

<%= link_to posts_path, data: {turbo: "false"} %>

<div data-turbo-"false">...</div>
Why would you want to do this? In simple terms, Turbo has some expectations about the request/response cycle, especially regarding form submissions. A POST request issued via Turbo Drive must result in either a 303 ("see other") or 422 ("unprocessable entity") response. If the route you are targeting doesn't comply to this, it's better to disable Turbo Drive for that route.
Browser-Native View Transitions
In browsers that support the View Transitions API (all but Safari and Firefox), Turbo provides a simple way to make use of them. Simply add the following meta tag in your document's head:
<meta name="view-transition" content="same-origin" />
...and Turbo will trigger a transition. The mechanics of view transitions are beyond the scope of this article, please refer to the Turbo docs and MDN.
Preloading and Prefetching for Enhanced Performance
Turbo Drive comes with two mechanisms to improve the perceived navigation latency of an application. One has been around since the inauguration of Turbo, the other was added recently in version 8.
Preloading links into the cache programmatically: As explained above, Turbo Drive maintains a browser-local cache of visits to further improve navigation speed. It is possible to pre-warm this cache by adding the
data-turbo-preloadattribute to a link. The Turbo docs explain the edge cases for which Turbo will refuse to preload a link. In the context of this article, the most salient thing to note is that each of these preloaded links will issue a separate HTTP request, leading to significant app server load. Thus, the most sensible rule of thumb is to only use it for a handful of the most visited links on a page.Prefetching links on hover: Available since Turbo 8, this mechanism applies a similar technique; it prefetches links when a user hovers over them with the cursor, in anticipation of a likely future visit. It's activated by default, but the caveat from above still holds and is even exacerbated: if you apply this to all the links on the page, you will inevitably cause high web server load. You can opt out of this behavior
- for the entire page, using the
<meta name="turbo-prefetch" content="false">, or - for singular links, using the
data-turbo-prefetch="false"attribute.
Sadly, there is no reverse "opt-in" functionality.
- for the entire page, using the
Persisting Elements with data-turbo-permanent
A side note that might come in handy: Sometimes you want certain elements of your page to be persistent across page loads. This especially applies to ephemeral changes that have been made via JavaScript, for example. A notification counter badge might serve as an example. Suppose you have a markup like this:
<span id="notifications-count">1</span>
A new notification arrives via Turbo Stream, the count is increased to 2. After a while the user clicks the browser's back button, which serves a cached version containing the wrong count of 1. You can avoid this scenario by adding the data-turbo-permanent attribute to the HTML, which will mark the element as "untouchable" (i.e. not cacheable) for Turbo:
<span id="notifications-count" data-turbo-permanent>2</span>
What Are Turbo Frames?
In a nutshell, Turbo Frames are containers that decompose your DOM into manageable pieces. One key advantage, as we shall see, is that this fosters dividing up RESTful resources into smaller parts by loading them in separate HTTP requests. But first things first, let's look at their key proposition: they provide the same mechanics as Turbo Drive (supercharged navigation and form submissions) scoped to <turbo-frame> elements enclosing the respective link or form. Let's look at a simple example:
<nav id="main-navigation">
  <a href="/home">Home</a>
  <!-- ... -->
</nav>

<turbo-frame id="tabs-frame">
  <a href="/tab-1">Tab 1</a>
  <a href="/tab-2">Tab 2</a>

  <div id="tab-panel">
    Panel 1
  </div>
</turbo-frame>
Now the user clicks on "Tab 2", and the server answers with this HTML:
  <nav id="main-navigation">
    <a href="/home">Home</a>
    <!-- ... -->
  </nav>

  <turbo-frame id="tabs-frame">
    <a href="/tab-1">Tab 1</a>
    <a href="/tab-2">Tab 2</a>

    <div id="tab-panel">
-     Panel 1
+     Panel 2
    </div>
  </turbo-frame>
As you can see, only the content of the tab panel has changed. Turbo will now go ahead and exchange the contents of the tabs-frame element with the new markup. It doesn't matter if the server response consists of only the Turbo Frame element or the entire page. Only the frame closest to the triggering link or form element will be swapped out, the rest will be left untouched:
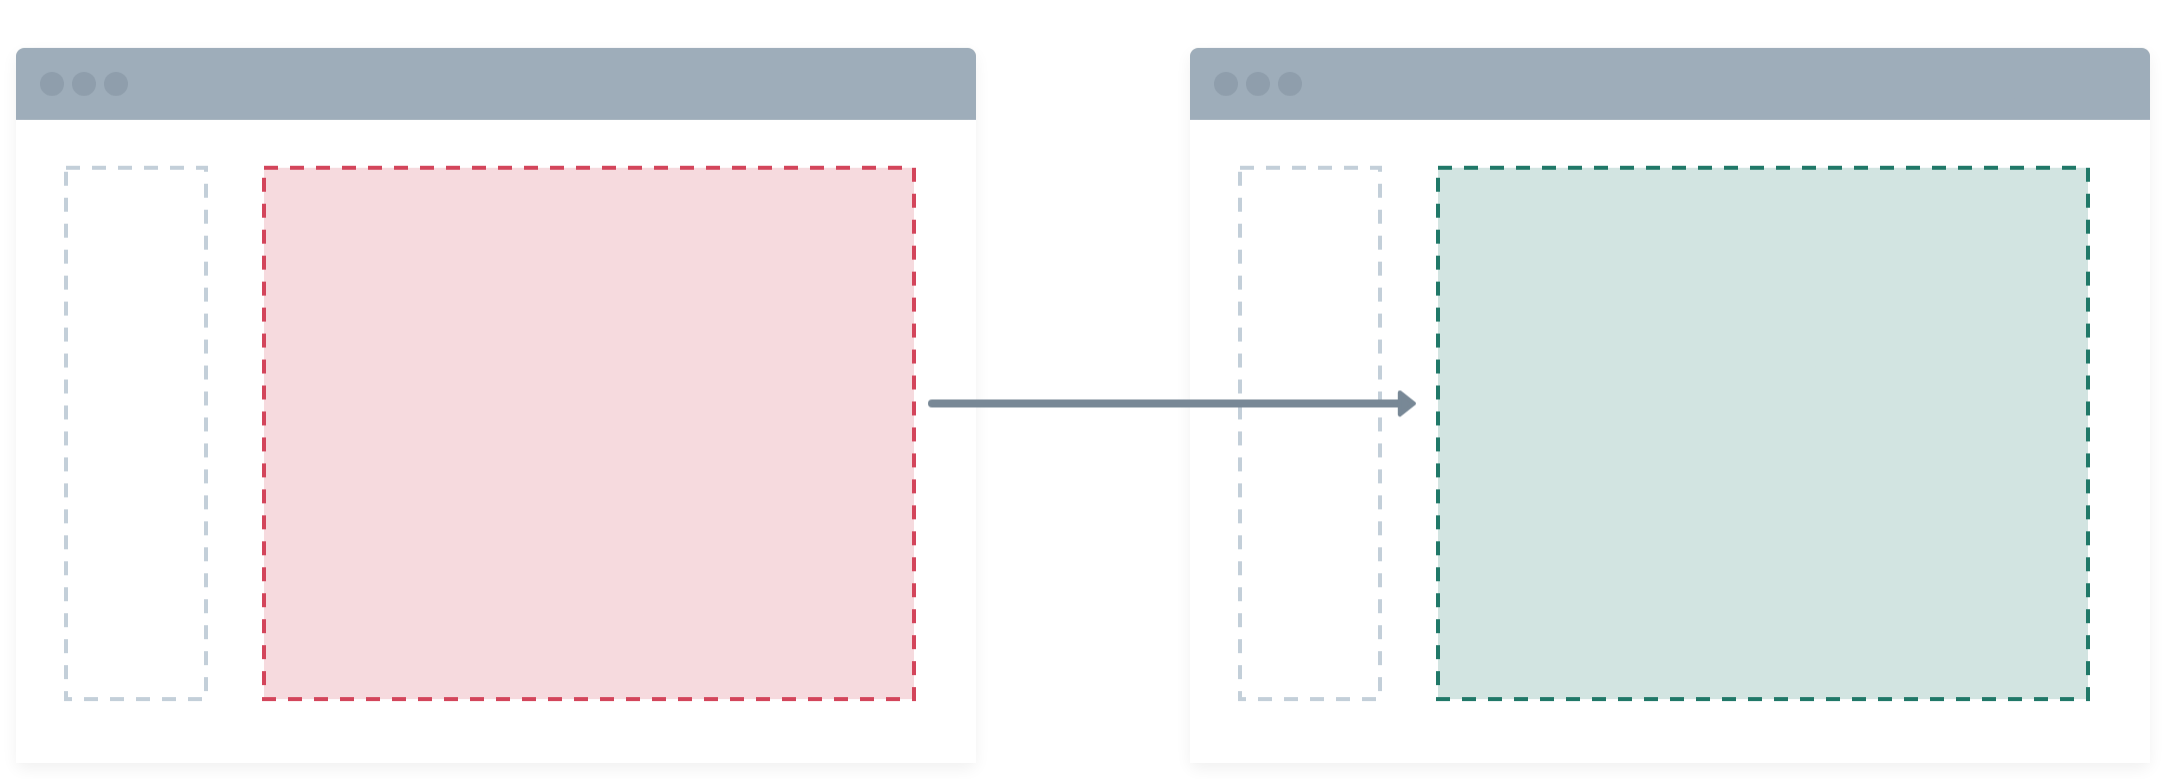
If you squint at it, this functionality already gives away the second core proposition of Turbo Frames: (a)synchronous loading of individual DOM parts by requesting them from the server separately, called eager and lazy loading.
In other words, if you provide a src attribute on a <turbo-frame>, it will autonomously initiate a request to load the given URL and swap out the contents. If you further add a loading="lazy" attribute, it will defer the network request until the respective frame is visible in the viewport.
Let's take a look at an example:
<turbo-frame id="shopping-cart-items" src="/cart/items">
  Placeholder
</turbo-frame>
or
<turbo-frame id="shopping-cart-items" src="/cart/items" loading="lazy">
  Placeholder
</turbo-frame>
The server now renders the requested route and responds:
<turbo-frame id="shopping-cart-items">
  <ul id="cart-items-list">
    ...
  </ul>
</turbo-frame>
...which will inject the list of shopping cart items into the page.
There are two important takeaways here that will help you get the most out of this technique:
- It fosters a new mindset about composing a view: dividing it up into eager or lazy loaded Turbo Frames will spread the load across multiple requests against your application server, which can speed up page loads if your ops setup provides enough parallel workers. It also means that each of these requests can potentially be HTTP-cached, thus reducing network traffic and latency.
- Pursuing this approach will most likely also make you re-think your domain model and lead to more specialized resources. Why? Because every eager/lazy loaded Turbo Frame needs a separate endpoint, which is most often tied to a specific model.
Targeting Arbitrary Turbo Frames
In the section above I've noted that
Only the frame closest to the triggering link or form element will be swapped out, the rest will be left untouched.
In fact, this is only the default case. Turbo allows you to arbitrarily target other frames upon navigation and form submission. Let's circle back to our tab navigation example from above:
<nav id="main-navigation">
  <a href="/home">Home</a>
  <!-- ... -->
</nav>

<a href="/tab-1" data-turbo-frame="tabs-frame">Tab 1</a>
<a href="/tab-2" data-turbo-frame="tabs-frame">Tab 2</a>

<turbo-frame id="tabs-frame">
  <div id="tab-panel">
    Panel 1
  </div>
</turbo-frame>
We've hoisted the links out of the frame and added a data-turbo-frame attribute to each, indicating that when following the href, the contents of the tabs-frame should be replaced instead of the enclosing frame (or <body>). The same is true for forms, by the way. Consider a Rails-specific example:
<%= turbo_frame_tag dom_id(@post) do %>
  ...
<% end %>

<%= form_with model: @post, data: {turbo_frame: dom_id(@post)} do |f| %>
  ...
<% end %>
Submitting this form will update the Turbo Frame outside of it. This can come in especially handy with the button_to helper, for example when you need to toggle the status of a resource that's found elsewhere on the page.
Promoting Frame Navigation to Page Visit
Turbo Frames allow you to efficiently manage your DOM, but it's important to keep in mind that they might interfere with typical user expectations when navigating a web application. The first time you'll typically encounter this is when dealing with pagination. Before you consider the implications, Turbo Frames might seem like a natural fit:
<turbo-frame id="clients">
  ...
  <nav>
    <a href="/clients?page=1">1</a>
    <a href="/clients?page=2">2</a>
    ...
  </nav>
</turbo-frame>
At first sight, this looks perfectly valid, and efficient: Every click on a pagination link will trigger an exchanging of the clients Turbo Frame. Nice! What's the catch?
The problem here is a bit hidden from plain sight: since only the Turbo Frame is swapped out, no new entry is added to the browser's History. In other words, the URL in the browsers address bar stays the same, and the back button doesn't work. That's unacceptable for pagination, or for any other way of building permalinks from query strings. Luckily, Turbo has a built-in remedy for this - a method to specify the intended action (see Turbo Visits above):
- <turbo-frame id="clients">
+ <turbo-frame id="clients" data-turbo-action="advance">
    ...
    <nav>
      <a href="/clients?page=1">1</a>
      <a href="/clients?page=2">2</a>
      ...
    </nav>
  </turbo-frame>
Now, any navigation event in this frame will result in an actual Turbo (Advance) Visit to be recorded.
Turbo Frame Events
Turbo Frames emit events for navigation and form submissions issued from within them, much like Turbo Drive Events. Here are the most salient ones:
turbo:frame-loadis fired when a frame has finished loading, either by a navigation event triggered within them, or upon lazy or eager loading.turbo:before-frame-renderis triggered after the underlying fetch request completes, but before rendering. You can intercept rendering to add animations etc., analogously to Turbo Drive.turbo:frame-missingis a special event that's fired when the received server response does not contain a matching Turbo Frame. You can cancel this event in order to override the default error handling and, for example, display an informational dialog or flash message, or initiate a page visit to an error page.
What Are Turbo Streams?
Turbo Streams are a way to perform DOM manipulations by specifying them on the server, and delivering them to the client in a special format. This format entails a custom <turbo-stream> element with special markup syntax, which we will look at in a moment. They can be sent to the client in a variety of ways:
- in response to a form submission, by specifying a special
Content-Typeheader (text/vnd.turbo-stream.html) - "out of band" using Websockets, for example in model callbacks
- by attaching a
<turbo-stream>element to the DOM from client-side JavaScript.
Let's take a look at the general concepts behind Turbo Stream messages, and the process of implementing them in a Rails app.
Turbo Stream Messages
There's nothing magical about Turbo Stream messages. They are just special <turbo-stream> elements specifying an action and a target, wrapped around the content to which that action applies. Let's look at an example:
<turbo-stream action="replace" target="indicator">
  <template>
    <div id="indicator">
      <span class="bg-green-500 rounded-full h-4 w-4"></span>
    </div>
  </template>
</turbo-stream>
This Turbo Stream message declares that the entire DOM node with the ID of indicator must be replaced by the contents of the message's own <template> tag. (Note that Turbo Stream messages always wrap <templates>, otherwise their content would be immediately applied.)
So after Turbo executes this action, we might see the following DOM change:
- <div id="indicator">
-   <span class="bg-red-500 rounded-full h-4 w-4"></span>
- </div>
+ <div id="indicator">
+   <span class="bg-green-500 rounded-full h-4 w-4"></span>
+ </div>
Note that in the above example, the whole wrapping <div id="indicator"> is replaced even though it stays the same. This means that any event listeners connected to it will be discarded.
If you're wondering what actions are currently available, Turbo features eight of them out of the box. You can also register your own custom actions:
import { StreamActions } from "@hotwired/turbo"

// <turbo-stream action="show_dialog" id="dialog"></turbo-stream>
//
StreamActions.show_dialog = function () {
  document.querySelector(`dialog#${this.getAttribute("id")}`).show()
}
The registered action above will look for a <dialog> with id "dialog", and open it.
Hint: If you'd like to take advantage of some ready-made custom actions, take a look at the Turbo Power library.
Turbo Stream Delivery
With Turbo Streams all delivery mechanisms essentially wait for incoming <turbo-stream> elements to be inserted into the DOM. Turbo waits until they're rendered and then executes whatever action is specified.
It's all in the source:
- Upon rendering,
StreamElementcallsperformAction. When and how a<turbo-stream>element renders (i.e. is added to the DOM) is irrelevant for its execution. - Immediately after rendering
StreamElementdisconnects, - ...and removes itself from the DOM.
In a nutshell, Turbo Stream elements are self-executing and self-destroying snippets of JavaScript.
But exactly how are these <turbo-stream> elements injected into the DOM? There are two main mechanisms:
- After form submissions: Turbo inspects the fetch response, and if its
Content-Typeistext/vnd.turbo-stream.html, stops and appends it to the DOM. Afterwards, the self-executing mechanism commences. - Using websockets: The
StreamObserveralso listens formessageevents from a connected Websocket, and injects it into the DOM.
So both methods are different flavors of the same technique, but they widely differ in their application and effect:
- stream actions applied in response to a form submission will target only the client who sent the request, while
- stream actions sent via Websockets will be applied by every client connected to the Turbo stream channel.
In other words, stream messages that are delivered via Websockets can be used to "fan out" to users other than the one who initiated it. The most common implementation in Rails is via the Turbo::Broadcastable, where model callbacks are employed to send out updates. You can also just directly call any method defined on Turbo::StreamsChannel from anywhere in your application.
What Is Turbo Morphing?
The typical Turbo Drive behavior - replacing the entire <body> of a web page - does have downsides, of course. Aside from visible UI flicker when navigating across an application and nasty challenges like scroll preservation, one of the hidden issues is that all event listeners connected to elements on a page are thrown away and need to be re-initialized.
Single Page Applications (SPAs) have their own way of solving these issues (e.g. by employing a "Virtual DOM"), but with the advent of potent morphing libraries like idiomorph, which Turbo uses under the hood, classic server rendered apps can offer a more continuous user experience.
Morphing is implemented in Turbo as a method you can specify on most actions. Continuing with the example from above, let's add method="morph" to it, which will only replace the elements that have actually changed:
<turbo-stream action="replace" method="morph" target="indicator">
  <template>
    <div id="indicator">
      <span class="bg-green-500 rounded-full h-4 w-4"></span>
    </div>
  </template>
</turbo-stream>
  <div id="indicator">
-   <span class="bg-red-500 rounded-full h-4 w-4"></span>
+   <span class="bg-green-500 rounded-full h-4 w-4"></span>
  </div>
But there's also a new refresh action you can send to the client:
<turbo-stream action="refresh"></turbo-stream>
This sends a signal to the client that something has changed and the client simply re-requests the current URL and morphs in any differences. This is especially handy when you want to signal changes to a model record asynchronous to the normal request-response cycle.
Let's look at a simple example.
class Issue < ApplicationRecord
  broadcasts_refreshes
end
Any create, update, or destroy of an Issue record will now be broadcast to every connected stream source:
<%= turbo_stream_from @issue %>

<%= @issue.status %>
Whenever the status attribute of this issue changes (n.b. also triggered by a different user or process), the page will be refreshed via morphing.
As with Turbo Drive you can preserve any element from being morphed by adding a data-turbo-permanent attribute. This can be helpful if there's an element with ephemeral state on your page, such as a <details> node, or a popover with an open attribute.
Use Cases
The "Golden Path" of Rails applications, where HTML is exclusively server-rendered and which relies heavily on HTTP standards, is where Turbo shines. More precisely, applications with limited interactivity that mainly use a standard CRUD (Create-Read-Update-Destroy) UX model can profit massively from this progressive enhancement of their core paradigms.
Limitations
Turbo, or Hotwire in its entirety, may fall short of expectations in highly interactive applications. If your app is write-intensive and frequently transmits state updates to the view layer, you might want to use either a full fledged SPA backed by a Rails API, or a hybrid approach where you mount individual components e.g. React, Svelte etc.
Pros and Cons
On the plus side, Turbo performs at its best when it's practically invisible. The heavy lifting done by Turbo Drive is an ingenious piece of engineering and most of the time you can just reap the benefits it provides. It also offers an exhaustive range of events you can plug into to achieve most front-end interactions.
Turbo Frames introduces an inventive and effective model for a compartmentalized view layer. Frames can help you provide a superior UX but I've also seen developers despair when their abstraction leaks. For tabbed navigation, for example, it's tempting to use a frame for the tab panel but you can't simultaneously mark the active tab in a straightforward way. You either have to fall back to Turbo Drive, losing all the performance gains, or provide an additional Turbo Stream action in your response.
Speaking of which - Turbo Streams should be used with caution. It's a powerful tool that may tempt you to overuse it. The term "Turbo Stream soup" describes responses to form submissions that contain a lot of consecutively executed Turbo Stream actions. Two issues with this spring to mind: first, it's prone to produce race conditions in the front-end that can be hard to debug. Second, it's a potential nightmare to maintain in larger-scale apps where many developers add features. Turbo Stream actions can act like a honeypot that will attract more of the same where a Stimulus controller, for example, would be a better choice.
Example App
To explore Turbo's capabilities in a more practical way, we'll build out an example application. This app will use an LLM chat boilerplate building on OpenRouter to allow you to chat with various available LLMs. The only requirement to follow along is to sign up for OpenRouter, buy a few credits (really < 5$ should suffice), and create an API key.
$ rails new -d sqlite3 -a propshaft -c bootstrap lurch
$ cd lurch
$ bin/setup
$ bundle add open_router
$ bundle add dotenv-rails
# .env
OPENROUTER_API_KEY=xxxxxxxx
# config/initializers/open_router.rb
OpenRouter.configure do |config|
  config.access_token = ENV["OPENROUTER_API_KEY"]
  config.site_name = "Lurch"
  config.site_url = "https://lurch.chat"
end
$ bin/dev
Note: You can browse the source of this example app at https://github.com/julianrubisch/lurch
Conversations
Let's start by fleshing out our domain model a bit. The centerpiece of our application is a Conversation. It will have a title and a summary, and new conversations can be created and navigated between. The summary will be filled in by AI in the background later, after the conversation has been populated with a few Messages.
$ bin/rails g scaffold Conversation title:string summary:text
$ bin/rails db:migrate
Messages
If you think about it, messages belonging to a conversation can come in two flavors: Prompts issued by the user, and replies from the LLM.
There are a couple of ways to approach this (e.g. polymorphic associations or single table inheritance), but because we want to display them in an ordered stream, this is an excellent use case for delegated types.
$ bin/rails g scaffold Message conversation:references messagable:references{polymorphic}:index
$ bin/rails g model Prompt body:text model:string
$ bin/rails g model Reply body:text prompt:references status:integer
$ bin/rails db:migrate
In this case, Message will be a "superclass" that contains references to a delegated messagable type, that are enumerated under the delegated_type directive:
# app/models/message.rb
class Message < ApplicationRecord
  belongs_to :conversation
  delegated_type :messagable, types: %w[ Prompt Reply ]
end
As you can see, we are referencing the Prompt and Reply models which are both backed by individual database tables (as opposed to Single Table Inheritance). Of course, each message also references a conversation that it belongs to.
Next, we have to define a Messagable concern that will tie together what Prompt and Reply have in common - a reference to a certain message, in our case:
# app/models/concerns/messagable.rb
module Messagable
  extend ActiveSupport::Concern

  included do
    has_one :message, as: :messagable, touch: true
  end
end
We can then include this concern in both respective messagable models:
# app/models/prompt.rb
class Prompt < ApplicationRecord
  include Messagable

  has_one :reply
end

# app/models/reply.rb
class Reply < ApplicationRecord
  include Messagable

  enum :status, [:pending, :completed]

  belongs_to :prompt
end
Note that a reply always has a belongs_to association to a prompt - this ensures replies are tied to the correct prompts. It also contains a status enum to reflect whether the reply has been completed by the remote LLM or not.
Our application shell consists of a single layout with a sidebar listing all conversations on the left, plus a modal dialog to create new ones. The main application container is rendered on the right:
<body class="p-4">
  <p style="color: green"><%= notice %></p>
  <p style="color: red"><%= alert %></p>
  <div class="row">
    <div class="col-3">
      <div class="d-grid">
        <!-- Button trigger modal -->
        <button type="button" class="btn btn-outline-primary mb-4" data-bs-toggle="modal" data-bs-target="#newConversationModal">
          New conversation
        </button>

        <!-- Modal -->
        <div class="modal fade" id="newConversationModal" tabindex="-1" aria-labelledby="newConversationModalLabel" aria-hidden="true">
          <div class="modal-dialog">
            <div class="modal-content">
              <%= render "form", conversation: @new_conversation %>
            </div>
          </div>
        </div>
      </div>

      <div class="list-group">
        <%= render partial: "index", collection: @conversations, as: :conversation %>
      </div>
    </div>
    <div class="col-9">
      <%= yield %>
    </div>
  </div>
</body>
Implementing Turbo in your example Application
We'll now start to build out our application from the ground up. First, let's start with creating new conversations.
To do this, we'll trigger a dialog when clicking the "New Conversation" button. With Bootstrap, this is easily done using the built in modal functionality:
<!-- Button trigger modal -->
<button type="button" class="btn btn-outline-primary mb-4" data-bs-toggle="modal" data-bs-target="#newConversationModal">
  New conversation
</button>

<!-- Modal -->
<div class="modal fade" id="newConversationModal" tabindex="-1" aria-labelledby="newConversationModalLabel" aria-hidden="true">
  <div class="modal-dialog">
    <div class="modal-content">
      <%= render "form", conversation: @new_conversation %>
    </div>
  </div>
</div>
Form Submission Quirks
In the default case, this works great. If we add a presence validation to the Conversation model, we run into a first problem though:
class Conversation < ApplicationRecord
  has_many :messages

  validates :title, presence: true
end
Submitting the form will correctly return a 422 response, but the modal is closed, which will leave the user confused. From what we learned about Turbo, there's an elegant way to handle this: Turbo Frames. Let's wrap the form partial in one:
<!-- app/views/conversations/_form.html.erb -->
<%= turbo_frame_tag :new_conversation_dialog do %>
  <%= form_with model: conversation do |form| %>
    <!-- ... --->
    <div class="modal-body">
      <% if conversation.errors.any? %>
        <!-- display error messages -->
      <% end %>

      <%= form.label :title, class: "form-label" %>
      <%= form.text_field :title, class: "form-control" %>
    </div>
    <div class="modal-footer">
      <button type="button" class="btn btn-secondary" data-bs-dismiss="modal">Close</button>

      <%= form.submit "Save", class: "btn btn-primary" %>
    </div>
  <% end %>
<% end %>
Now, upon a validation error, the controller will render a view containing this frame, and it will be appropriately reloaded:
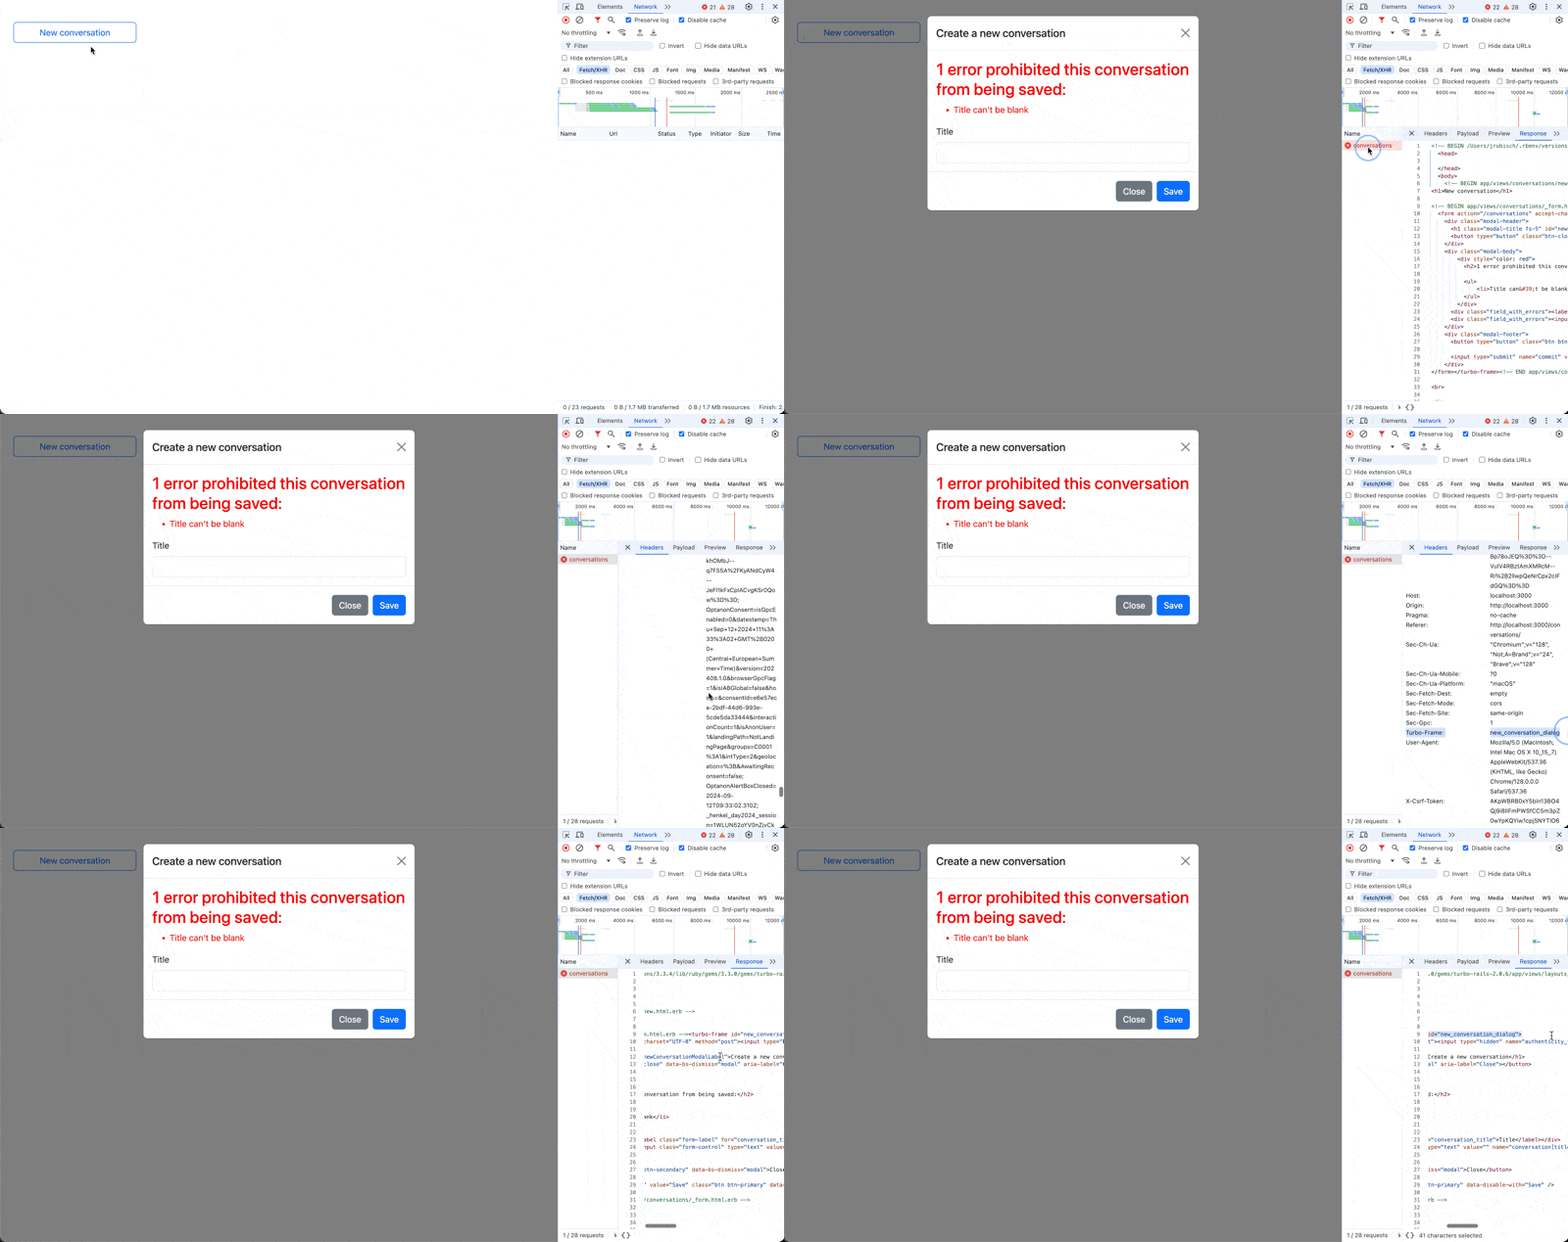
In the GIF above, you can observe that the Turbo-Frame header is sent in the request, signalling that the content of this frame has to be present in the response. And looking at the response HTML proper, it is indeed proper. Hooray!
So let's add a title and submit it.
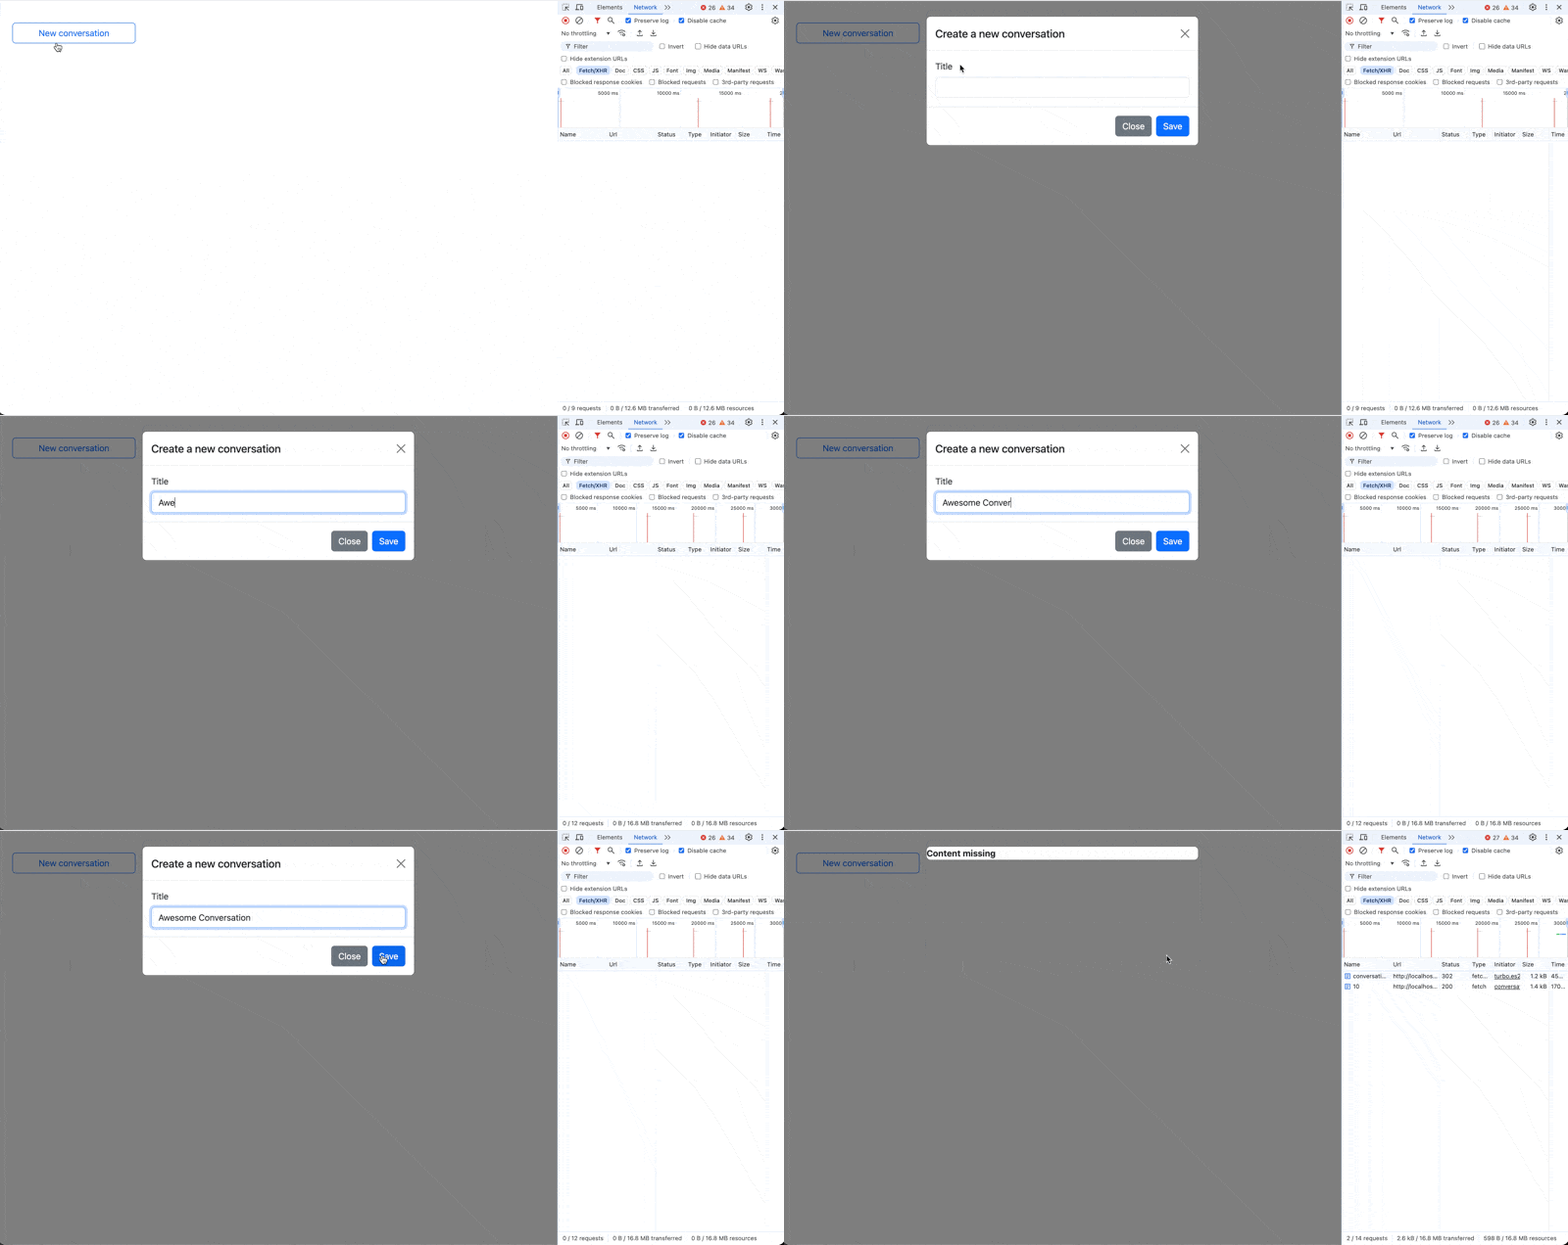
Oops, what's wrong? This is actually a classic problem that sheds some light on why it's important to have a grasp of Turbo's mechanics. The server responds with a 302 that sends the browser to a view that doesn't include this specific frame. The conversation actually is created in the background, but the modal isn't closed (as we would expect) and, since the form originates from inside a Turbo Frame, the rest of the page is left untouched. Instead, we get a "content missing" error, pointing at this issue.
So what's the remedy? Well, breaking out of the Turbo Frame with target="_top" isn't it, because then the modal would close in the case of validation failure. In our case we could reach for Bootstrap's native events, but that solution isn't transferable to other frontend stacks.
Luckily, though, there's the turbo:frame-missing event we touched upon above. It allows us to treat exactly this case, and using a little JavaScript we can narrow down to when this event is emitted by a modal and provide an escape hatch.
Add this to your app/javascript/application.js:
document.addEventListener("turbo:load", () => {
  const dialogs = document.querySelectorAll(".modal");

  dialogs.forEach((dialog) => {
    dialog.addEventListener("turbo:frame-missing", async (e) => {
      const { ok, url } = e.detail.response;

      if (ok) {
        e.preventDefault();
        e.detail.visit(url, { action: "replace" });
      }
    });
  });
});
What's happening here? In case this event is triggered from a modal, we look at the response to find out whether it was successful (the ok property). If it's successful, we cancel the event and instead issue a manual visit (which is a convenience method provided by the event's detail property) to the redirected URL. Voilà:
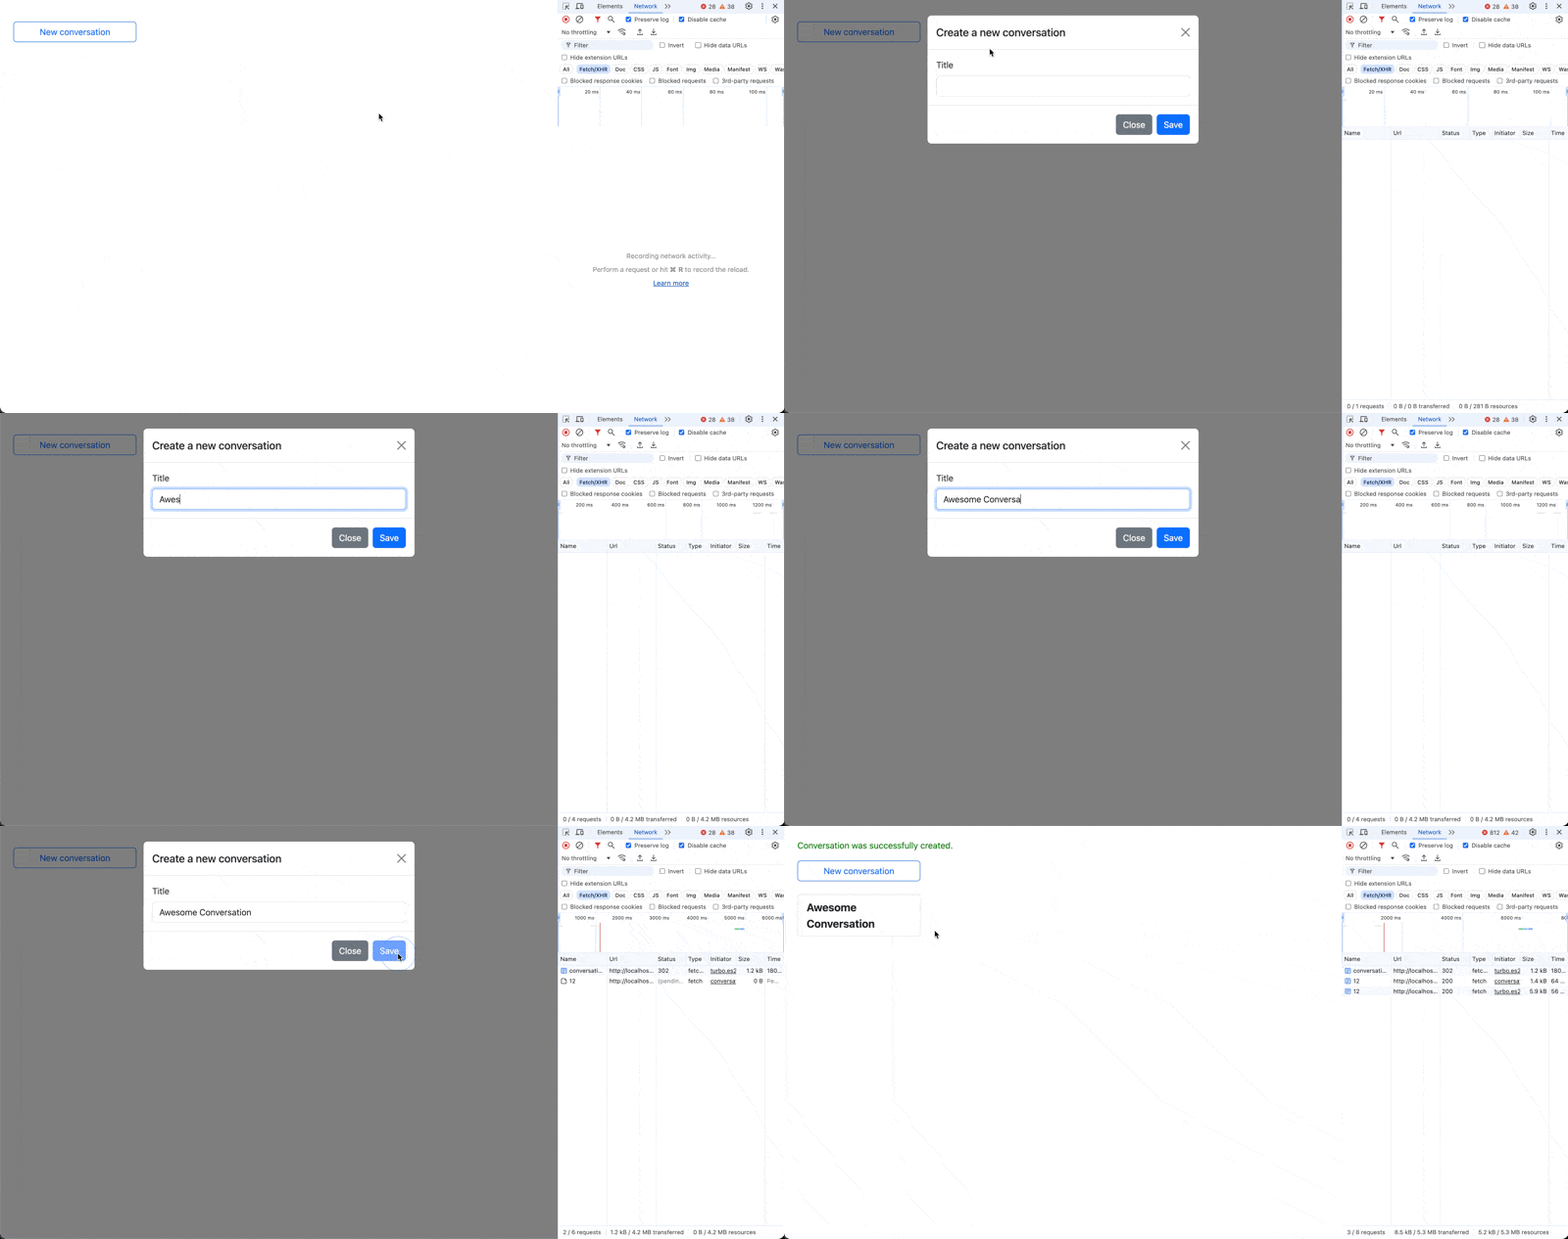
We need an extra GET request to the server, but in this case it seems warrented.
Stream Messages with Turbo
Great, now that we can add conversations, let's actually add some messages. First of all we need a form element to submit new prompts. We add it to the bottom of our converation's show view:
<div class="position-fixed bottom-0 mb-2 w-75">
  <%= form_with model: [@conversation, Message.new] do |form| %>
    <div class="row">
      <div class="col-10">
        <%= form.text_field :body, class: "form-control", autocomplete: "off" %>
      </div>
      <div class="col">
        <%= form.submit "Send", class: "btn btn-primary" %>
      </div>
    </div>
  <% end %>
</div>
Then we need to tweak the MesssagesController's create action a bit, because we opted for delegated types:
def create
  @message = Message.new(conversation: @conversation,
                         messagable: Prompt.new(body: message_params[:body]))

  respond_to do |format|
    if @message.save
      format.turbo_stream
    else
      # ... handle validation errors
    end
  end
end
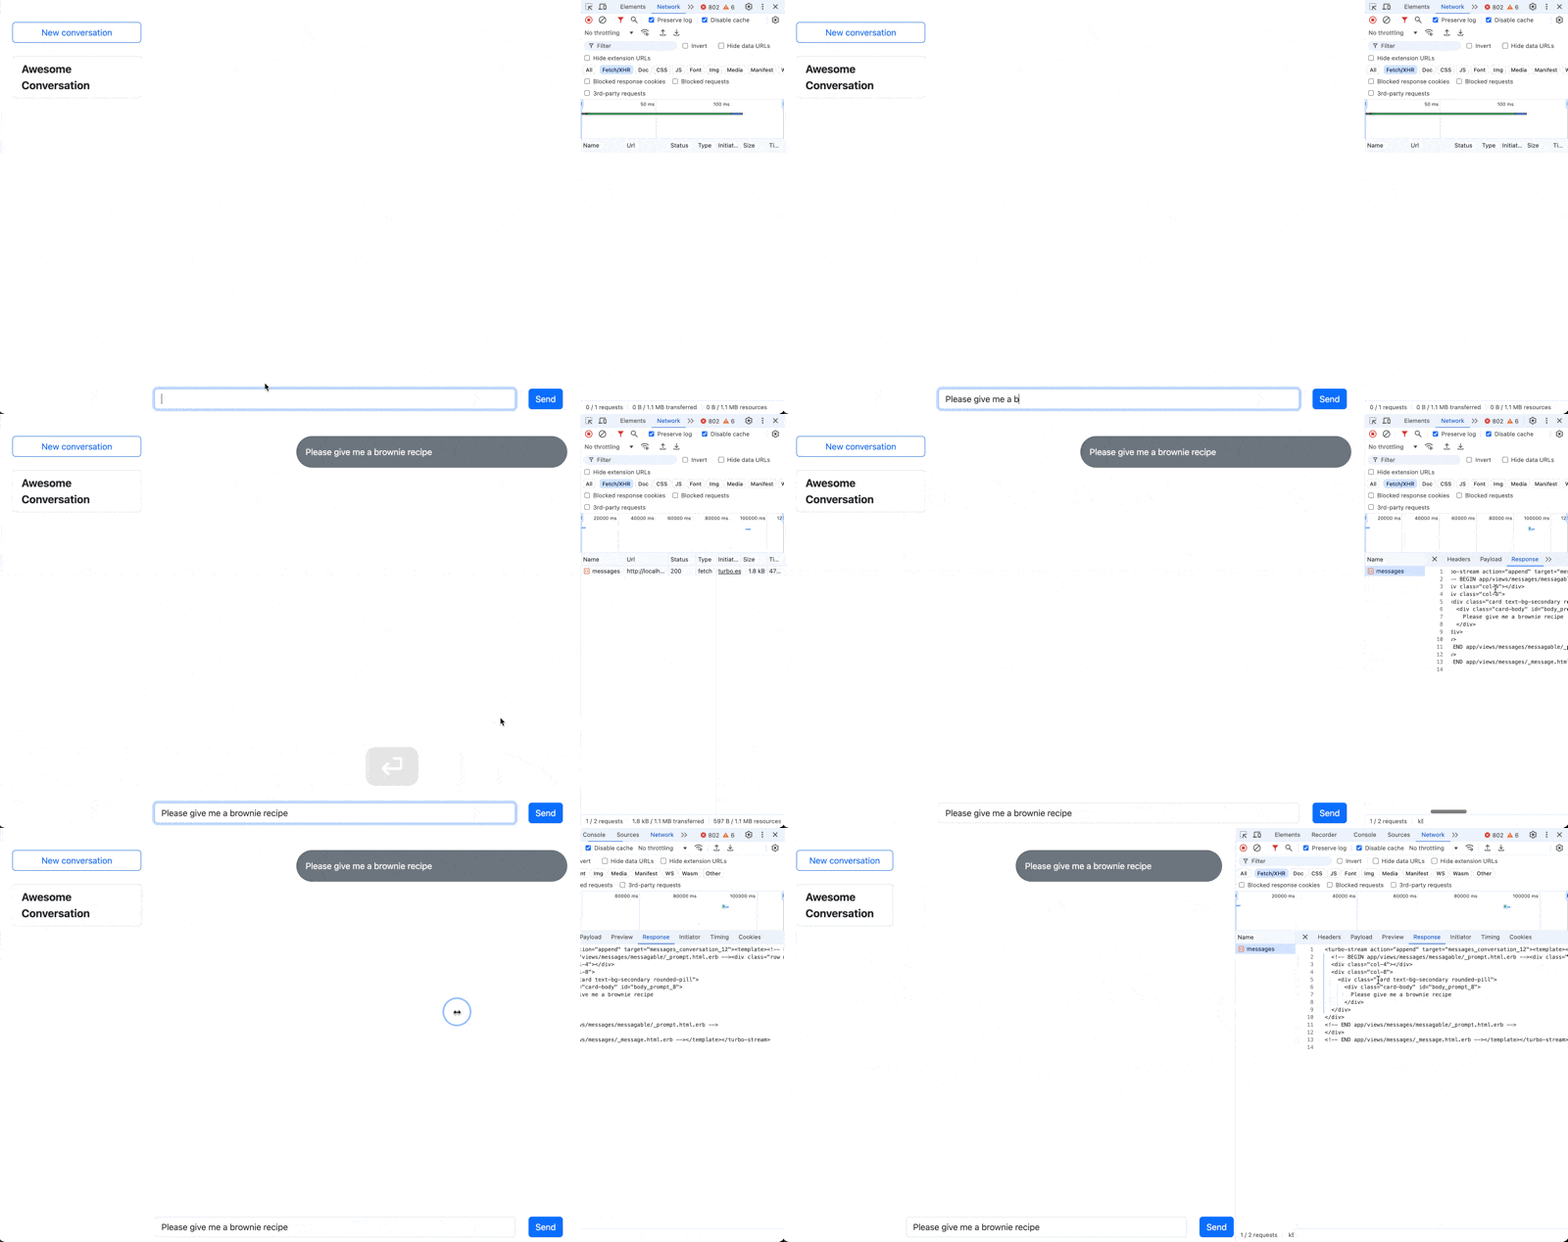
Note that we have to create a new Prompt as explicitly messagable and pass the body. The last bit of the puzzle is to prepare the corresponding create.turbo_stream.erb view. That's pretty simple:
<%= turbo_stream.append [@conversation, :messages], @message %>
The Turbo Stream tag builder exposes a method for each stream action, in our case append. The second argument refers to the target and is expanded to a DOM id, in this case the list of messages inside the _conversation partial. Finally @message is a shorthand for rendering the message in its respective model partial. The more verbose option would be partial: "messages/message", locals: { message: @message }.
Let's give this a try:
Responding to Prompts with an LLM
Okay great, we can add prompts but how do we get them answered? This needs a bit of consideration: these answers will come in asynchronously when they're ready, which means we have to use Websockets for them. Then we have to think about the lifecycle of a reply:
- When created, the body should default to "thinking..."
- We need to clear the form and to prevent prompts from being added while the answer is pending
- Once the LLM has responded via the OpenRouter API, we have to update the body and stream the response back to the browser
Let's find the optimal way to architect these events:
- We could trigger creation of a
Replyright from a model callback in the respectivePrompt, but I'm not a huge fan of this approach. I'd rather leave control of creating and modifying records to, well, the controller. So we'll create a newReplywith a default body right after the correspondingPrompthas been saved:
  def create
    @message = Message.new(conversation: @conversation,
                           messagable: Prompt.new(body: message_params[:body]))

    respond_to do |format|
      if @message.save
+       Message.create(conversation: @conversation,
+                      messageable: Reply.new(body: "thinking...",
+                                             prompt: @message.prompt))
        format.turbo_stream
      else
        # ... handle validation errors
      end
    end
  end
Instead of appending another Turbo Stream action to the create.turbo_stream.erb template, we will handle this directly from the Reply model via Websockets. The reason for this decision is simple: we will need more out-of-band updates later, so it makes sense to introduce it here.
Theturbo-rails gem provides the Turbo::Broadcastable concern we can use in our model to provide reactive updates via callbacks.
  class Reply < ApplicationRecord
    include Messagable

    enum :status, [:pending, :completed]

    belongs_to :prompt

+   broadcasts_to ->(reply) { reply.message.conversation },
+     target: ->(reply) { [reply.message.conversation, :messages] },
+     partial: "messages/messagable/reply"
  end
Here we are specifying that, when a reply is created, it will be streamed to the correct conversation (using a lambda), using the right target (the DOM ID designated by a lambda), rendering the _reply partial. If you look at the Broadcastable code, you'll notice that the default insert action is :append, so it gets added to the conversation's message list:
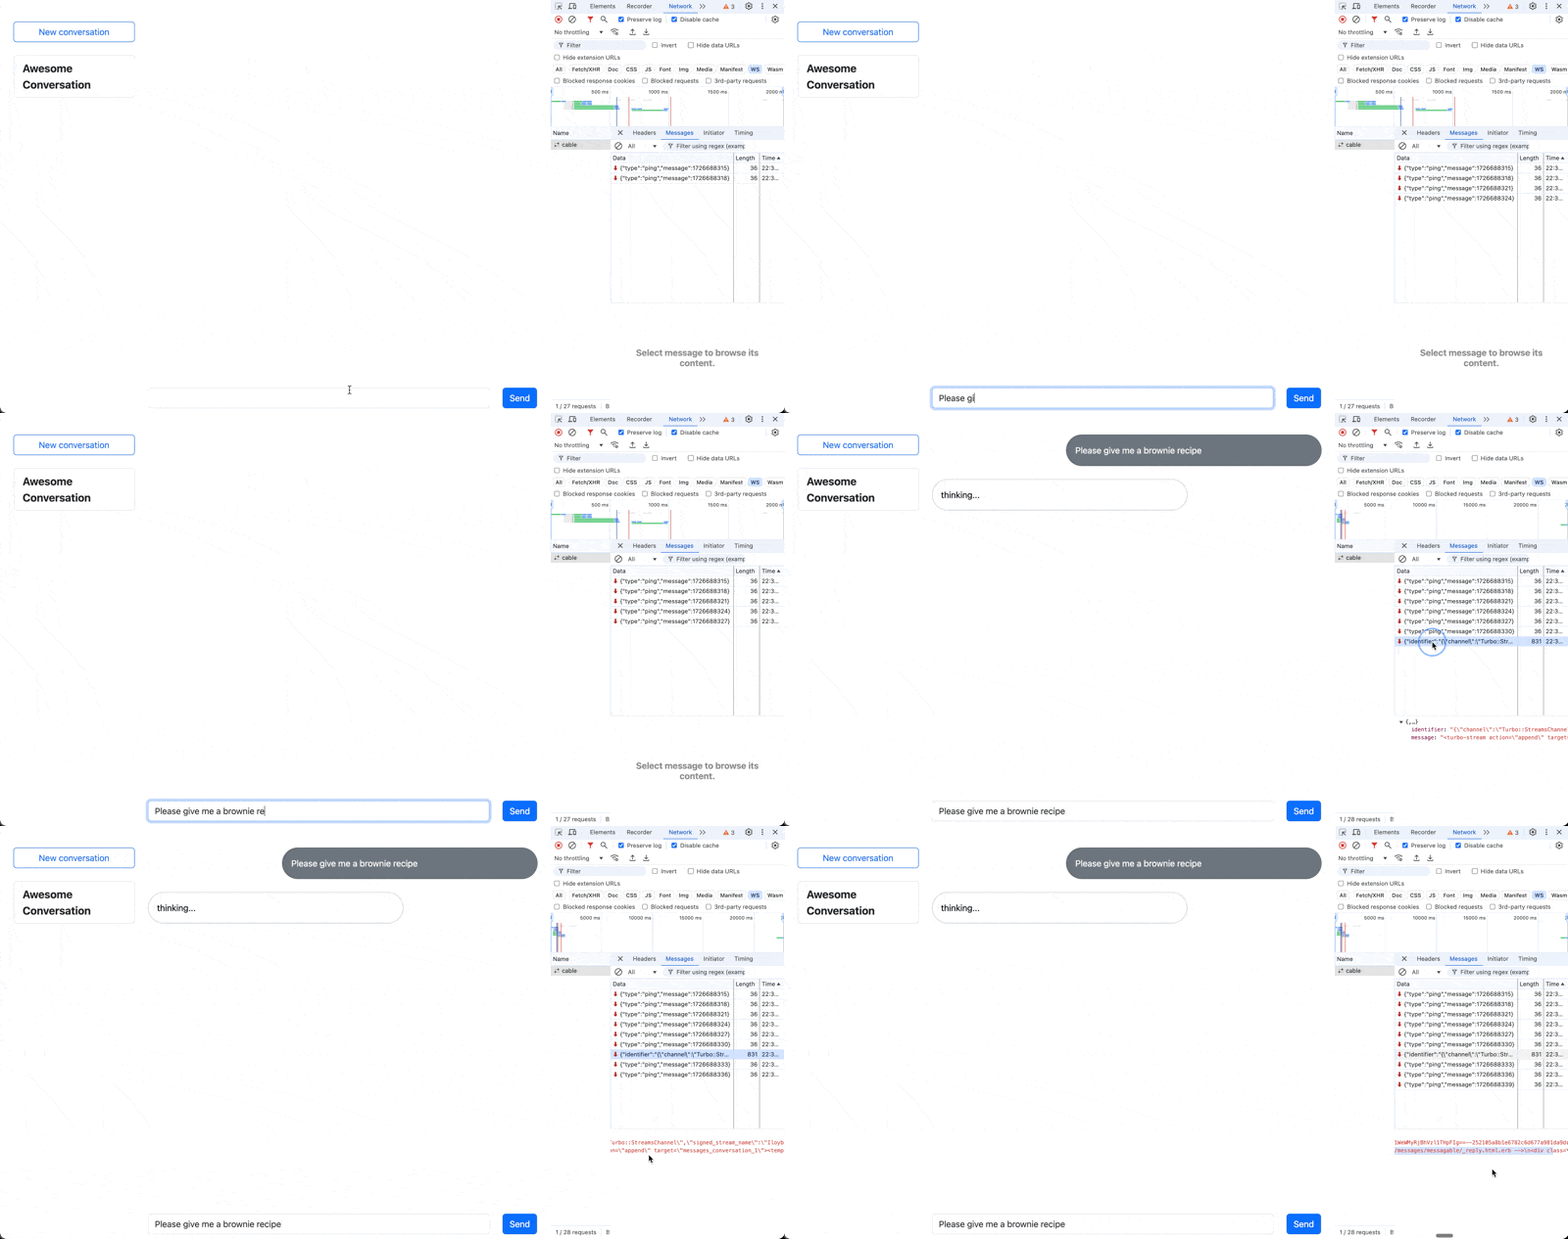
- If you watch closely, you'll notice that in the GIF above, the form isn't cleared upon submission. That's because we've overridden the default behavior (a 303 redirect to the success path) with a custom Turbo Stream response. To take care of this, and in order to disable the form as long as the reply is being generated, we will amend the
messages/_formpartial and use Turbo Streams to update it increate.turbo_stream.erb:
<% last_messagable = conversation.messages.last&.messagable %>
<% disabled = last_messagable.is_a?(Reply) && last_messagable.pending? %>

<%= form_with model: [conversation, Message.new] do |form| %>
  <div class="row">
    <div class="col-10">
      <%= form.text_field :body, class: "form-control", autocomplete: "off", disabled: disabled %>
    </div>
    <div class="col">
      <%= form.submit "Send", class: "btn btn-primary", disabled: disabled %>
    </div>
  </div>
<% end %>
Above, we look at the last messagable in the conversation and determine its type. If it's a Reply, and is pending, we'll disable both the text field and the submit botton.
Note: in a production application I would add a class method returning the last messagable to Conversation and a view helper to determine the disabled state, but to keep things simpler for this article, I've assigned them right in the view.
Let's add the respective Turbo Stream action to our response:
  <%= turbo_stream.append [@conversation, :messages], @message %>
+ <%= turbo_stream.update "message-form-wrapper",
+     partial: "messages/form", locals: {conversation: @conversation} %>
- Now it's time to think about actually querying OpenRouter for a response. Because this happens asynchronous and we don't want to block our user interface, the best place for this is a job. So let's create one:
$ bin/rails g job GenerateReply
class GenerateReplyJob < ApplicationJob
  queue_as :default

  def perform(prompt:)
    client = OpenRouter::Client.new

    response = client.complete([
      {role: "user", content: prompt.body}
    ])

    prompt.reply.update!(
      body: response["choices"].first.dig("message", "content"),
      status: :completed
    )

    Turbo::StreamsChannel.broadcast_update_to prompt.message.conversation,
      target: "message-form-wrapper", content: ApplicationController.render(
        partial: "messages/form",
        locals: {conversation: prompt.message.conversation}
      )
    # OR
    # Turbo::StreamsChannel.broadcast_refresh_to prompt.message.conversation
  end
end
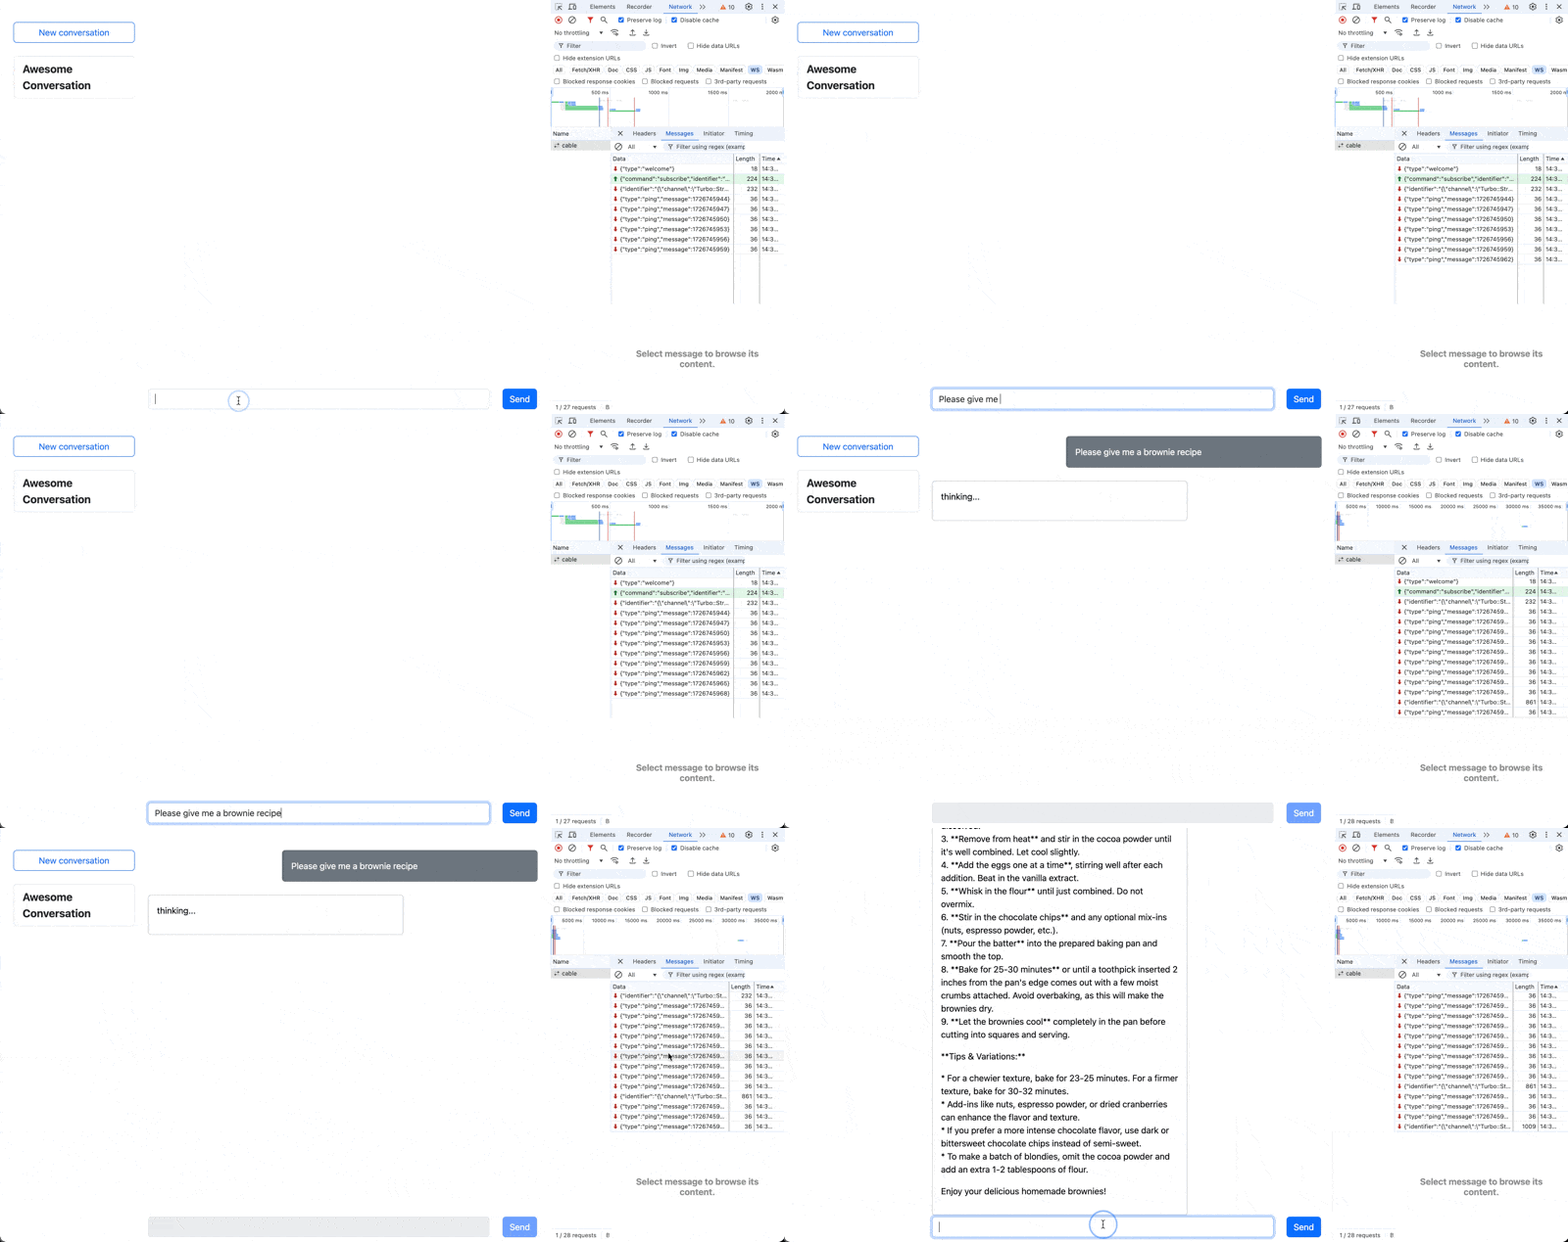
We're creating a new OpenRouter client instance and ask it to complete our prompt. Once the response arrives, we update the dummy reply body with the actual content received from the LLM. This will be automatically injected into the view via the broadcasts_to hook we've set up in the Reply model.
The last thing we have to do is to re-enable the form again to accept new prompts. We can do this in two ways:
- We can update the form wrapper using an
updateaction sent va theTurbo::Streamschannel. The downside to this is that ActiveJob has no rendering pipeline, so we have to manually invokeApplicationController.renderto transform the partial into HTML we can send along. - We can simply send a
broadcast_refresh_totriggering a morphing refresh of the whole page. This will also re-activate the form, but remember that this will re-render the whole view. If you have a lot of messages in your conversation already, this can take considerable time.
In any case, we need to call the new GenerateReplyJob. Here, I'm doing this in the controller after the reply has been generated:
  def create
    @message = Message.new(conversation: @conversation,
                           messagable: Prompt.new(body: message_params[:body]))

    respond_to do |format|
      if @message.save
        Message.create(conversation: @conversation,
                       messageable: Reply.new(body: "thinking...",
                                              prompt: @message.prompt))
+       GenerateReplyJob.perform_later(prompt: @message.prompt)

        format.turbo_stream
      else
        # ... handle validation errors
      end
    end
  end
Here's the result:
I advise you to explore your options in cases like this. With all the capabilities Turbo provides, there's almost always more than one way to reach your goal.
Summarizing Conversations
After a few messages have arrived (to simplify it in our case, let's say that 2 suffice), we want a background job to summarize what has been said so far.
Let's generate this job first:
$ bin/rails g job Summarize
In a "tell, don't ask" manner, we want to make the job itself responsible for determining whether it's time to summarize. So let's pass it the conversation and inspect the count of messages:
class SummarizeJob < ApplicationJob
  queue_as :default

  def perform(conversation:)
    return if conversation.messages.count != 2
    return it conversation.messages.last.messagable.pending?

    client = OpenRouter::Client.new

    combined_convo = conversation.messages.map { _1.messagable.body }.join("\n------\n")

    response = client.complete([
      {role: "system", content: "Reply without any explanation"},
      {role: "user", content: "Please title this conversation using only a few words: #{combined_convo}"}
    ])

    conversation.update!(
      summary: response["choices"].first.dig("message", "content")
    )

    Turbo::StreamsChannel.broadcast_refresh_to conversation
  end
end
The remainder of the job looks quite similar to the one above: we first create a new OpenRouter client, then request a completion that contains a system prompt (to reply without an explanation), and the combined messages of the conversation to summarize.
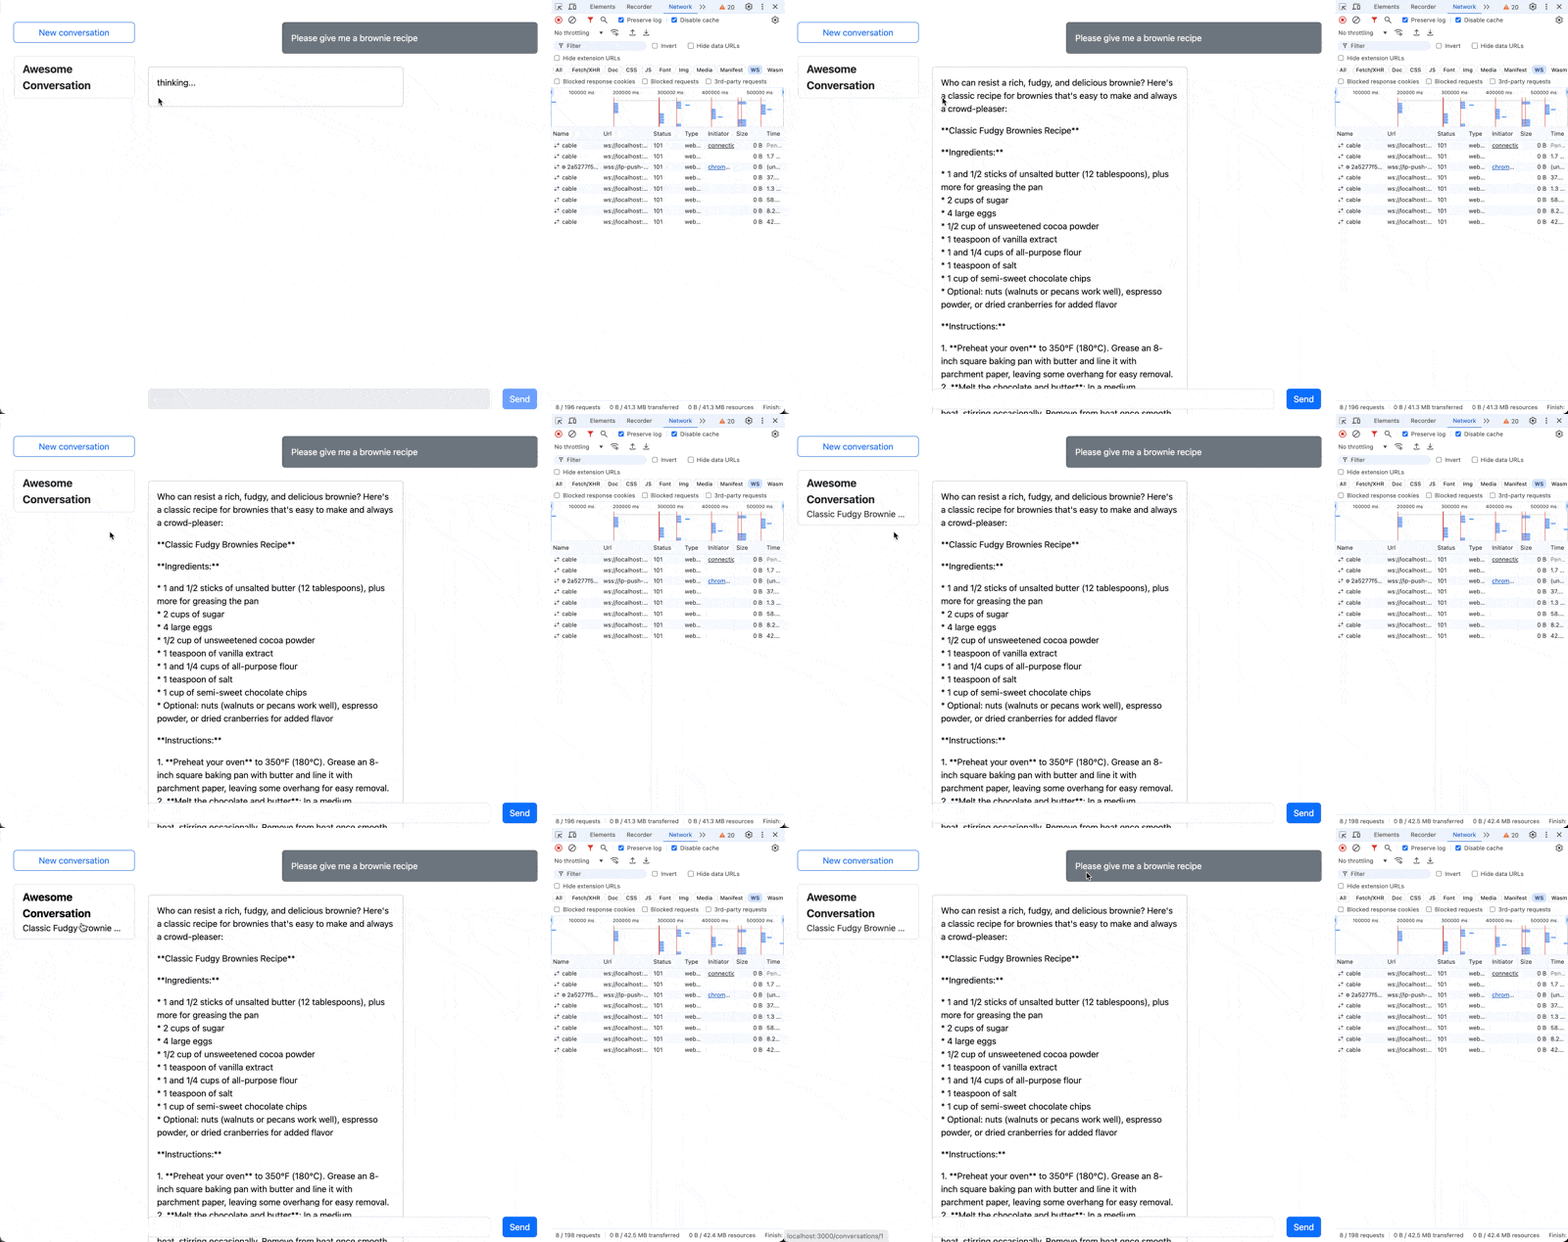
Once it responds with a summary we update the conversation record and ask Turbo to refresh the view via morphing. In this case this makes sense because this update happens completely asynchronous to any user interaction.
Because we designed the job for resiliency, we can just enqueue it after the reply has been updated - it will only be executed if the conversation has exactly 2 messages:
  class GenerateReplyJob < ApplicationJob
    queue_as :default

    def perform(prompt:)
      client = OpenRouter::Client.new

      response = client.complete([
        {role: "user", content: prompt.body}
      ])

      prompt.reply.update!(
        body: response["choices"].first.dig("message", "content"),
        status: :completed
      )

      Turbo::StreamsChannel.broadcast_update_to prompt.message.conversation, target: "message-form-wrapper", content: ApplicationController.render(partial: "messages/form", locals: {conversation: prompt.message.conversation})

+     SummarizeJob.perform_later(conversation: prompt.message.conversation)
    end
  end
To not lose your scrolling position, don't forget to add the following to your application layout:
  <html>
    <head>
      <title><%= content_for(:title) || "Lurch" %></title>
      <meta name="viewport" content="width=device-width,initial-scale=1">
      <meta name="apple-mobile-web-app-capable" content="yes">
+     <meta name="turbo-refresh-scroll" content="preserve">
      <%= csrf_meta_tags %>
      <%= csp_meta_tag %>

    <!-- ... -->
  </html>
You can see it in action below:
Polishing
The above covers the heart of our project. Let's switch to honing our application and smoothing out some edges.
Lazy Loading
One problem that might bite you pretty quickly is that if you have a lot of conversations and/or messages per conversation, those might delay the rendering of your views substantially.
To demonstrate lazy loading via Turbo Frames, let's examine our message stream once again: It consists of _message partials being rendered individually. We replace their contents with a Turbo frame pointing to the /message/:id route:
+ <%= turbo_frame_tag message,
+                     src: conversation_message_path(message.conversation, message),
+                     loading: :lazy %>

- <div id="<%= dom_id message %>">
-   <%= render "messages/messagable/#{message.messagable_name}", message: message %>
- </div>
This will lead to each message being loaded separately, and lazily. Of course, we now have to adapt the respective app/views/messages/show.html.erb:
<%= turbo_frame_tag @message do %>
  <%= render "messages/messagable/#{@message.messagable_name}", message: @message %>
<% end %>
Note that we were able to drop the wrapping <div> because the DOM id is now being provided by the turbo_frame_tag.
View Transitions
To finish this deep dive into Turbo, let's sugar coat our user interface a bit. To do this, we are going to employ Turbo's view transition capabilities. Specifically, we will add nice slide in/out animations to the messages in a conversation.
To start off, we have to activate this behavior by adding the appropriate meta tag to our application layout:
<meta name="view-transition" content="same-origin" />
There are great tutorials about browser view transitions in general, so I will not go into depth here. However, one notable concept is that of view-transition-name: In a nutshell, it is a token that represents a view transition that's separate from the root view transition of the page.
That's why we can define two separate view transitions for prompts and replies:
  <!-- app/views/messages/messagable/_prompt.html.erb -->
- <div class="row mb-4" id="<%= dom_id(message.messagable) %>">
+ <div class="row mb-4" id="<%= dom_id(message.messagable) %>" style="view-transition-name: prompt;">


  <!-- app/views/messages/messagable/_reply.html.erb -->
- <div class="row mb-4" id="<%= dom_id(message.messagable) %>">
+ <div class="row mb-4" id="<%= dom_id(message.messagable) %>" style="view-transition-name: reply;">
Now, in the application's main stylesheets, let's add animations for sliding and simultaneously fading out prompts and replies:
// app/images/the-ultimate-guide-to-implementing-hotwired-and-turbo-in-a-rails-application/stylesheets/application.bootstrap.scss

// ...

@keyframes fade-out-to-left {
  0% {
    opacity: 1;
    transform: translateZ(0)
  }

  100% {
    opacity: 0;
    transform: translate3d(-4rem, 0, 0)
  }
}

@keyframes fade-in-from-left {
  0% {
    opacity: 0;
    transform: translate3d(-4rem, 0, 0)
  }

  100% {
    opacity: 1;
    transform: translateZ(0)
  }
}

@keyframes fade-out-to-right {
  0% {
    opacity: 1;
    transform: translateZ(0)
  }

  100% {
    opacity: 0;
    transform: translate3d(4rem, 0, 0)
  }
}

@keyframes fade-in-from-right {
  0% {
    opacity: 0;
    transform: translate3d(4rem, 0, 0)
  }

  100% {
    opacity: 1;
    transform: translateZ(0)
  }
}

html[data-turbo-visit-direction="forward"]::view-transition-old(prompt) {
  animation: fade-out-to-right 1s ease-out forwards;
}

html[data-turbo-visit-direction="forward"]::view-transition-new(prompt) {
  animation: fade-in-from-right 1s ease-out forwards;
}

html[data-turbo-visit-direction="forward"]::view-transition-old(reply) {
  animation: fade-out-to-left 1s ease-out forwards;
}

html[data-turbo-visit-direction="forward"]::view-transition-new(reply) {
  animation: fade-in-from-left 1s ease-out forwards;
}
The listing above applies four different animations, two for prompts, and two for replies. The view-transition-old and view-transition-new keywords refer to snapshots of the old and new contents of the page (i.e., before and after the transition).
So the style definitions above result in:
- old prompt messages fading out and sliding out to the right
- new prompt messages fading in and sliding in from the right
- old reply messages fading out and sliding out to the left
- new reply messages fading in and sliding in from the left
The result, though, looks a bit broken:
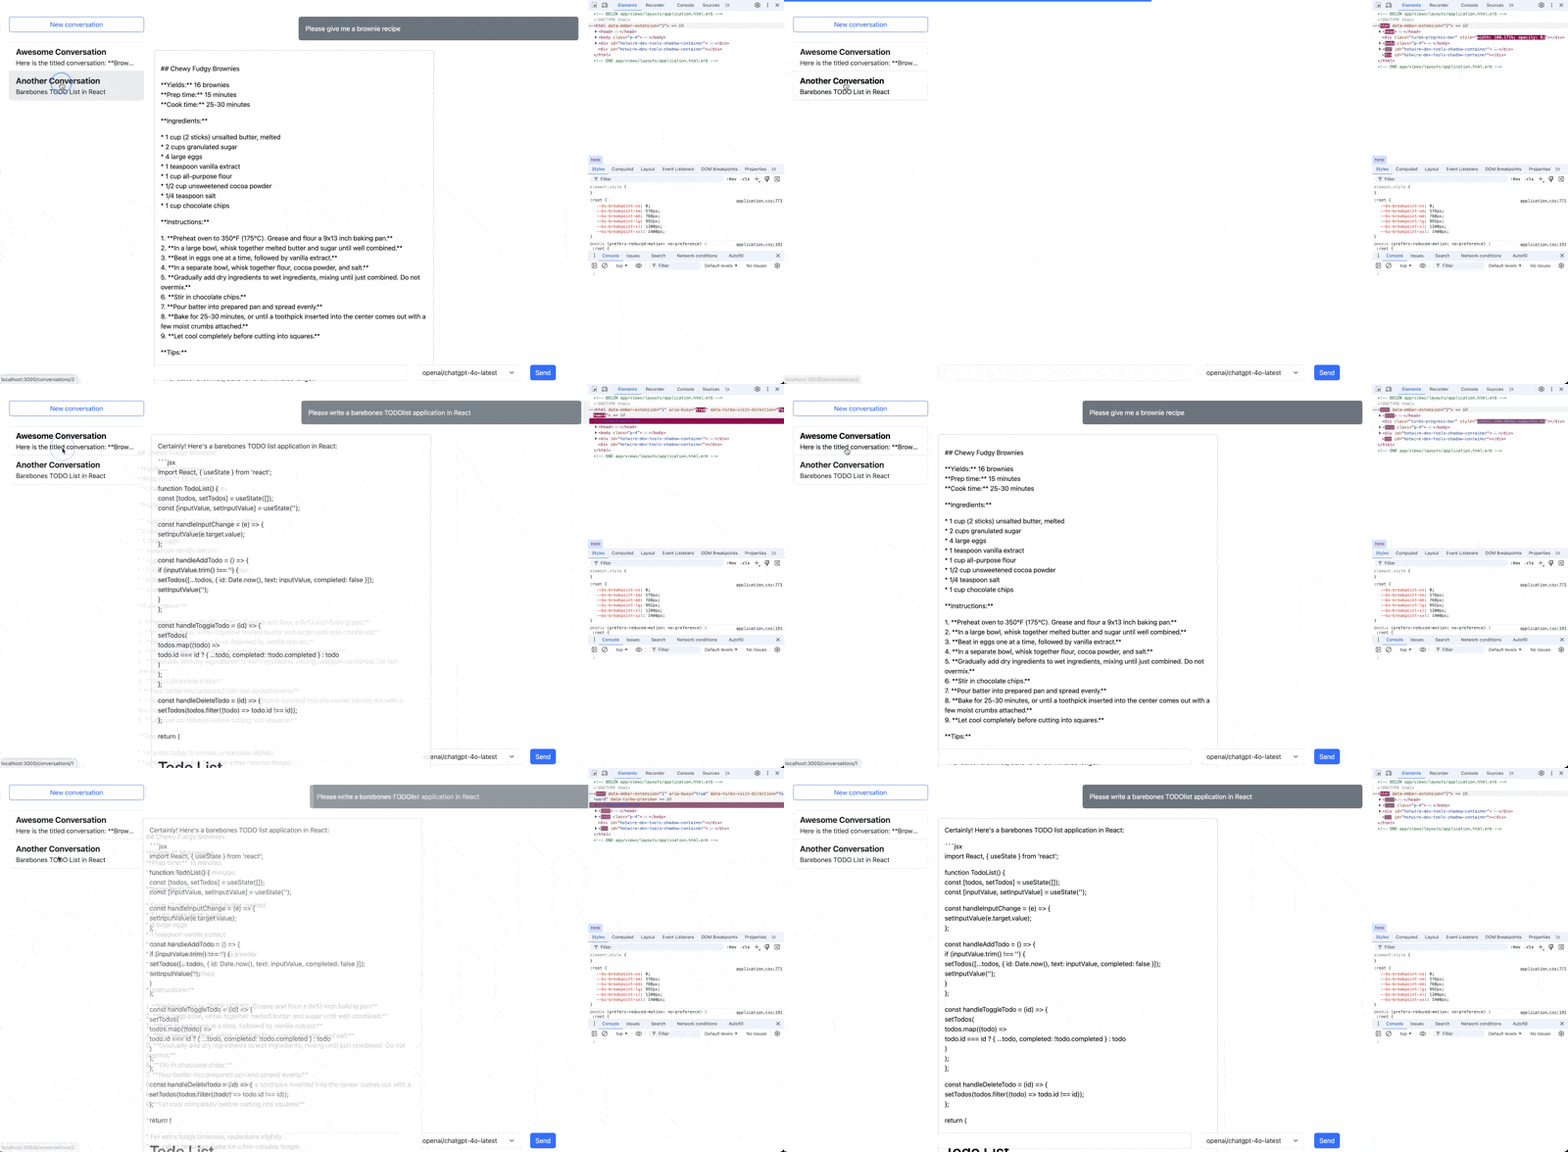
As you can see, between the page visits there's an ugly flash of unrendered content. We'll have to do a bit of sleuthing to get behind this glitch. What we are witnessing is one of the downsides of lazy loading: Turbo Drive is loading a preview from the cache but that preview is then replaced by the actual page, which in its initial state contains only empty Turbo Frames.
Resolving Turbo Drive Caching Quirks
To resolve this, first we add placeholders to the lazy loaded Turbo Frames definition:
- <%= turbo_frame_tag message, src: conversation_message_path(message.conversation, message), loading: :lazy %>
+ <%= turbo_frame_tag message, src: conversation_message_path(message.conversation, message), loading: :lazy do %>
+   <%= render "messages/messagable/#{message.messagable_name}" %>
+ <% end %>
This helps with the UX in general, as these placeholders will now also be displayed on initial page load. It doesn't solve the issue completely though, because Turbo will still display a preview from its cache, resulting in some layout shift:
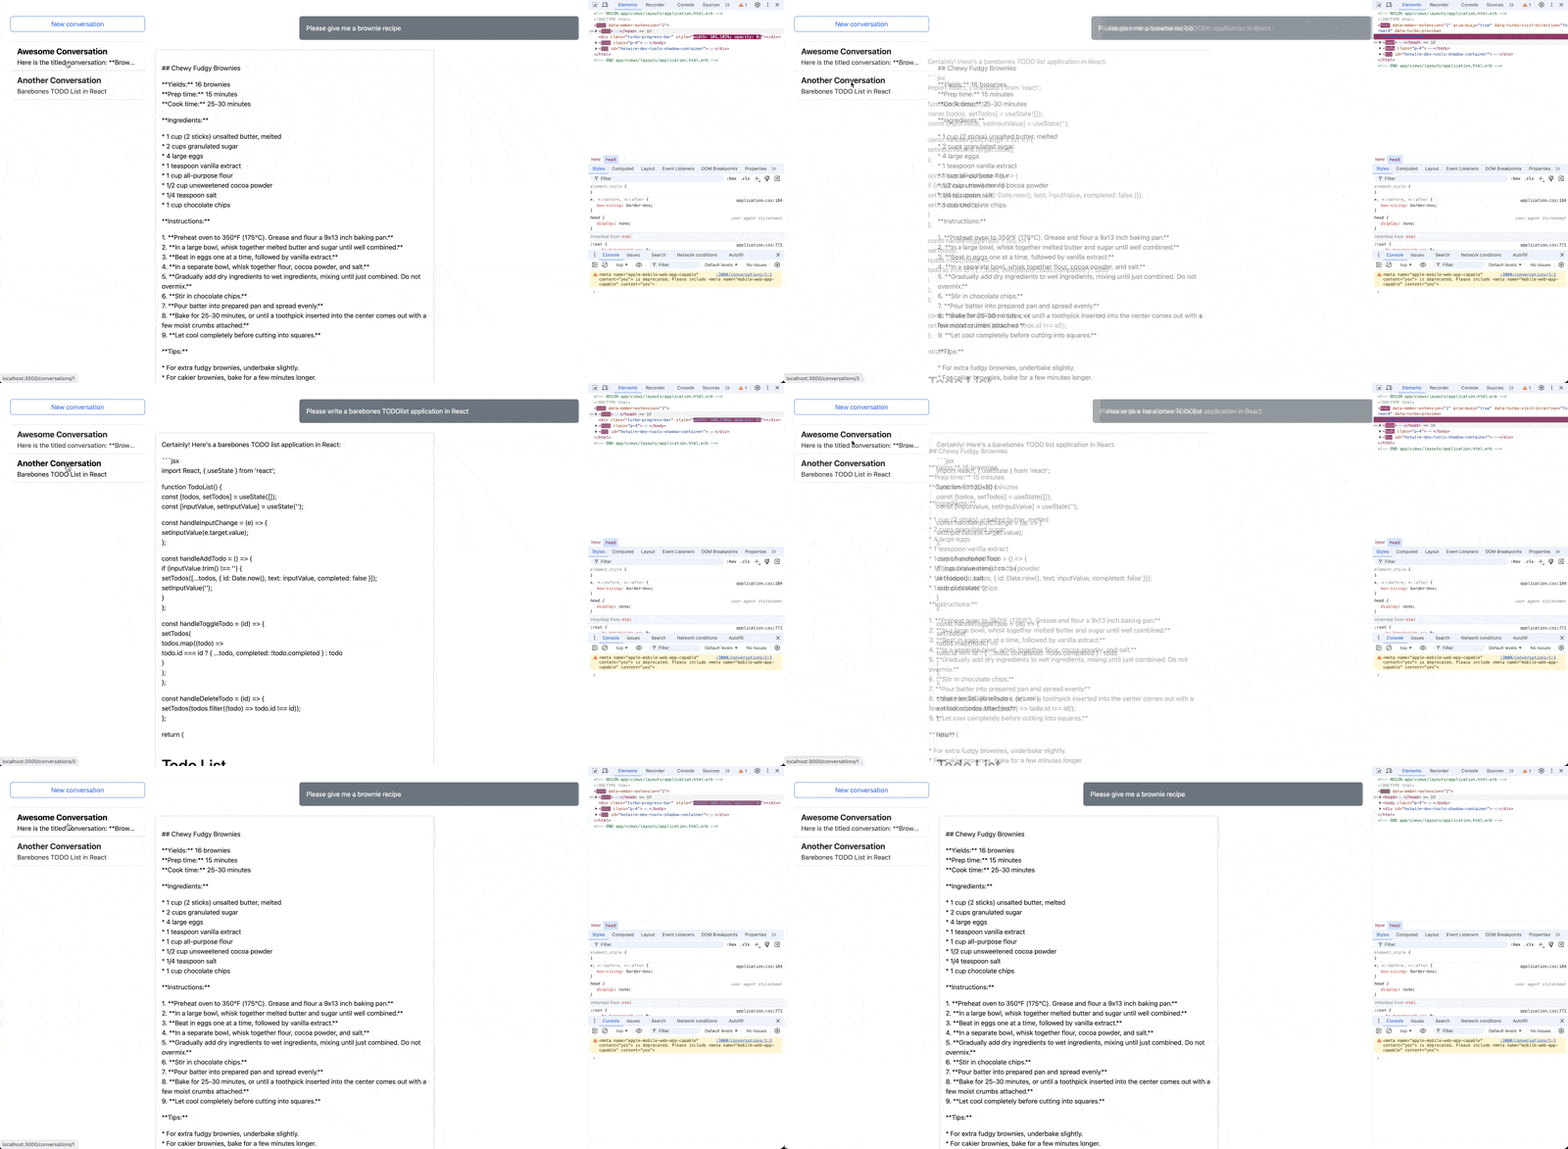
It would be preferable if this preview was also showing the placeholders, but we have to prepare that manually. Typically, you would use a Stimulus controller to handle this and neatly modularize it, but for our demonstration here we'll just add an event handler to our global app/javascript/application.js:
document.addEventListener("turbo:before-cache", (event) => {
  document
    .querySelectorAll("turbo-frame[loading=lazy] .card-body")
    .forEach((body) => {
      body.innerHTML = "Loading...";
    });
});
This looks for all card bodies inside of lazy loaded frames on our page and replaces their contents with the string "Loading...". Essentially, we're preparing a blank slate to be stored as a preview in Turbo Drive's cache. Now, at least, the placeholders are shown directly and the page isn't affected by UI flicker when navigating from one conversation to the other:
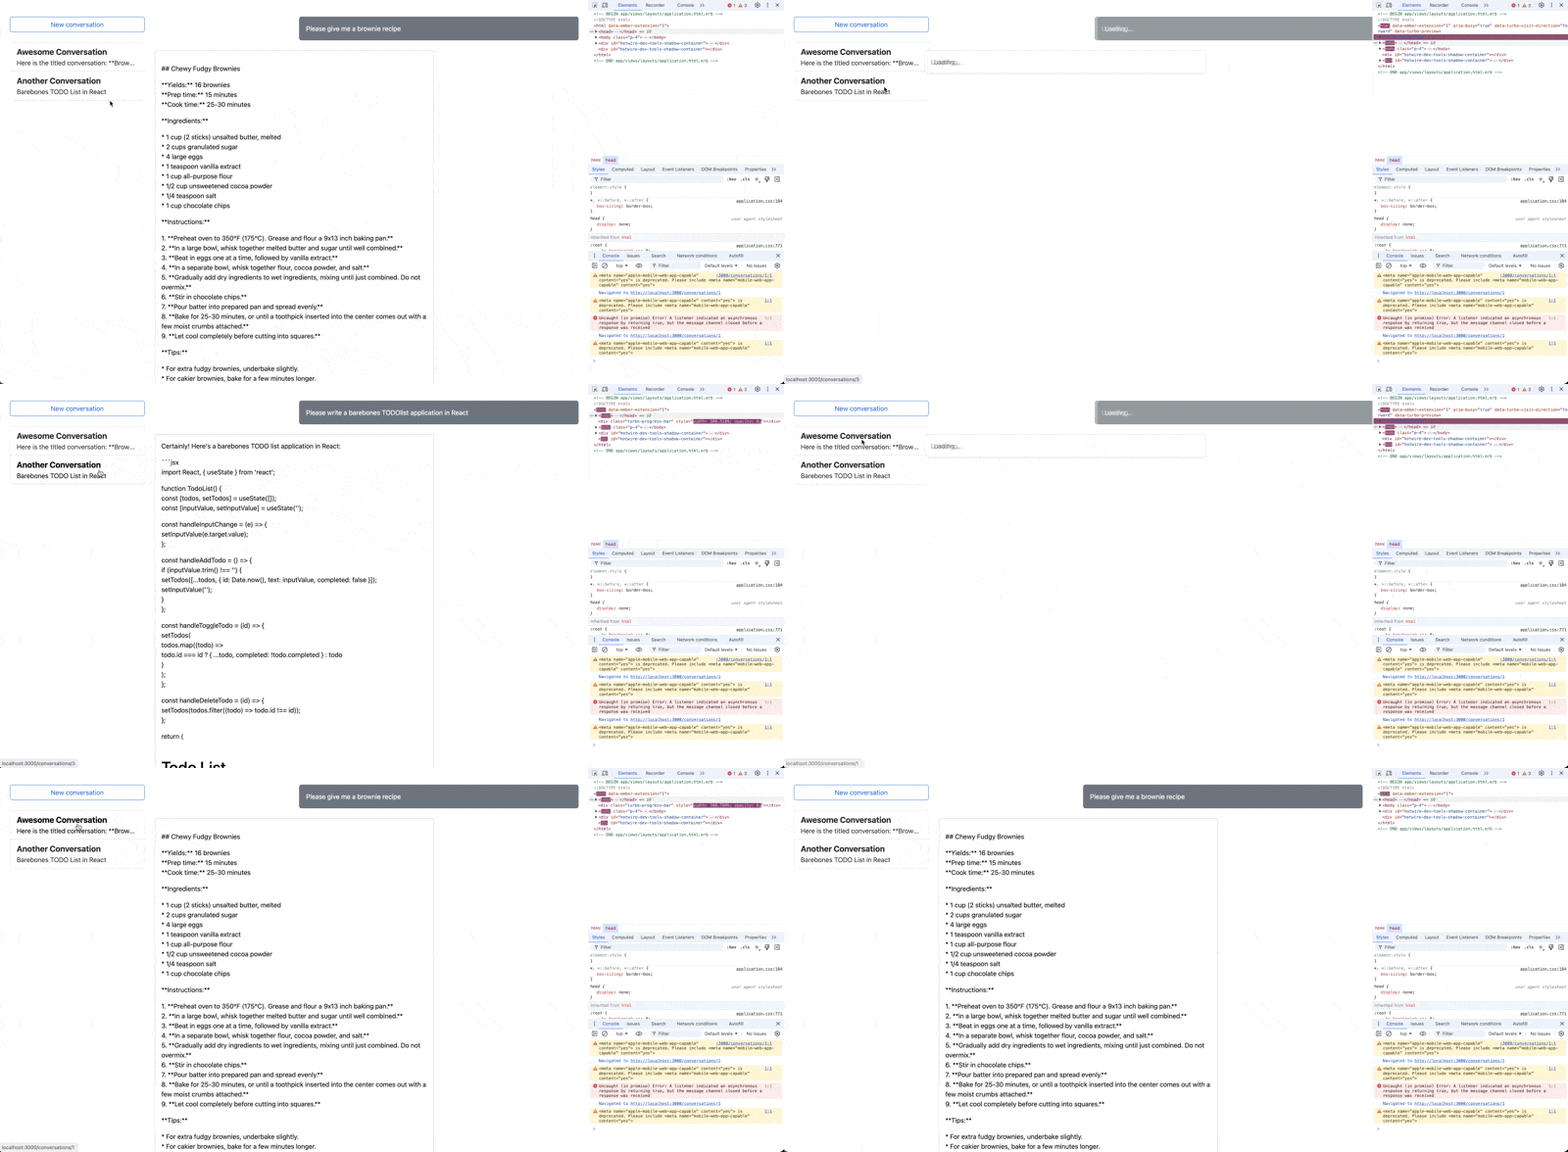
Granted, this won't win a design award either, but it summarizes the types of pitfalls and cross connections you will run into when pulling out all of Turbo's stops at once.
Conclusion
This comprehensive guide has explored the intricacies of implementing Hotwire and Turbo in a Rails application. We've covered a wide range of topics, from the basics of Turbo Drive to advanced techniques like morphing and lazy loading. Through our example chat application which exhibits a mixture of patterns that is not uncommon for Turbo-driven apps, we've demonstrated how these technologies can be used to create dynamic, responsive user interfaces without the need for complex JavaScript frameworks.
Key takeaways include:
- Turbo Drive's ability to accelerate page loads and form submissions by updating only changed parts of a page.
- The power of Turbo Frames in decomposing the DOM into manageable, independently updatable pieces.
- Turbo Streams' capability to perform server-initiated DOM manipulations, enabling real-time updates.
- The potential of Turbo morphing to provide a more fluid user experience by preserving page state during updates.
- Techniques for optimizing performance through lazy loading and view transitions.
We've also highlighted some challenges and potential pitfalls, such as handling form submissions in modals and managing caching behavior with lazy-loaded content.
While Hotwire and Turbo offer powerful tools for building modern web applications, they're not a one-size-fits-all solution. They excel in applications with server-rendered HTML and moderate interactivity, but may not be the best choice for highly interactive, state-heavy applications.
As with any technology, the key is to understand its strengths and limitations, and to use it judiciously. By mastering Hotwire and Turbo, Rails developers can create fast, responsive applications that provide a great user experience while maintaining the simplicity and convention-over-configuration philosophy that makes Rails so powerful.
