
Today we are going to show you how to deploy to Vultr using Registered Servers feature.
We take you by the hand to deploy a Docker , Rails or Node project under 5 minutes including load balancing, Let's Encrypt SSL and all the cool feature we support.
As you might know, we integrate with all the major cloud providers and we love it. A lot of our customers, due to legislation or other legal issues, need to deploy their applications on servers which are running physically in their own country and also owned and operated by local companies or just want to cut costs.
With Registered Servers we make this happen and your get more freedom which cloud provider to choice from.
What? Registered Servers?
Registered Servers are essentially a pool of your own servers on a private or public cloud that can be used for any stack and configuration. Stacks can be deployed across a hybrid of cloud and registered servers, in this way you could have a dedicated server for your database and burst cloud servers for your front end.
Vultr?
Vultr is a simple, scalable, high-performance SSD cloud platform.
Great. Let's see how to get this thing going using Vultr .
Let do this!
Prerequisite
- Cloud 66 account - signup here for a two-week free trial account.
- Vultr account - signup here and get a server for $2.50/month billed by the hour.
We are going to deploy a Docker Project with one load balancer, a two server docker cluster and a separated DB server. We need to provision 4 servers for this example.
NOTE: The following steps can also be used to deploy a Rails or Node project.
Provision the servers
It's time to provision some servers with Vultr. A good thing is that you can provision servers on all datacenters globally and Cloud 66 will make sure the intra-container communication, using a feature called ContainerNet, between servers/across datacenter is handled securely.
ContainerNet is a private and secure network between all containers across all the servers and components in your stack, including databases. This network provides an internal IP address to each container, automatically updating with DHCP and DNS and is fully integrated with the life-cycle management of your services.
Provision the loadbalancer
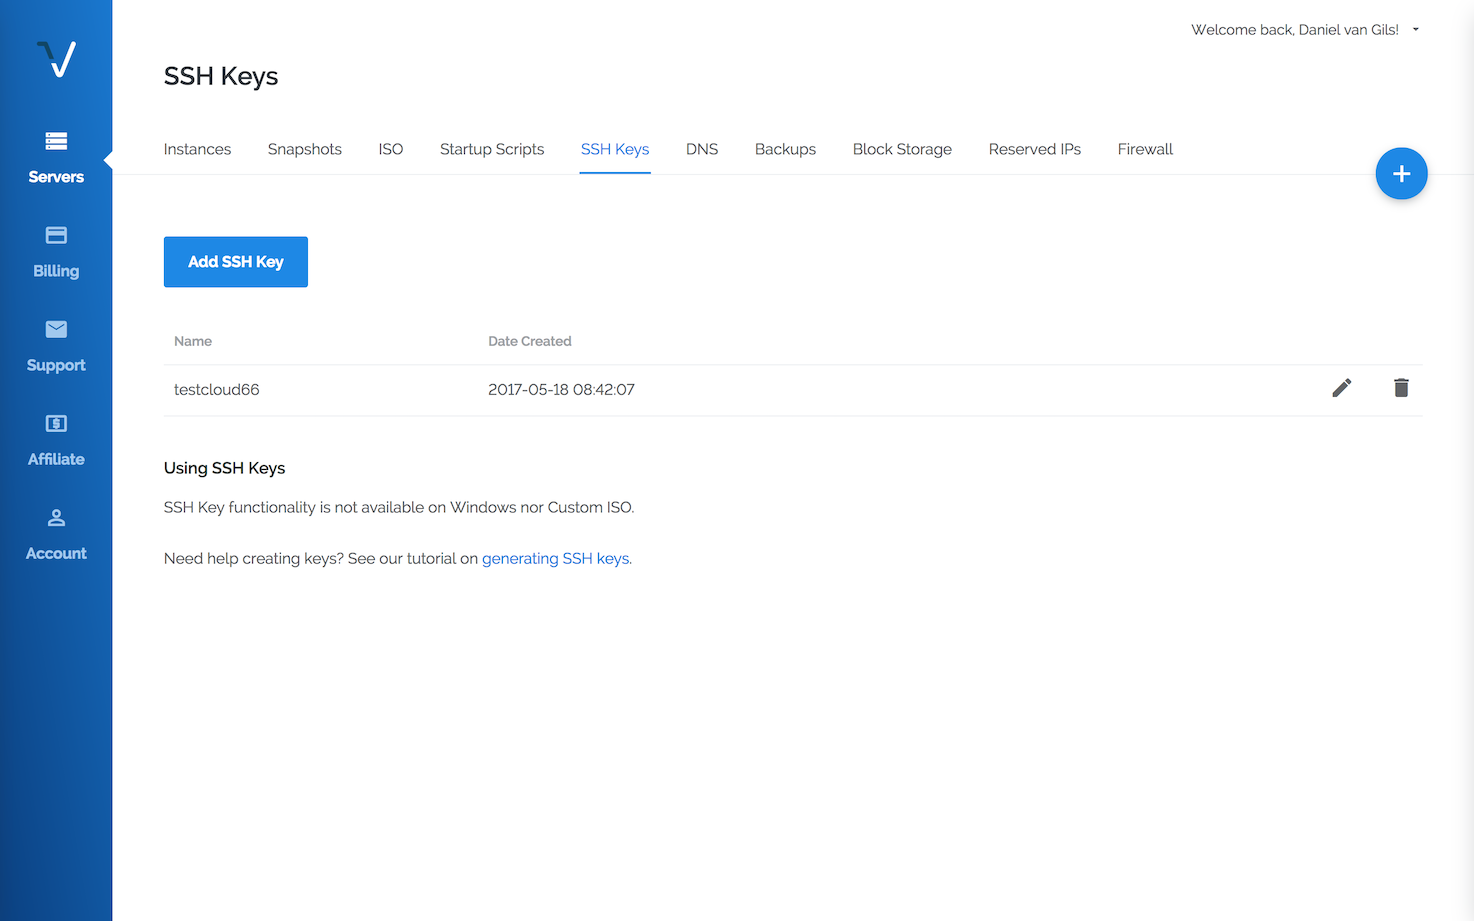
Before you provision any instance, make sure you added you SSH key. This is needed to give initial access to you server using SSH. After the initial setup, Cloud 66 will generate a new one as soon as you bring the server over.
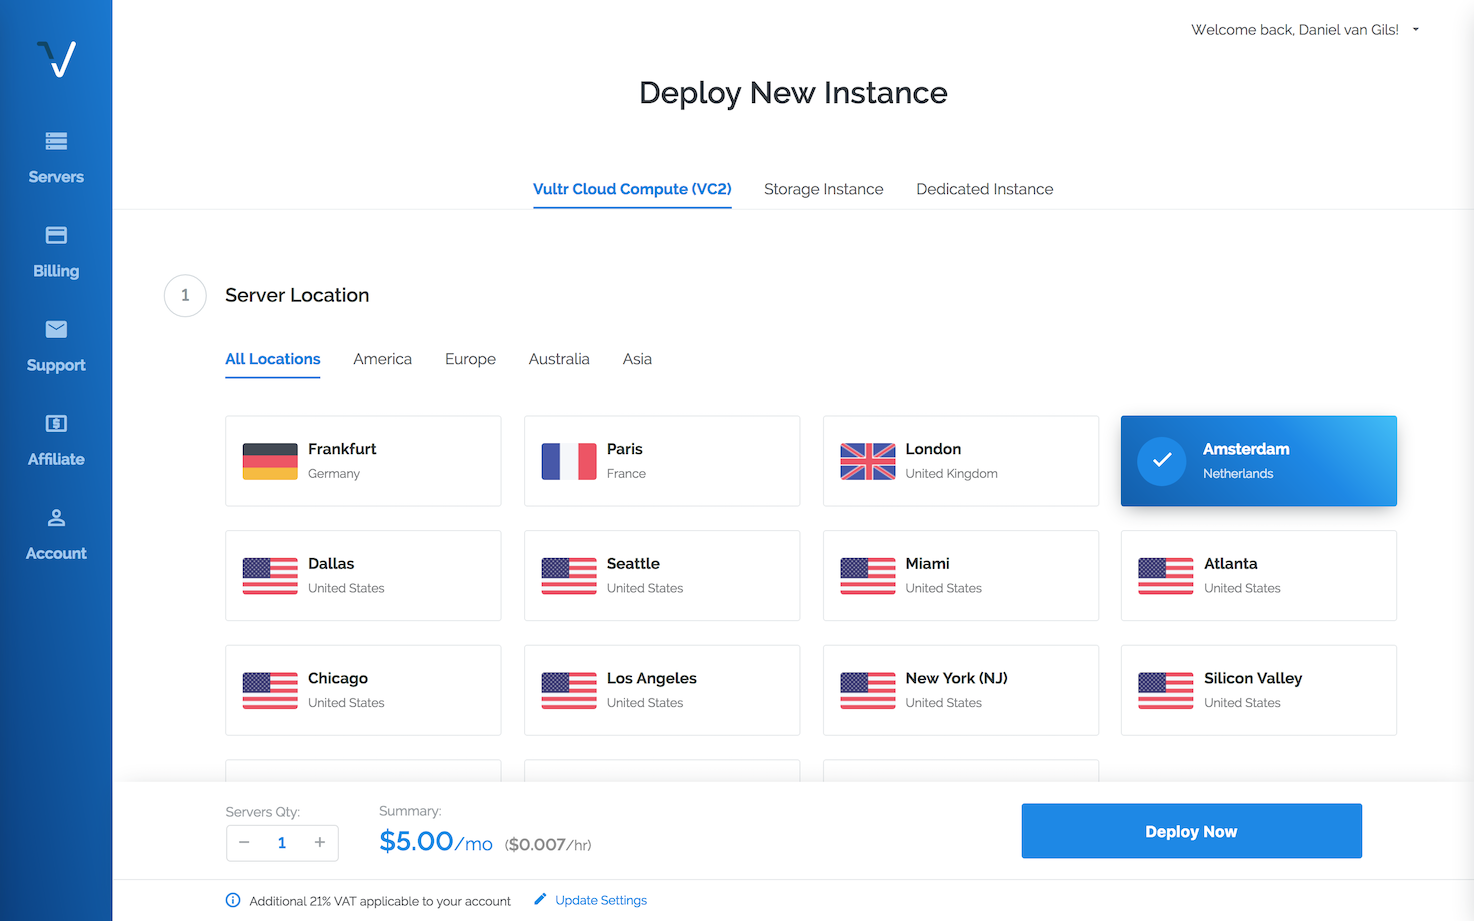
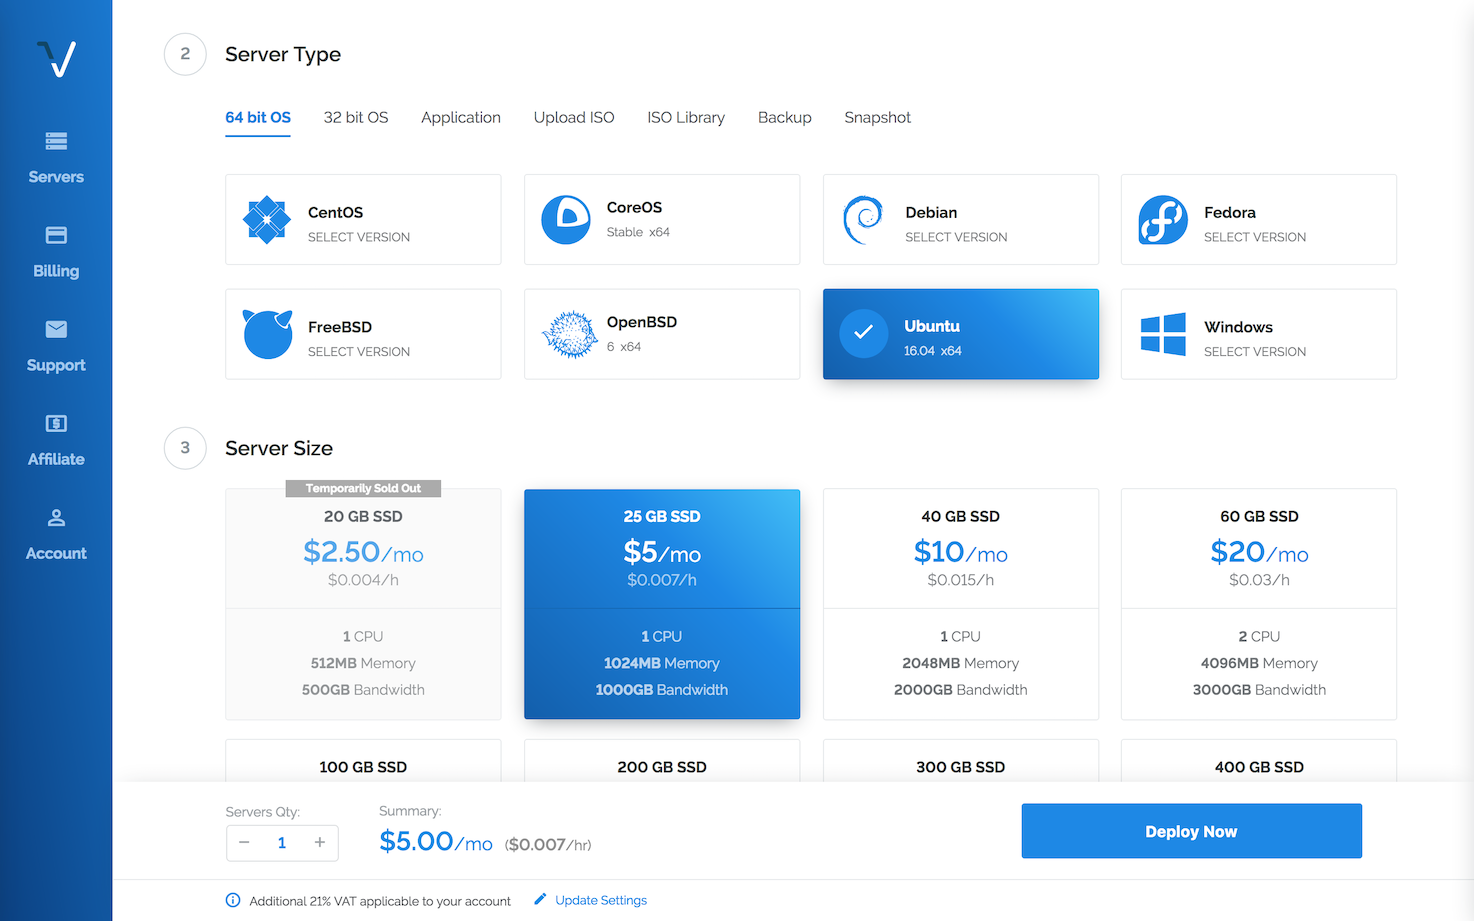
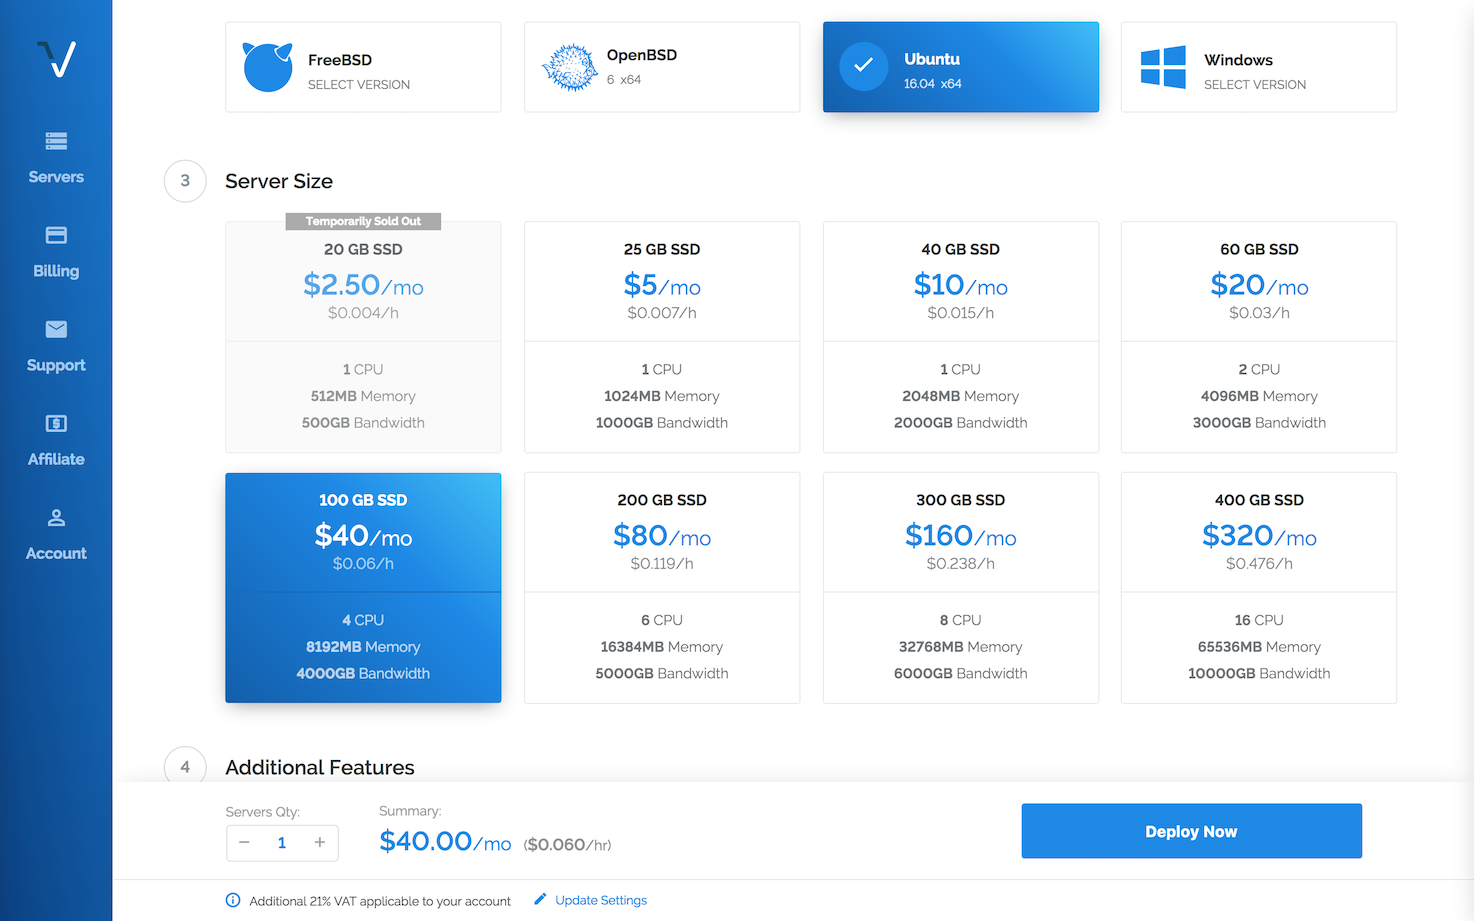
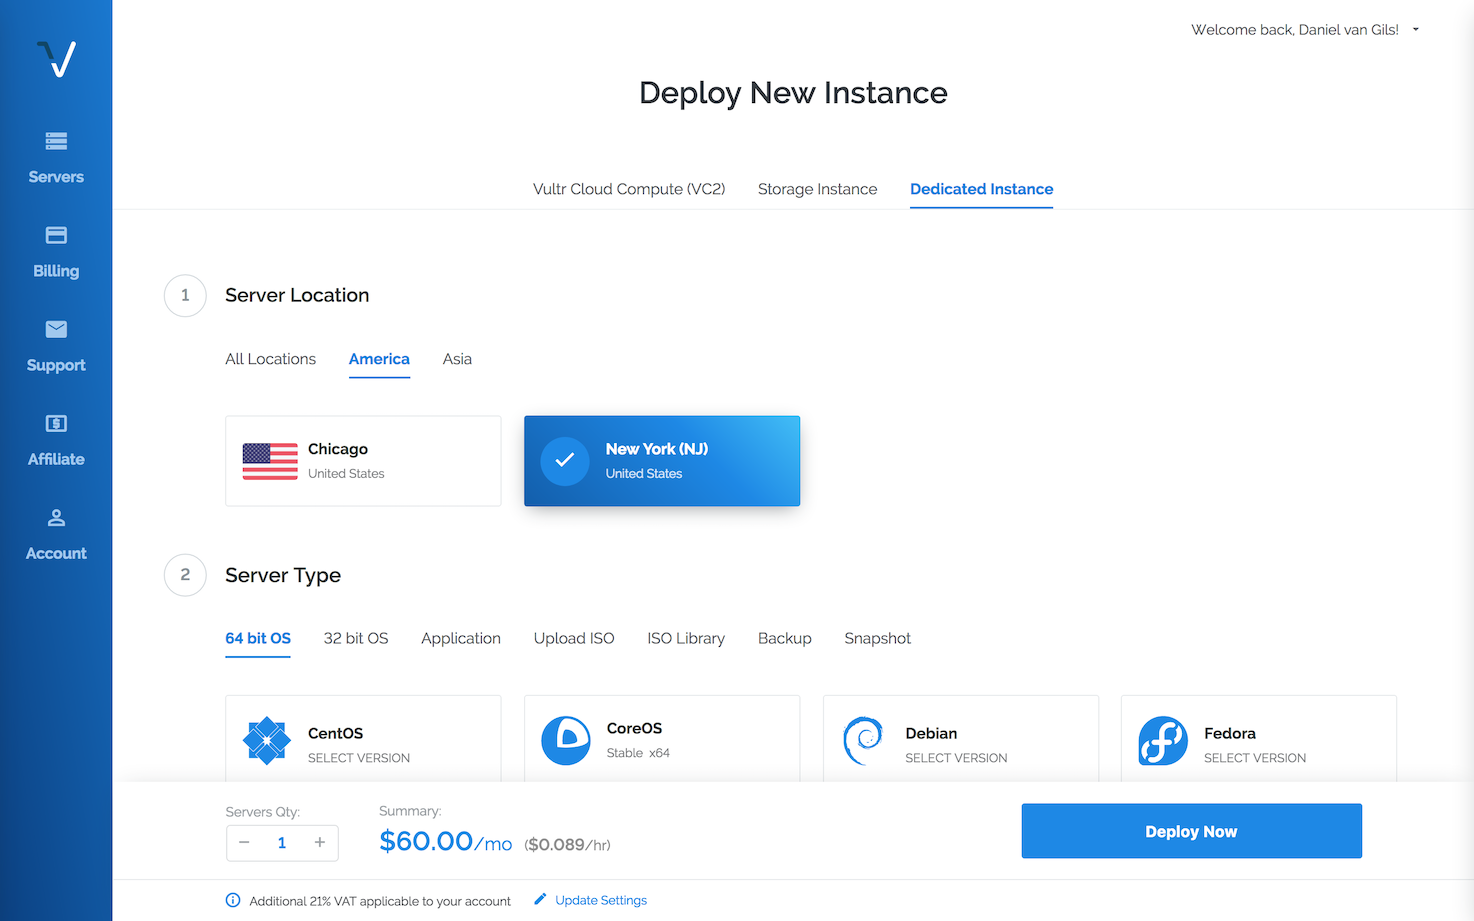
Create a new Instance for the load balancer. Loadbalancers don't require much power, memory and storage. Choose a name (cloud66loadbalancer for example) and make sure your choose Ubuntu Xenial 16.04(LTS) image. (we only support Ubuntu 16.04). Choice the option (2 CPU / 1 GB memory / 20GB disk).
Make sure you select your SSH key for access, and name the new instance.
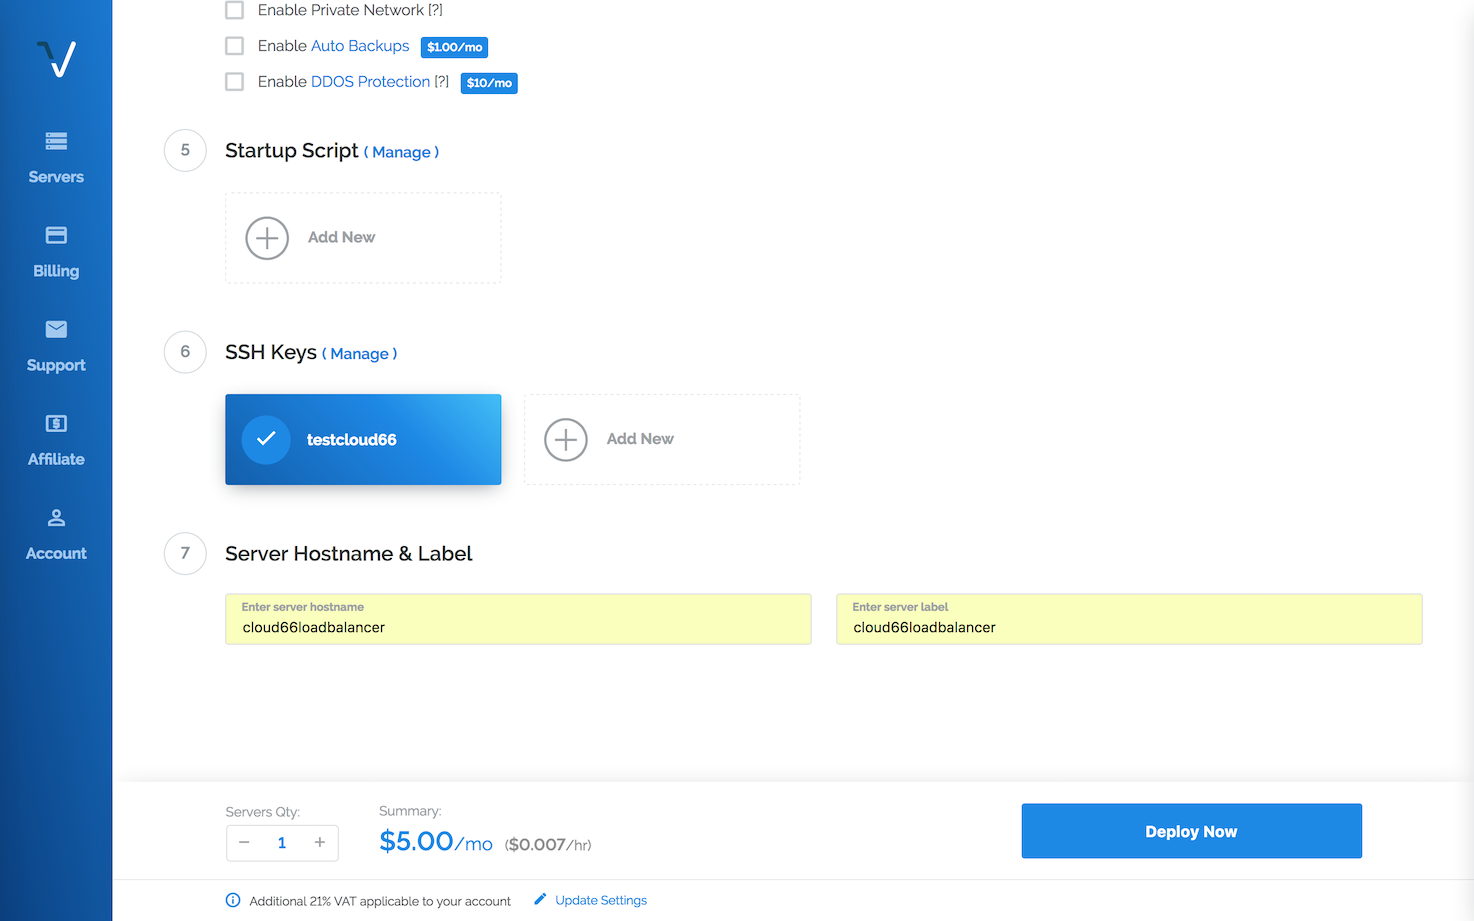
When you hit Deploy Now server and your new server will be created. Simple and elegant.

When Cloud 66 is deploying to your servers, a firewall will be installed and also SSH access only works with public/private key access and is closed by default to the outside world.
Provision the Docker nodes
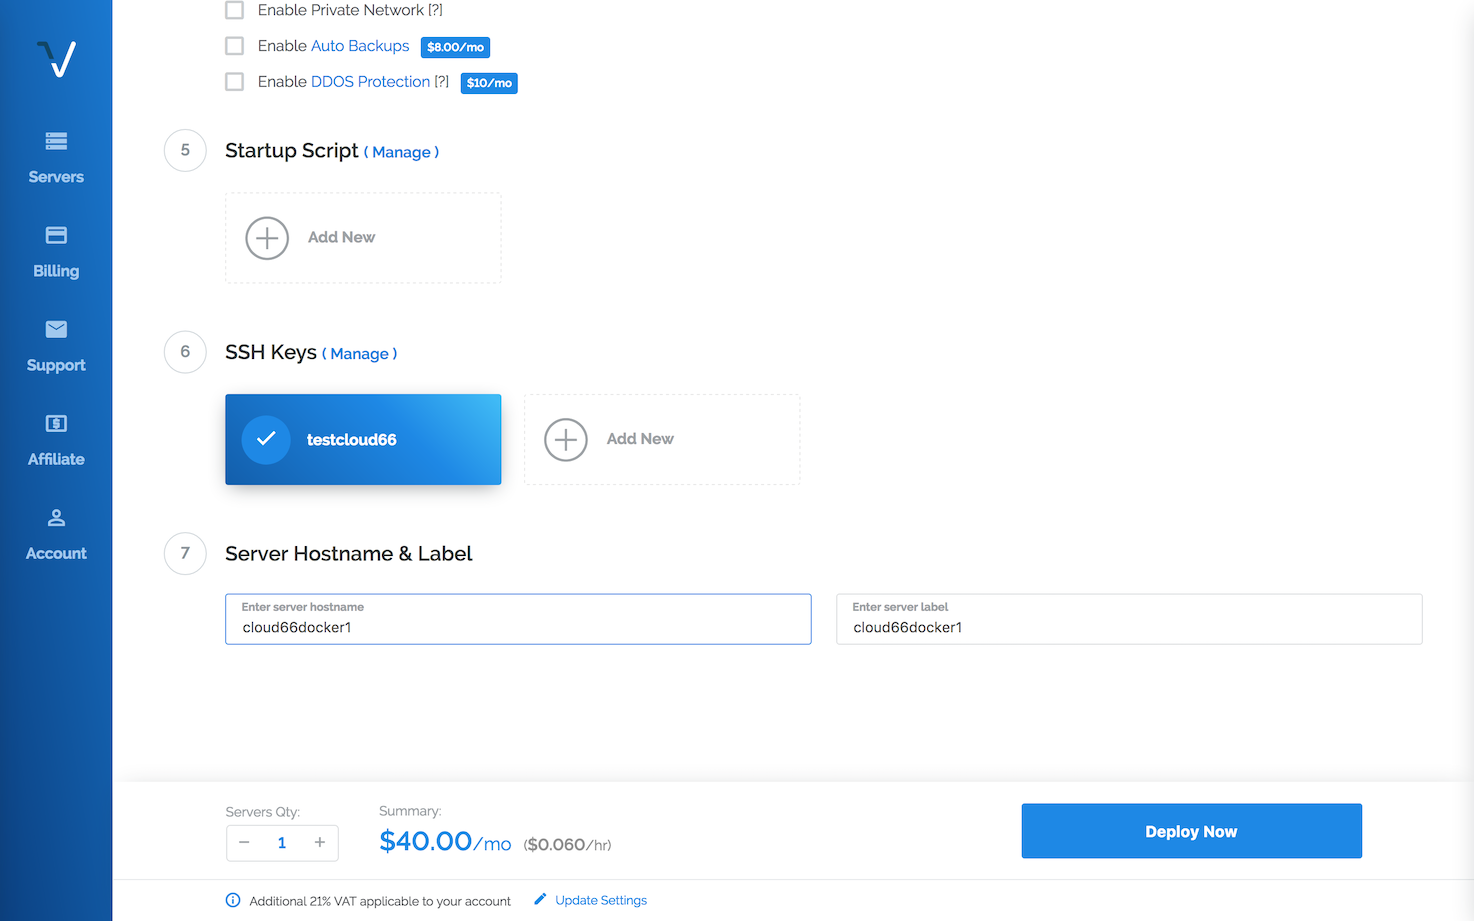
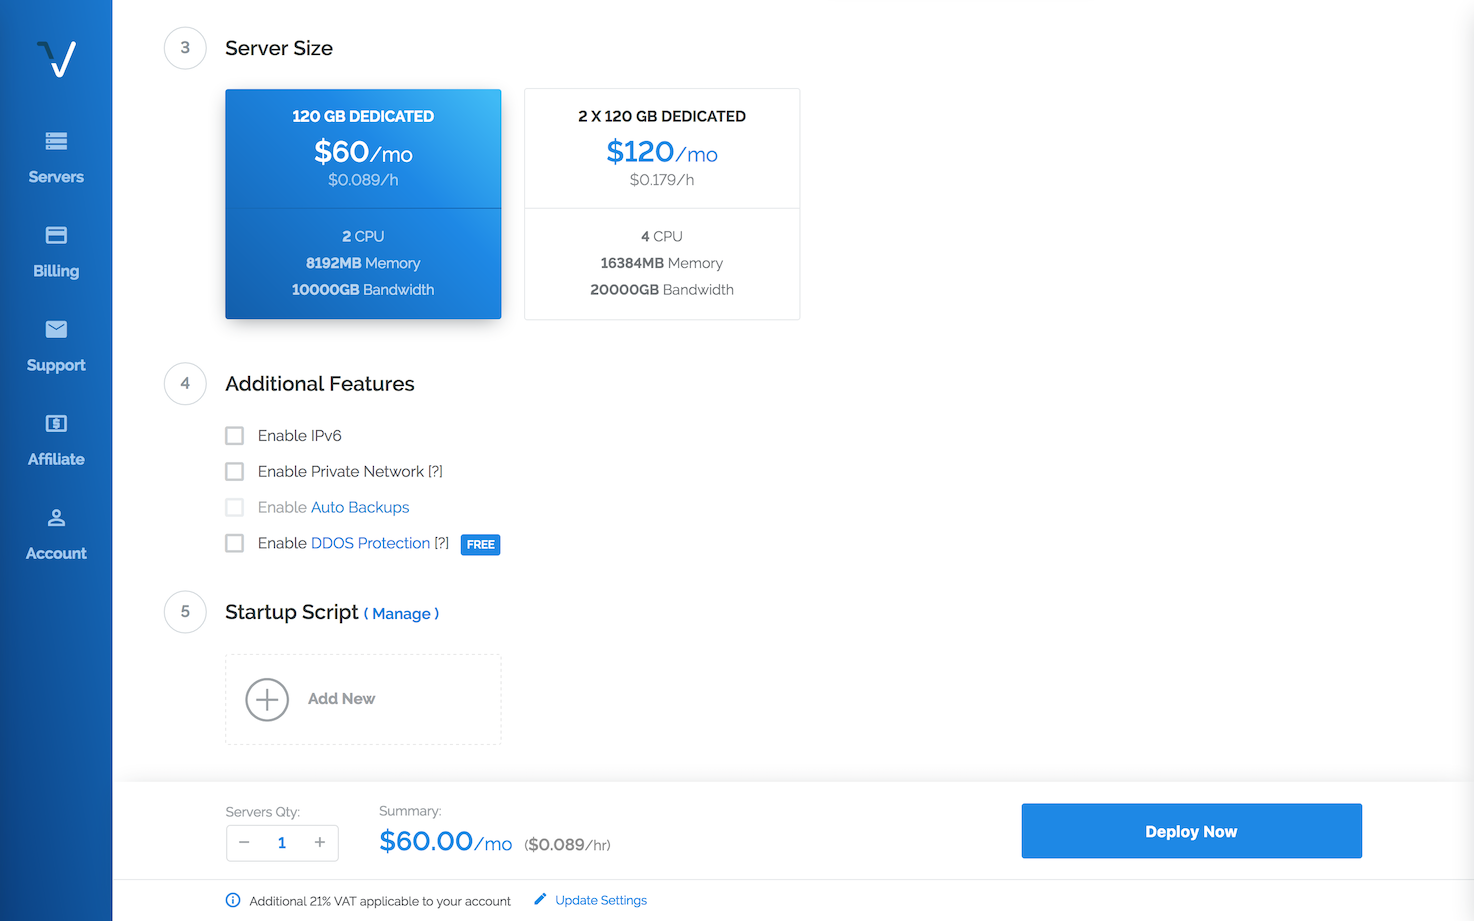
Create the other three servers too. Choose a server which much more muscle to run your Docker services. A (4 cores and 8GB memory) is just fine to start. Of course, it all depends on your workload.
Don't forget to give it a hostname.
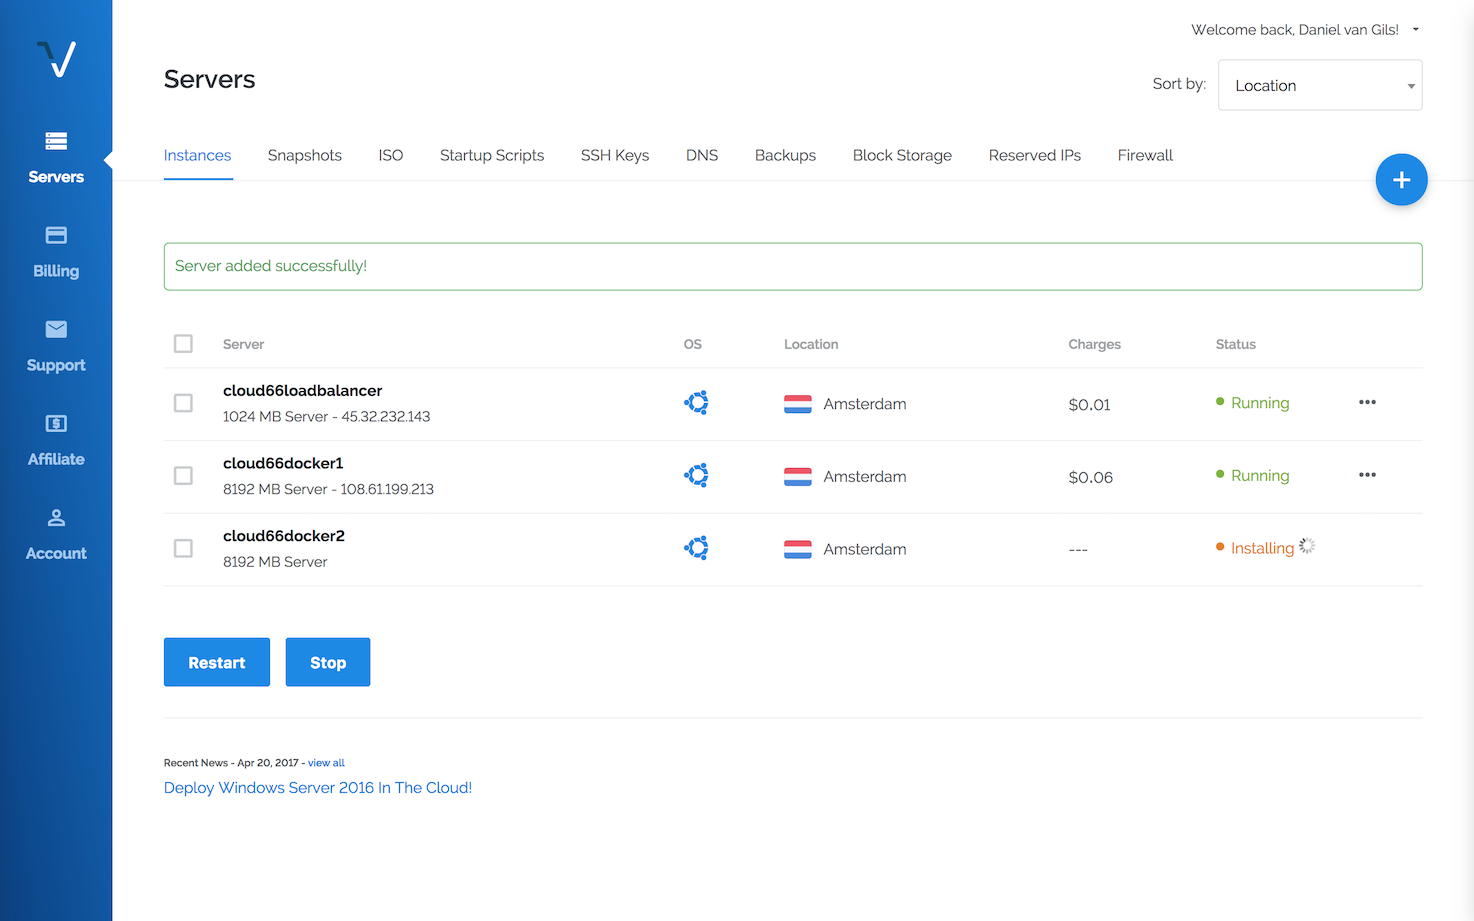
And in under 30 seconds, we have three servers running to get managed by Cloud 66.
Provision the Database node
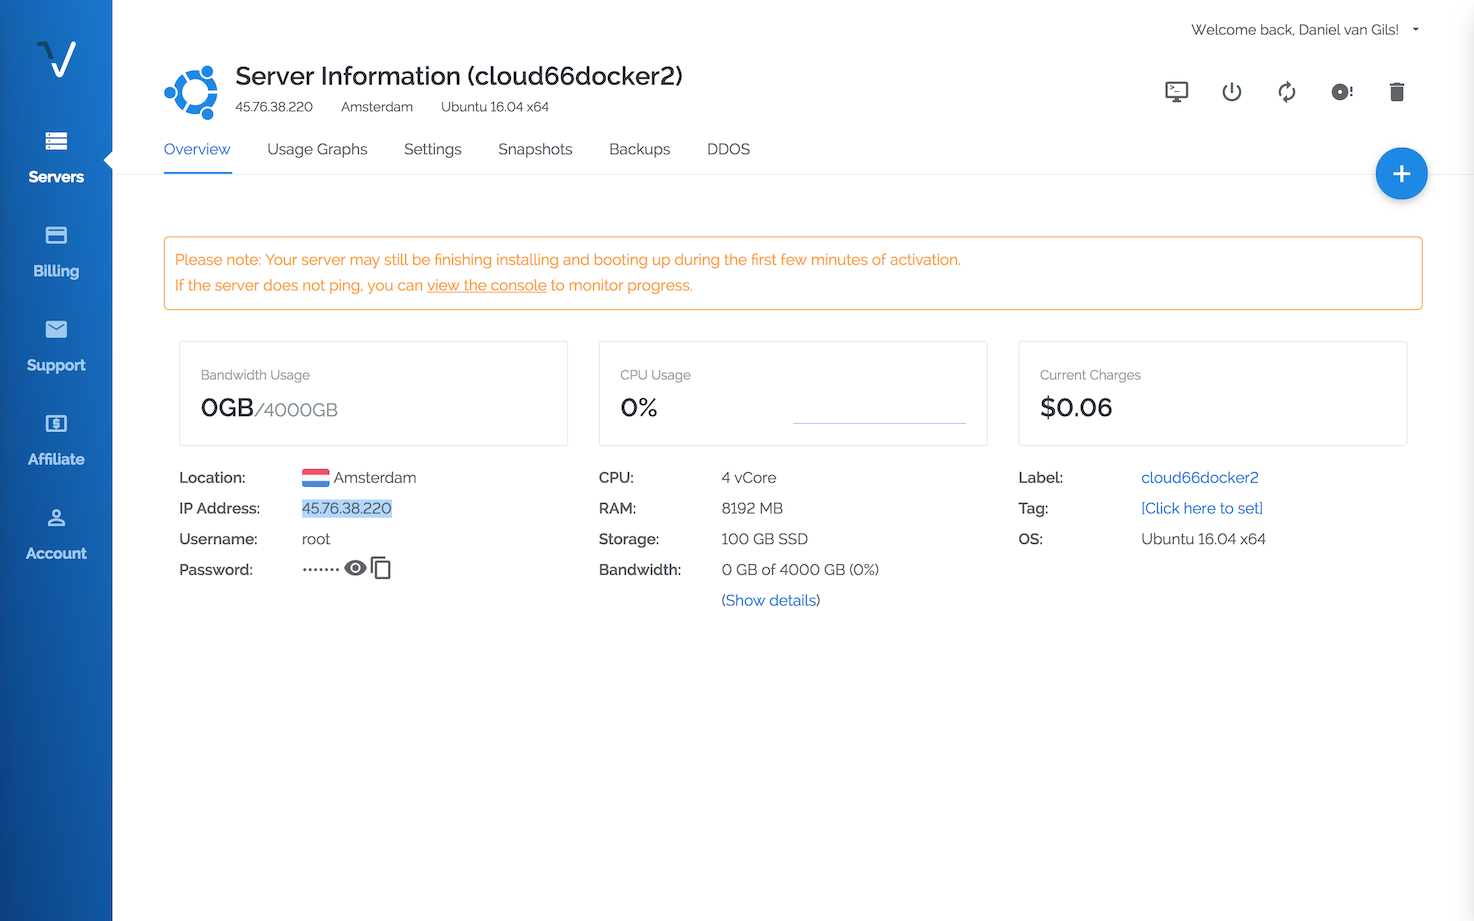
After creating the Docker nodes. Create a server for our database. Vultr also supports dedicated hosts (no VM). A bare-metal (2 cores and 8GB memory) is a great box to run a DB (we provisioning DB natively and using all the resources it provides). We want blazing fast disk performance, we choice a 120GB SSD.
Bring them to Cloud 66
Great! In a couple of minutes, we are ready to build, deploy and manage your application on those servers. Let's bring them over.
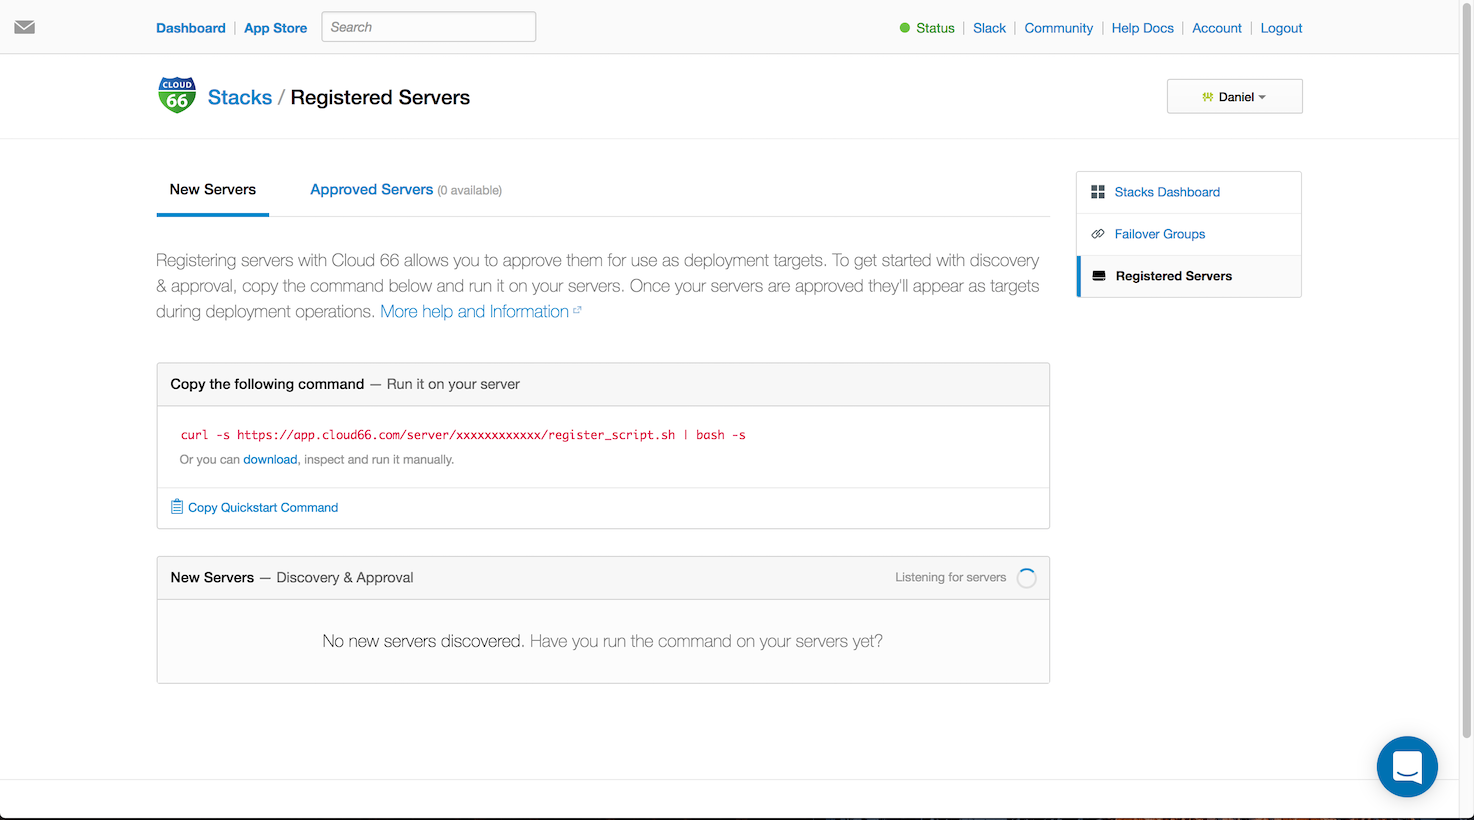
Now it's time to log into your Cloud 66 account. Before we create any project, make sure we put our Vultr servers into our inventory. Go to the Register Server panel and you find a command to run on each server to bring them on board.
SSH to each server and make sure you add your private key to the ssh chain. ssh-add private_key
~$ ssh root@xxx.xxx.xxx.xxx
Register the server
Run the Cloud 66 register server command (of course change the xxx to the value you found in your register server panel)root@cloud66dockernode2:~# curl -s https://app.cloud66.com/server/xxx/register_script.sh | bash -s
When the command is executed, you see the following message.

Approve the servers
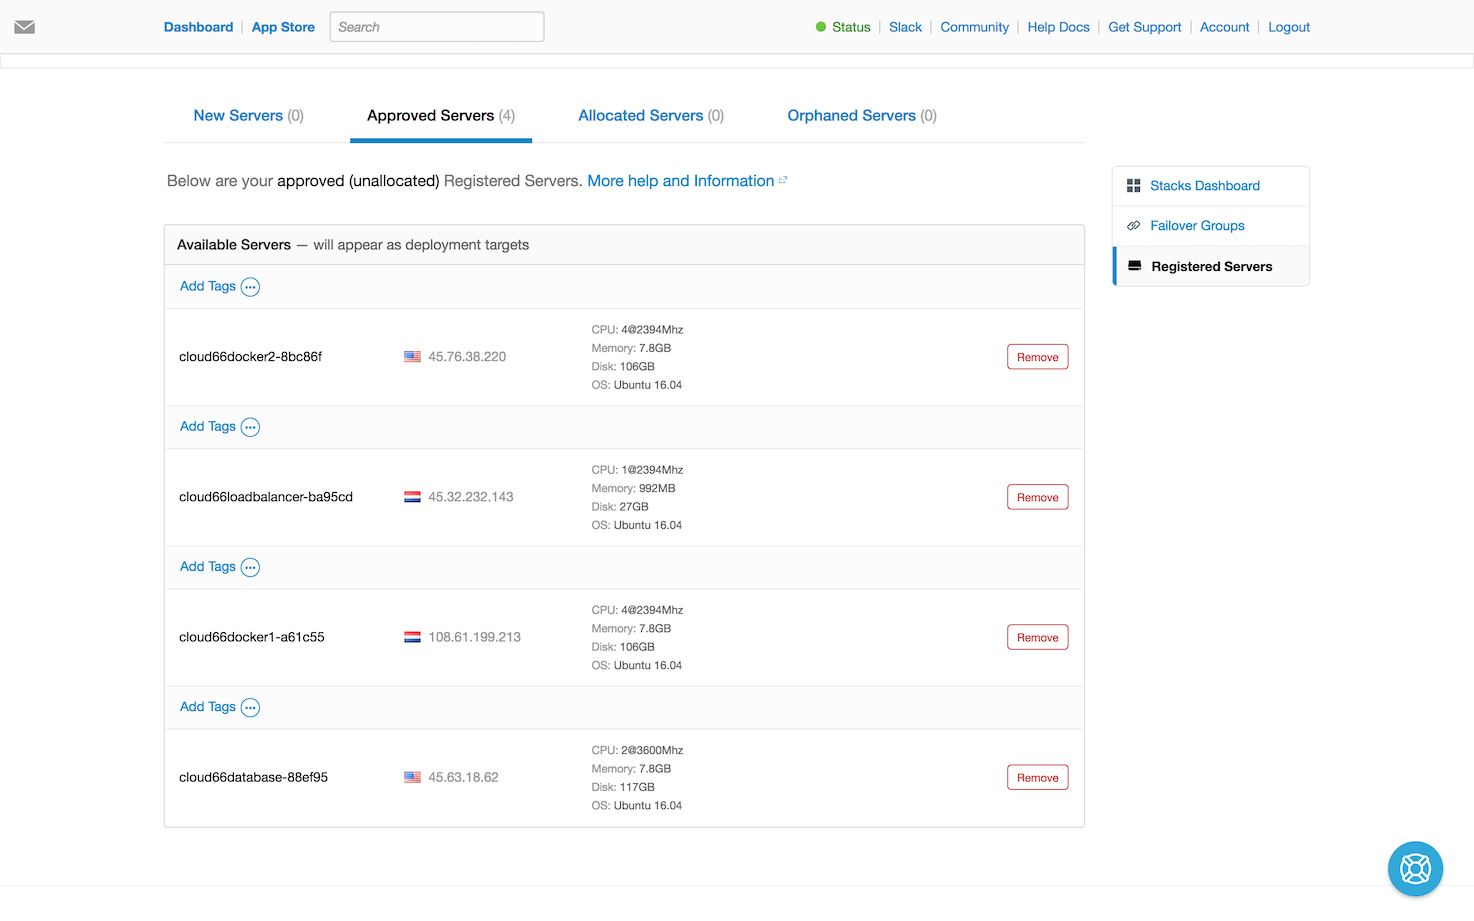
Your servers will show up automagically in the Cloud 66 UI. Approve them to add them to the server inventory.
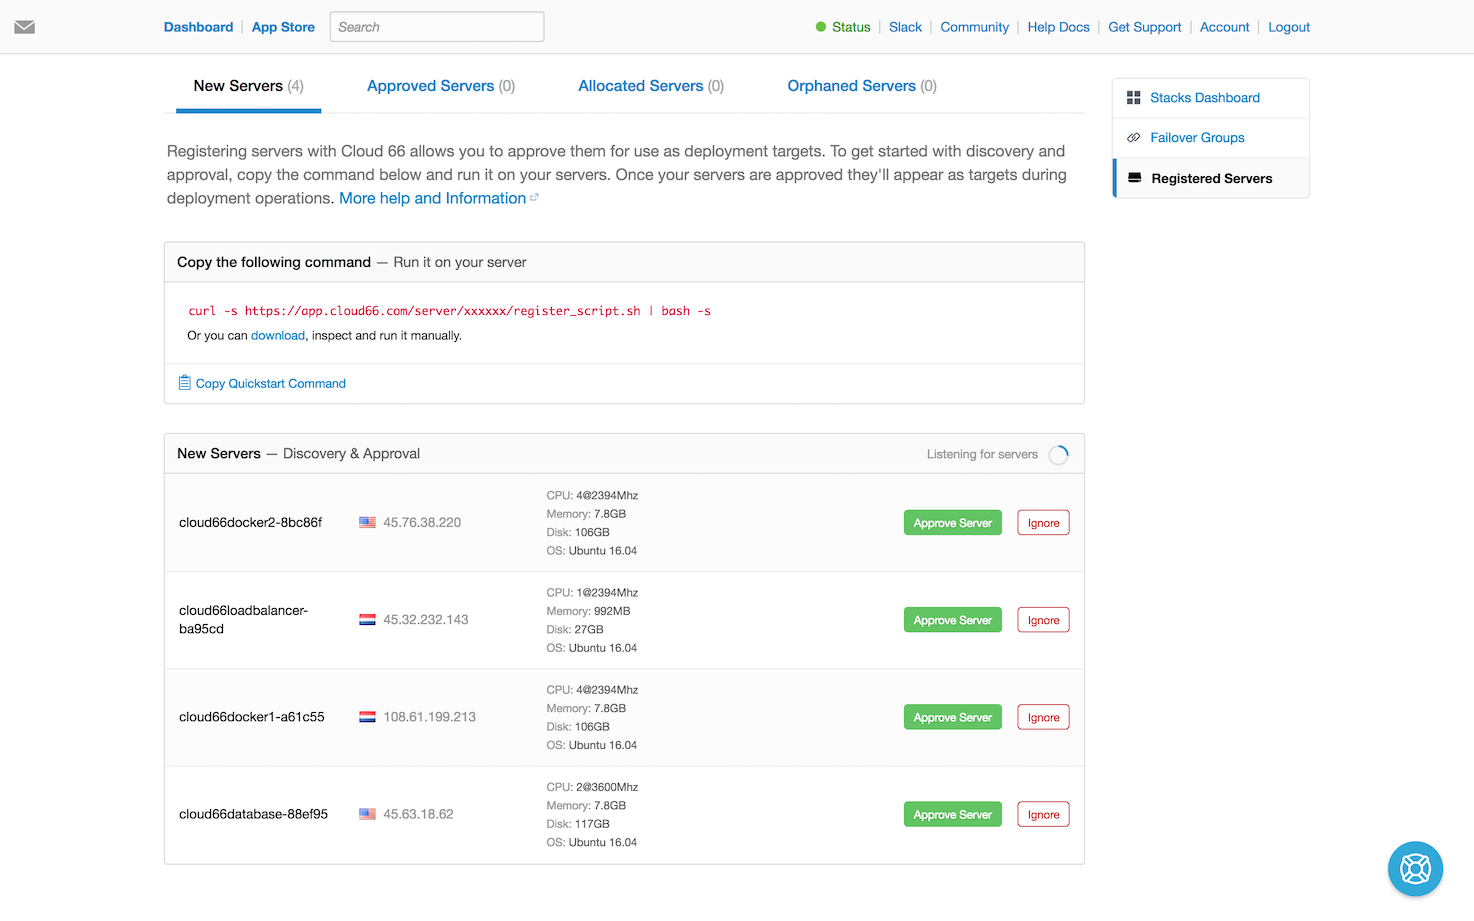
You can also tag the server to make them easy findable if you deploy a stack.
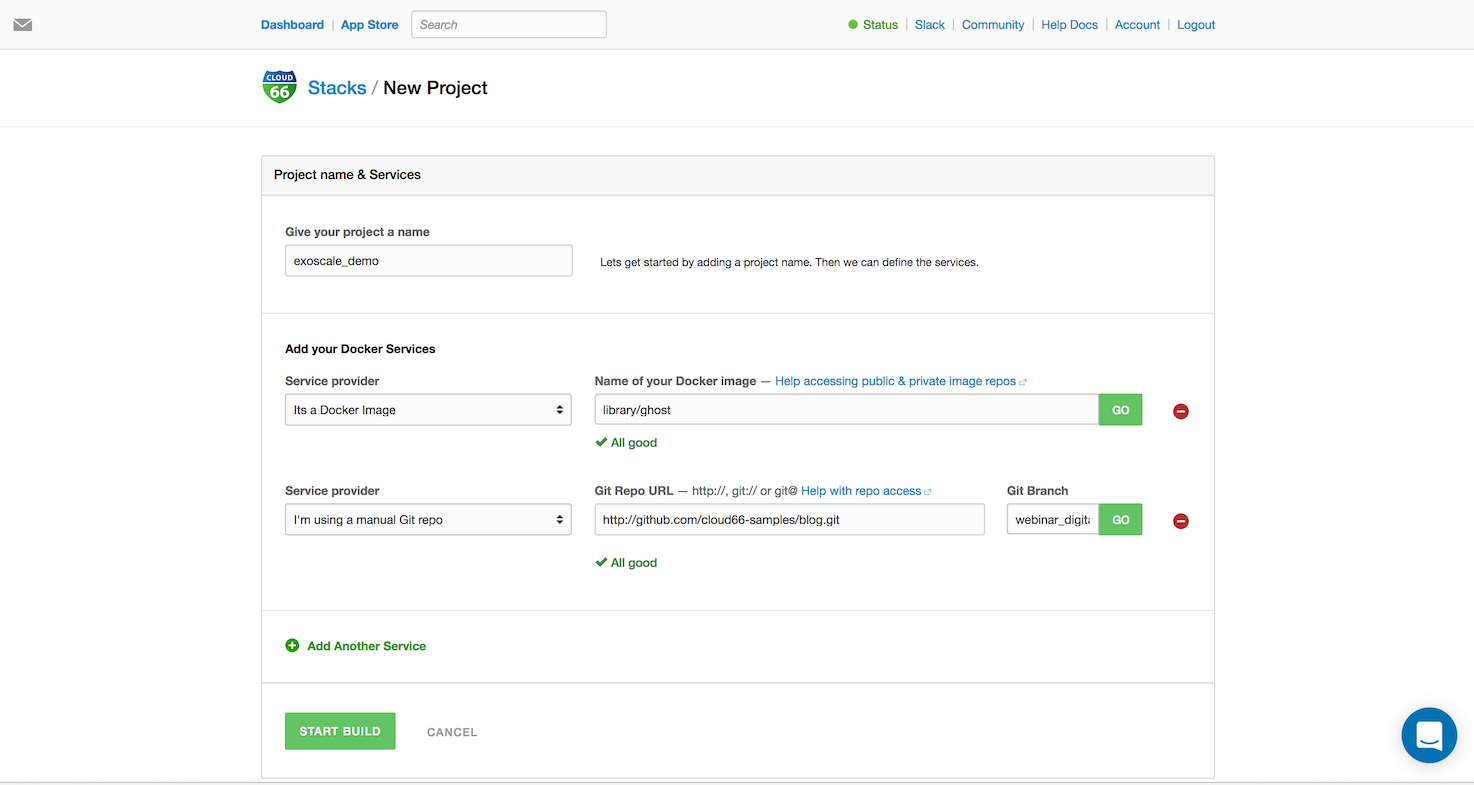
Create a Docker project
Let's create a Docker stack. We are using a private docker image but also we let Cloud 66 build a docker image using the Build Grid feature. The onboarding UI will let you know if everything is good to go.
We create a new deployment for a production environment.
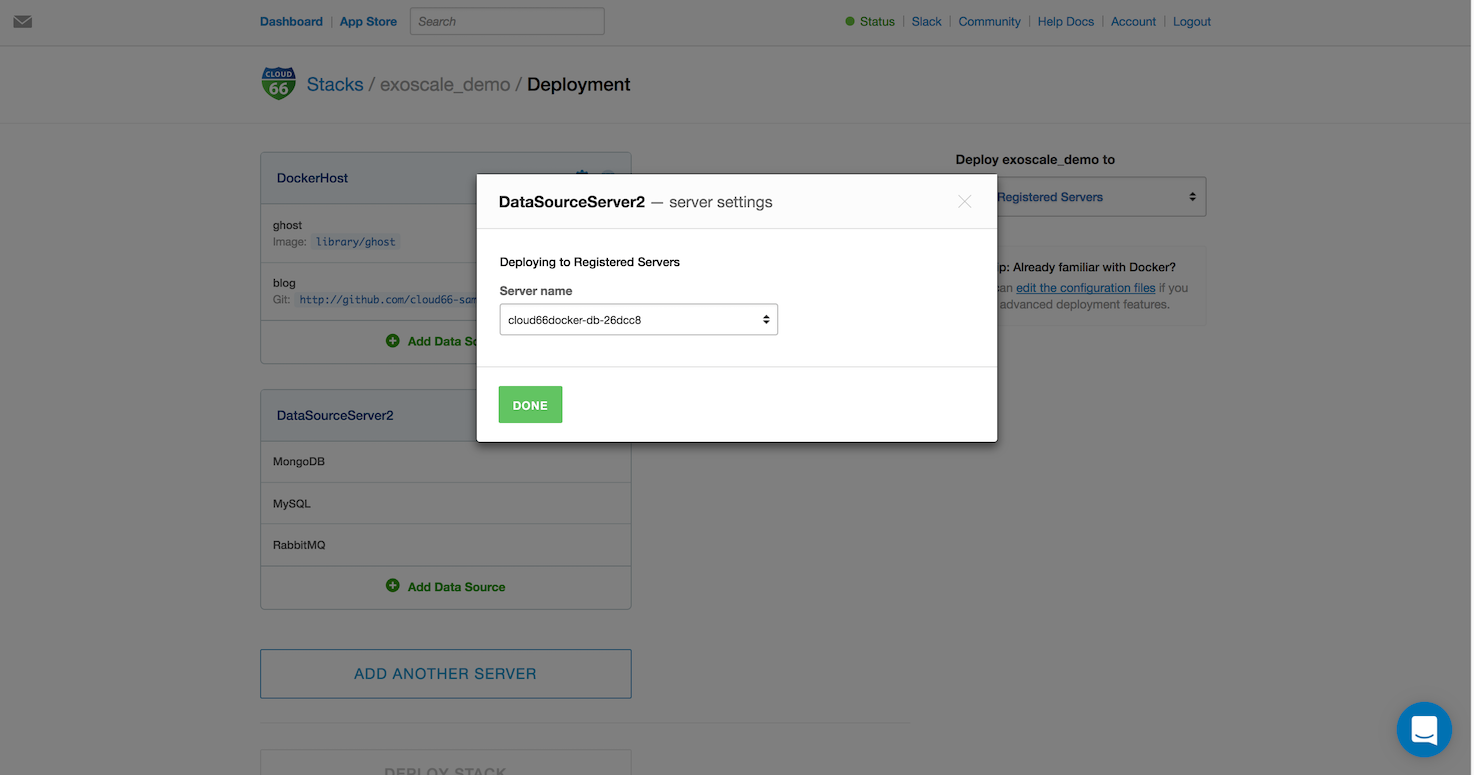
We start with a deployment of 1 Docker host and 1 Database host. And select the right servers we want our application to be deployed to.
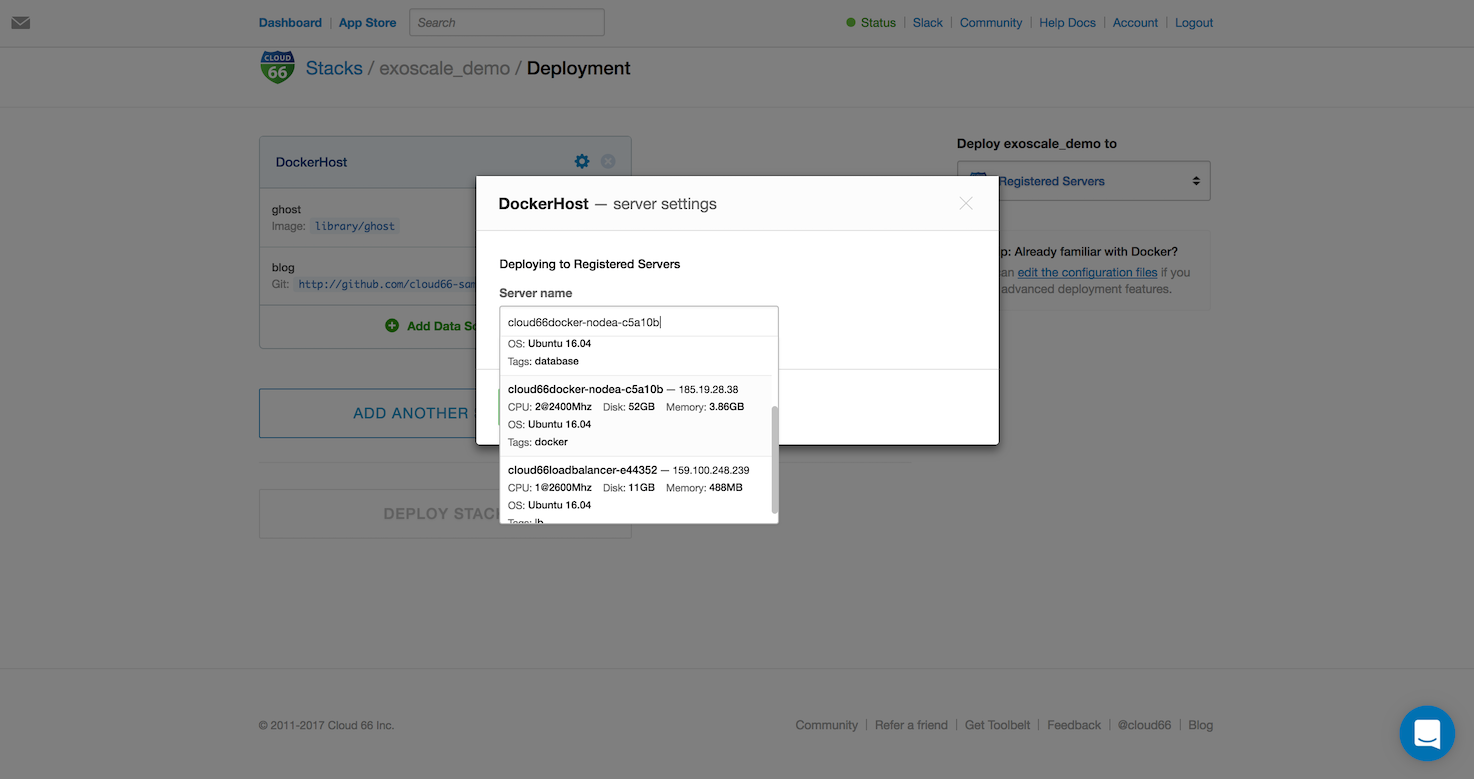
And we add another server for our MongoDB, MySQl database and RabbitMQ message queue.
Of course one of our Docker services need access to the internet. Cloud 66 gives you an UI to set the port mapping and take care of all the load balancing and firewall management.

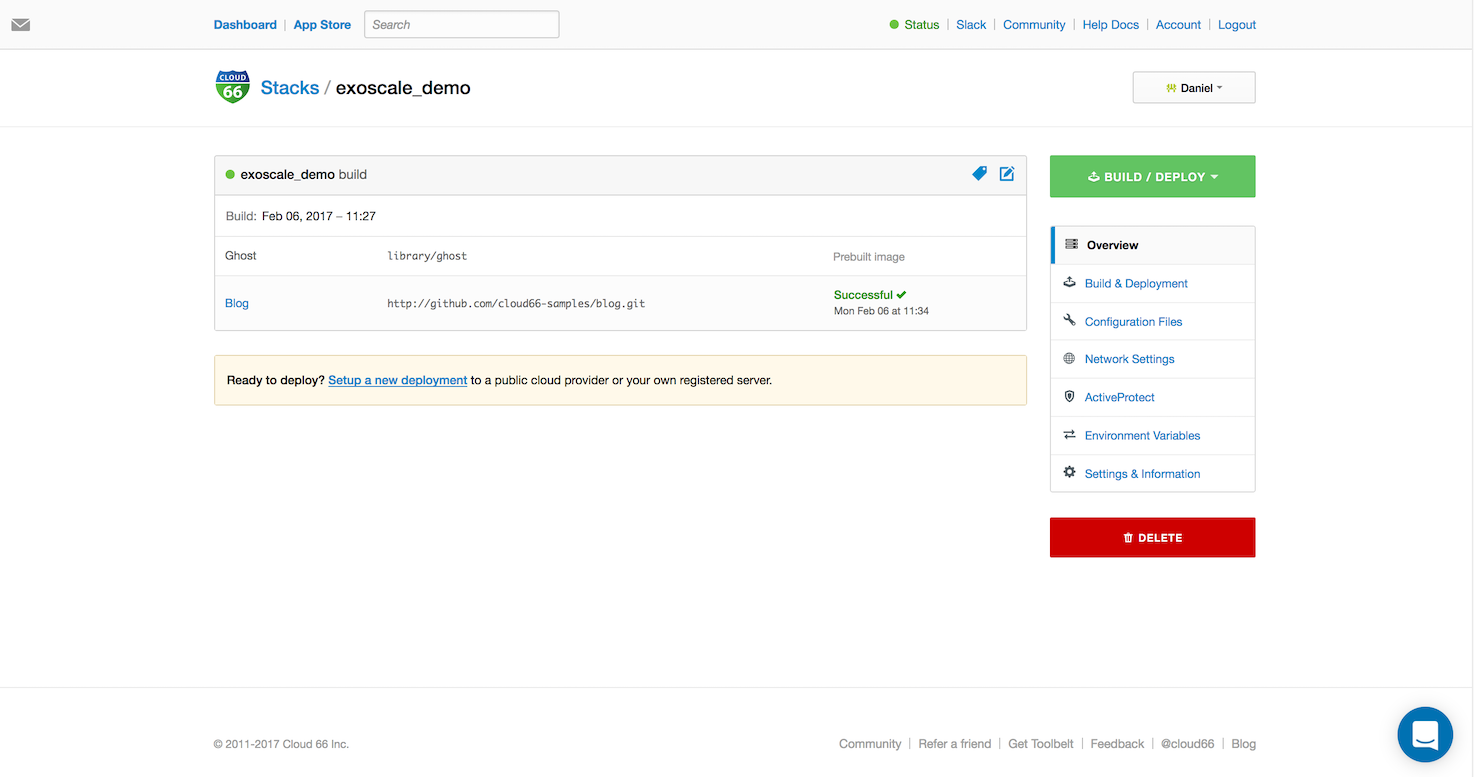
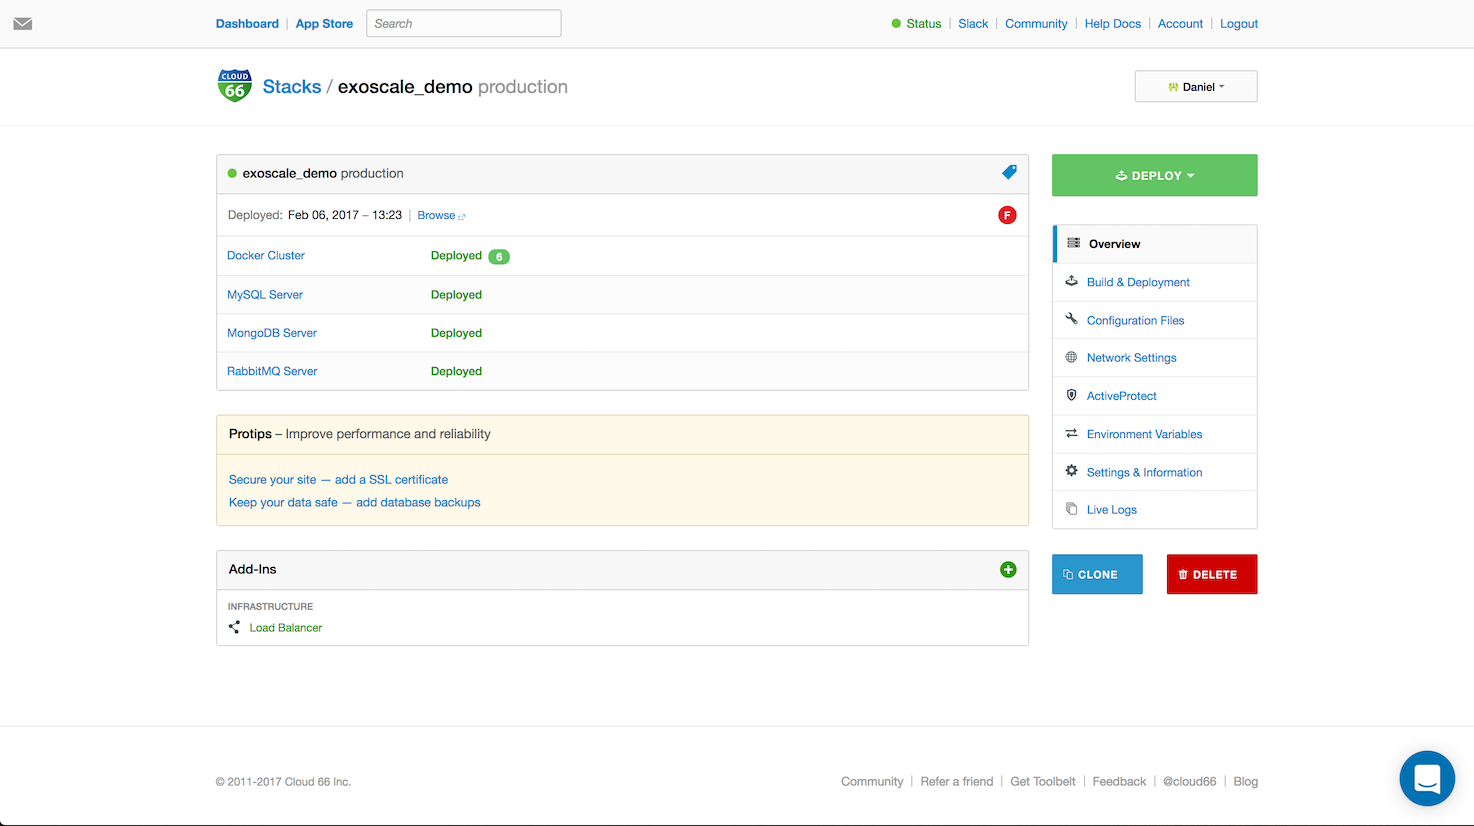
Hit deploy stack and Cloud 66 will provision (= install all the packages, networking, db and security) the servers and start building and deploying your application. You get an e-mail when Cloud 66 is done setting up your application.
Scale up!
Cloud 66 makes it really easy to scale up. Let's add an extra host to our Docker cluster and install a load balancer.
Go to the Docker cluster and hit the button Add Docker Server. Choose the right registered server and hit Add. Cloud 66 will provision this server and add this one to the Docker cluster and make sure all the intra-service networking is setup and secure.
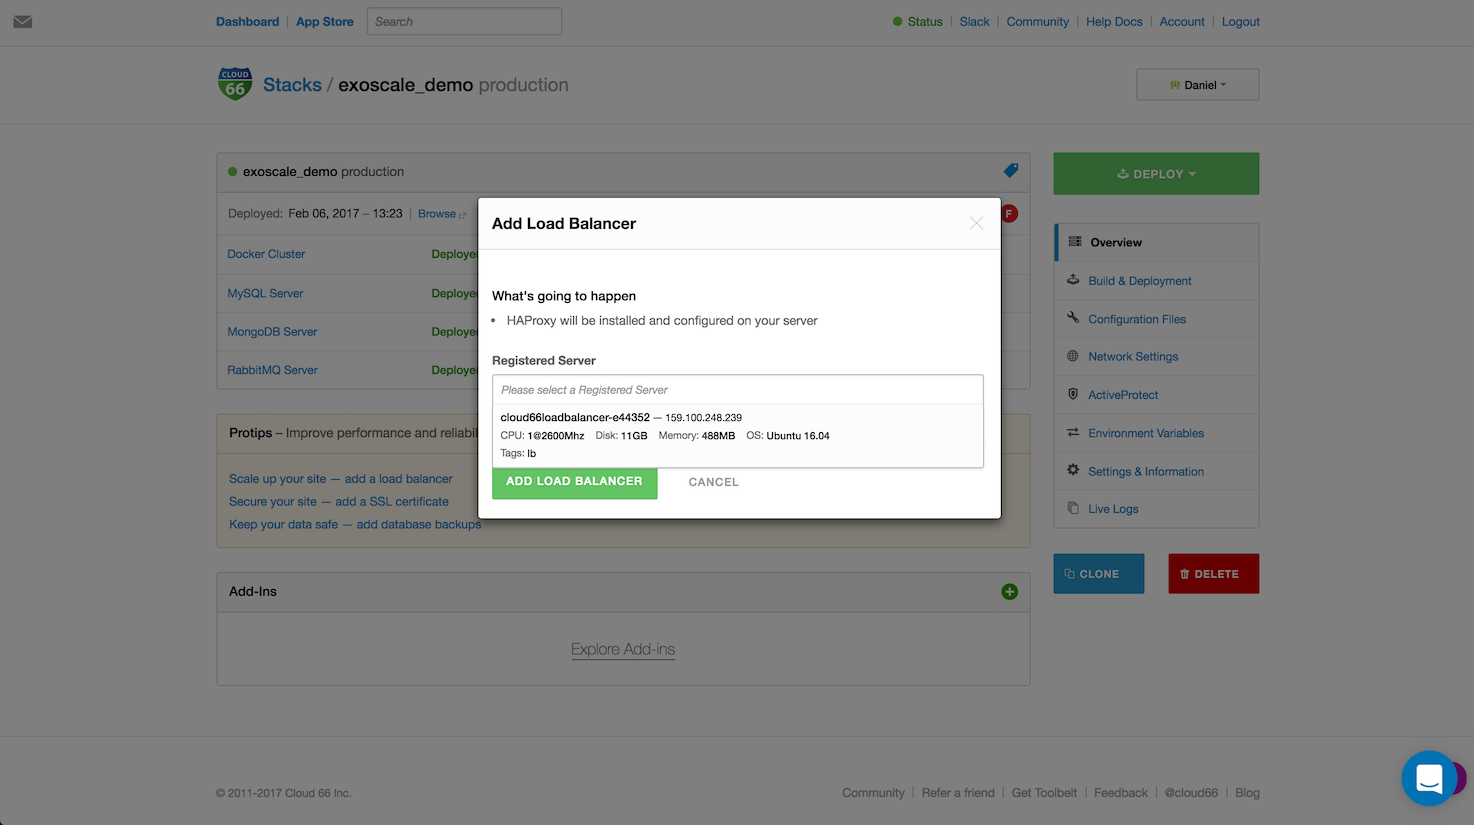
Last but not least, we need a load balancer. Hit the link Scale up your site - add a load balancer and choice the last remaining server. Hit Add Loadbalancer and let Cloud 66 do all the heavy lifting. When this is done! Point your traffic to the load balancer. Happy scaling!
Security
Don't forget to add an SSL certificate to your stack. With one click you can add your own SSL certificate or generate a free one using Let's Encrypt. No need to access your servers or doing difficult configuration.
Summary
The combination Cloud 66 and Vultr give you the power of DevOps right in your hand. Provisioning servers on Vultr are fast and easy to use, with the combination of Cloud 66 you can focus on your devs and leave the ops to us.