
Let's assume you’ve already devoured every Docker 101 tutorial for breakfast. You’re now ready to take that brilliantly crafted application into production. But wait... first you need to test your container-based microservices architecture. What does the whole DevOps workflow look like? What about performance and security? And last but not least; how the hell do I run my microservices in production, and will it scale?
You're in for a treat. In this blog post, we'll be explaining what a proper docker workflow looks like, and how to manipulate it to make it your own. We'll guide you through the entire docker development process, test your microservices architecture and run your app in production on the cloud provider of your choice using Cloud 66 and the new Codeship Pro. To wrap things up, we'll also show you how to scale your app to greater heights.
We need a microservice
To kickstart the process, first we'll need a microservice to get started. Who doesn't love cats, right? So let's create a simple API to store cat names in a MySQL backend. We know that normally you wouldn't want your microservice to talk directly to a database. We too are fans of loosely coupled services! But for the purpose of today's tutorial, let's park the conversation around loosely coupled services and containers for another blog post. Now back to the cats.
The Cats API has three responsibilities:
- provide a list of all the added cat names
- add a new cat name
- remove all cat names from the list
The endpoints of our Cats API will look like this:
curl -X GET http://<your ip>:3000/api/catscurl -X POST -d '{"name":"rocky"}' http://<your ip>:3000/api/catscurl -X DELETE -d '{}' http://<your ip>:3000/api/cats
The node.js app can be found on github. Please clone it onto your local dev machine, then check out the source and how the project is structured.
Test first ask questions later
I'm using the BDD way of testing. Every microservice exposes a contract/software interface, which can be tested from the outside-in.
For the node.js test, we use the mocha framework for running tests. For those with a ruby background, mocha has some similarities with rspec.
From an outside-in test approach, I really don't care if the implementation is run by a unicorn who can shit rainbows. As long as the fancy unicorn can provide us with a stable, secure, scalable and high-performance microservice, that's all I care about.
Here's an overview of what a developer workflow will look like using Codeship Pro and Cloud 66.
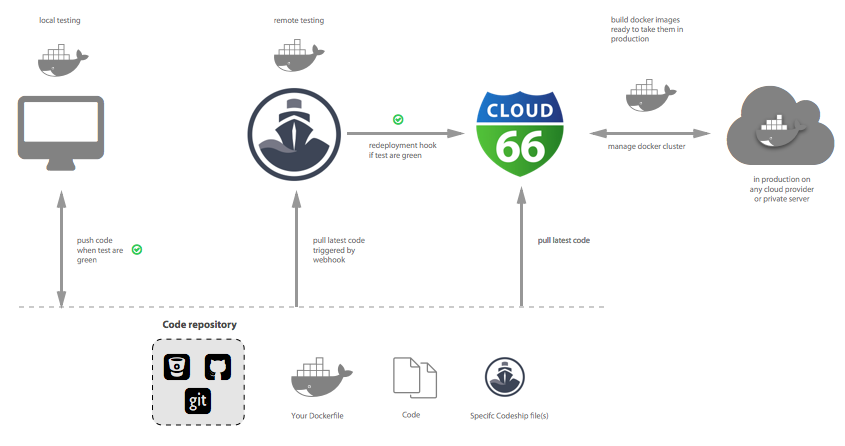
And this is what's going on under the hood:
- Build all container images for the Cats API , test and notify service. In the end, only the API will be deployed to production.
- Run the Cat API microservice and start the dependencies the service relies on. Mysql in this case.
- Wait for those two guys to warmup.
- WARNING: You'll never know how long it takes for a service to boot. Make sure to check if a service is running before making calls. Check this generic wait script.
- Run the test service against the Cat API when everything is up and running.
- Notify your Docker stack managed by Cloud 66 using the notify service to deploy the new Cats API when the tests are green.
So now you're ready to rock. Let's try this puppy (cat) out!
git clone https://github.com/cloud66-samples/codeship_docker_workflow.git catscd cats
Test time
The best way to get your microservice architecture built and running on your local dev system is by using the Compose (docker-compose) tool. Compose is a tool for defining and running multi-container Docker applications. With Compose, you use a Compose file to configure your application’s services. Then by using a single command, you create and start all the services from your configuration.
Build all the services we need.
docker-compose build
Run the test suite
docker-compose run test
Watch the generic wait scripts to check if mysql and the API are up and start firing off those tests. Expected output:
$ docker-compose run test
api [172.17.0.3] 80 (http) open
mysql [172.17.0.2] 3306 (mysql) open

  start all test
    ✓ should remove all existing cats from the database (53ms)

  the wonderful cat API
    ✓ should create a cat
    ✓ should list all cats

  3 passing (83ms)
The works
That's it... you've tested the Cats API service. Take a look at our docker-compose.yml.
What you want to remember is, only the api service will be deployed to the production stack managed by Cloud 66. The rest of the services are for local development and testing, and will be running on Codeship Pro.
# the infamous api
api:
  build: services/api
  ports:
  - "3000:80"
  links:
    - mysql:mysql.cloud66.local

# test suite to test the api outside-in
test:
  build: services/test
  links:
    - api:api.cloud66.local
    - mysql:mysql.cloud66.local
  environment:
    - API_ADDRESS=api.cloud66.local

# a mysql db for data storage
mysql:
  image: mysql

# a notifier script to tell Cloud 66 to redeploy our well tested api service
notifier:
  build: services/notifier
You notice we use an alias for our links. In a real Docker production setup, you need some kind of service discovery. The Cloud 66 platform uses the very stable DNS for service discovery, called ElasticDNS.
After redeploying the service, ElasticDNS automagically updates, providing you with zero-downtime. By linking the containers in our local and test environment this way, we don't need to change the code finding the services.
Let me make something clear concerning working with images. The api image is the same in dev = test = staging = production. Treat the image in each step the same. Only the database name may change, because you don't want to lose any data.
Use Codeship Pro for running your tests
Nice! Does it run on the new Codeship Pro? Codeship released a CLI tool called Jet to test your service locally, and in the cloud. Follow this instruction and guide to Codeship Docker infrastructure to get Jet installed.
Jet needs a service configuration file called codeship-service.yml. Looks almost the same as docker-compose.yml with a couple of exceptions.
# same but not ports definition (cant be accessed from the interwebs)
api:
  ...
#same
test:
   ...
#same
mysql:
   ...

# little addition to get the secrets in!
notifier:
  ...
  encrypted_env_file: services/notifier/cloud66-deployment.env.encrypted
If you want to know about encrypted secrets and environment variables (and you should if you want to prevent security breaches), read this tutorial on how to use encrypted environment variables with Codeship.
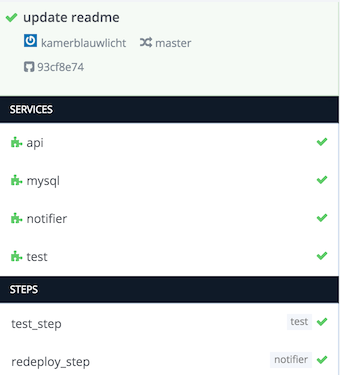
Also, we need all the steps of our CI/CD workflow. You can define them in the codeship-steps.yml. Ours is as simple as a microservice should be.
The codeship-steps.yml configuration:
# run the test suite, because it depends on the api and mysql those will start too
- name: test_step
  tag: master
  service: test
  command: /app/test.sh

# if the test doesn't fall that redeploy on cloud66
- name: redeploy_step
  tag: master
  service: notifier
  command: /app/redeploy_hook_cloud66.sh
Ready to rock? Run the test suite using the Jet CLI to test if it works with Codeship
jet steps
When the test hits green, we're ready to get the real magic in. Follow the steps for creating a project on the Codeship Docker Infrastructure and automagically, a Github webhook triggers the tests.
If we edit some code. Run the tests:
docker-compose run test
Push the code changes to Git and our test will run on the Codeship Docker Infrastructure. Expected codeship output.
But wait? You bragged about running this thing in production. So let's throw in some more magic. Check the last step called redeploy_step?
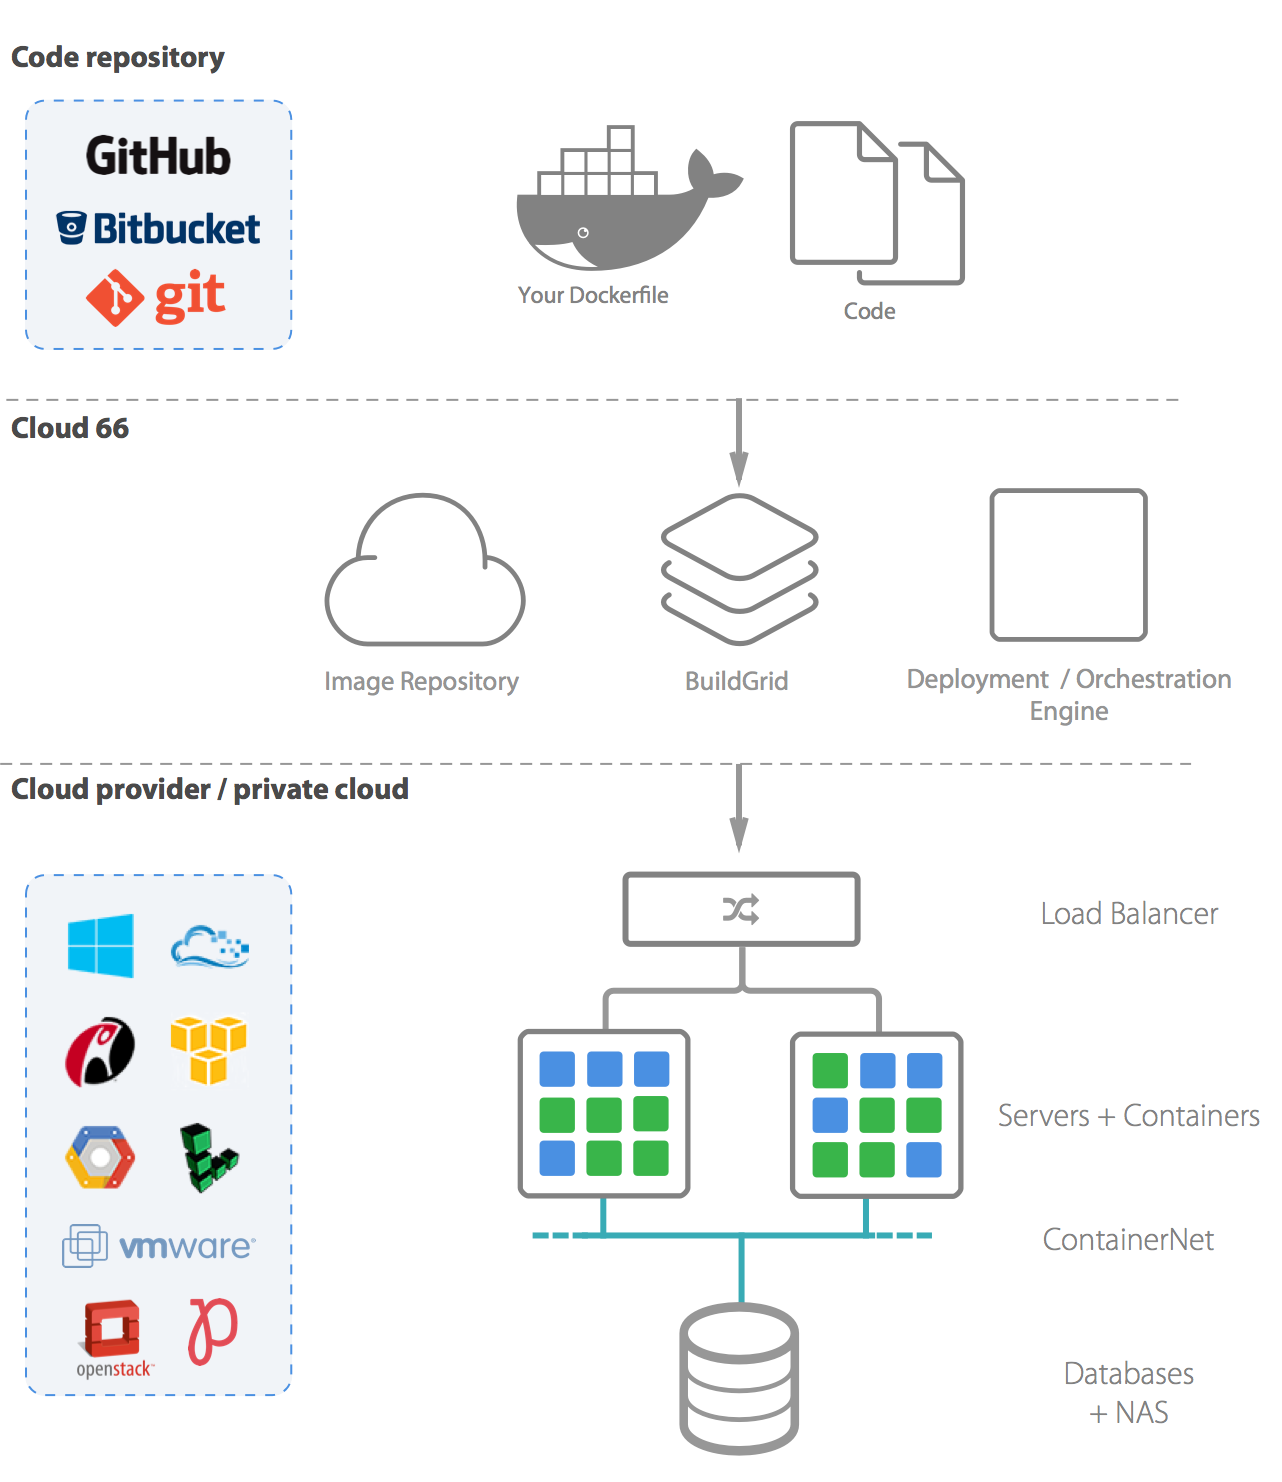
Run docker in production for real Cats!
If you're not familiar with Cloud 66; the service simplifies Ops for developers by building, configuring and managing your servers on any cloud. Our Docker support provides a complete toolset for rolling out containers to production on your own infrastructure.
We only need this very simple service.yml to run the whole thing in a real Docker production environment. With the service.yml you can do a lot of cool things to get the most out of your service.
---
services:
  api:
    git_url: git@github.com:cloud66-samples/codeship_docker_workflow.git
    git_branch: master
    ports:
    - 80:80:443
    build_root: services/api
databases:
- mysql
You're a polyglot I hear you say?
Ok. Hold. You checked all the source code on our github repo. But you're not into Node.js but more of a Ruby person? How can you start using the workflow right away? We have a Starter project just for that.
Cloud 66 Starter is an open-source command line tool to generate a Dockerfile, docker-compose.yml and a service.yml file from arbitrary source code. The service.yml file is a Cloud 66 service definition file, which is used to define the service configurations on a stack.
So let's go back to where it all starts from again, as I can hear you saying; How the hell do I run Docker in production? Let me tell you now:
Creating a Docker cluster
Register with Cloud 66, dial in with the credentials of your cloud provider of choice, and begin using the UI to start a Docker stack. Pop in the service.yml and off you go! Grab a coffee and sit back to get those servers provisioned.
Or be like me - just install the CX toolbelt and get your docker cluster up and running in no time:
$ cx stacks create --name "My Awesome Cat Stack" --environment "production" --service_yaml service.yaml
Once Cloud 66 provisions your server(s) and your Docker cluster is up and running, sit back and enjoy the view:
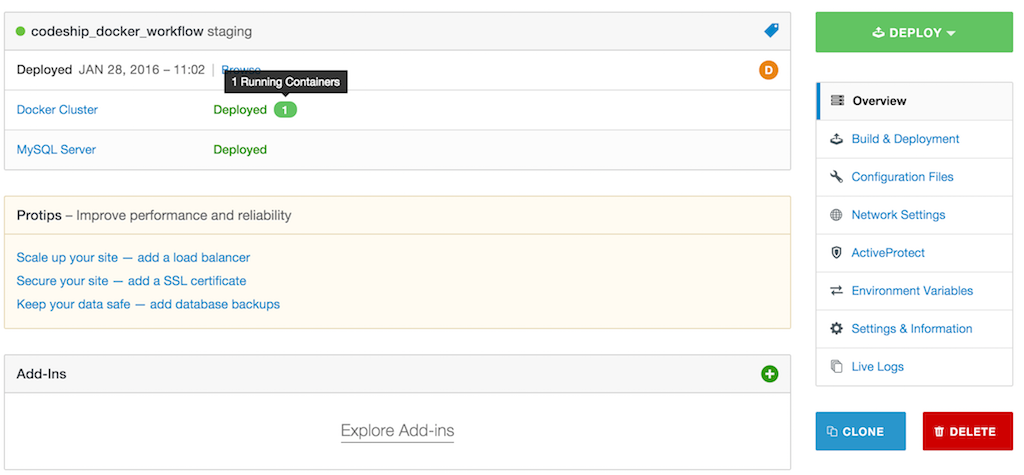
Scale to the moon and back
So you want to scale? Right then. You can scale vertically to add more Docker servers to your cluster to scale horizontally and spawn more containers running de api image. Cat power!
You're working hard on your API, run the test (green! yeah!), and tell Cloud 66 to redeploy the running services. Let's add a redeploy hook to Codeship and trigger that event at Cloud 66.
Hookup Codeship to Cloud 66
We use the notifier service running during tests on Codeship. The notifier only runs one simple script:
#!/bin/bash
curl -X POST -d "" ${CLOUD_66_REDEPLOY_HOOK}
The script needs an environment variable called CLOUD_66_REDEPLOY_HOOK. How do I get one? Once you’ve deployed your stack with Cloud 66, you’ll see a Redeployment Hook URL on your Stack Information page. To trigger a new deployment via Codeship, simply use the example notifier service (based on the ultra small alpine base image) to last project step.
Recap
With the integration of Codeship Pro and Cloud 66, you get an easy-to-use and fast docker workflow pipeline, and don't have to worry about running Docker in production. Let Codeship Pro take care of all the (integration) testing, and don't worry about your Docker cluster - Cloud 66 has got your back.
Happy DevOps time.
Last final note: If you have a Philips Hue hanging in your office? Checkout this script to also get some fancy red/green lights in your office during tests and deployments!
This article was first published on Codeship blog.