

This is a guest post by Mike Mackrory, a Senior Engineer on a Quality Engineering team and a technical writer at Sweetcode.
This article is intended to be a quick-start guide for developing real-world microservices with Node.js. It’s the article that I would have liked to read when I started programming with Node.js. Therefore, you won’t find the words “Hello” or “World” anywhere in this article (at least, not more than that first mention). You should have a basic understanding of Javascript, but other than that, follow the steps for a working application.
In our highly connected world, projects can be constructed by combining functionality from different APIs in unique and performant ways. In this example, we’re going to create a microservice using Node.js which connects to an external API, and then look at improvements we can make to make it more cost-effective and performant.
The business requirement for this service is to accept two Zip Codes and return the distance between them in miles. We’ll look at validation techniques, the configuration for an external API call, and implement an internal cache to make duplicate calls faster and more cost-efficient.
Initial Steps
You’ll need to have Node.js installed on your workstation for this example. I’m using version 8.11, and you can download the latest version for your operating system from Nodejs.org. The Node.js installation includes NPM, which is the Node.js package manager. We’ll use NPM to bootstrap the project, install dependencies and execute the service. (You can follow along with this example or view the completed example in this GitHub repository.)
We’ll start by initializing the project using npm init. Run this command in the root folder for the project. The command walks you through the creation of the package.json file, which is the foundation for the project. If you’re not sure of an answer, accept the default, and we can update it later if necessary. We’ll be using the name and version a little later.
We’re going to use a package called Express to build our service. Express is an established framework for Node applications and continues to benefit from the support of the Node.js Foundation. We’re also going to use the Request package to enable us to connect with a third-party API on the Web.
We’ll add these packages to our project with the following command (the save flag at the end of the command adds it to the package.json file which was created by NPM ).
One last thing before we delve into the code. Let’s look at the structure of how it’s all going to fit together. There are two files and a folder created by the npm init command. These are package.json, package-lock.json, and node_modules. When we installed the express and request packages, their dependencies were downloaded and saved in node_modules.
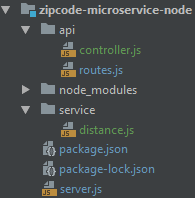
The primary file in our project is named server.js. We’ll have files to support the API in a folder called api, and we’ll add the logic to connect to a third-party API in the service folder.
Let’s build our service!
Creating a Server to Accept Requests
We’ll start from our primary file, then define the routes, add controllers, and finally, build the connection to an external service.
Create a file in the root folder for your project called server.js. This file contains the code below. I’ll step through each part of it, so you can see how it goes together.
This file creates our server and assigns routes to process all requests. We’re going to have two endpoints which we’ll define in the next step.
The first thing we’ll do is to bring the express package into the file. We’ll use this to create a new app object. We’ll also specify the port. The process object is used to reference system properties. If I want to define the port number based on the machine running the application, I can define an environment variable called PORT , and it will be used. The default port value is 3000 if it isn’t defined.
The next line brings in a routes object from the routes.js file in the _ api _ folder. We’ll pass the app to this object, and that sets the routes for our application. Finally, we’ll tell the app to start listening on the port we defined, and to display a message to the console when this process is complete.
Defining the Routes
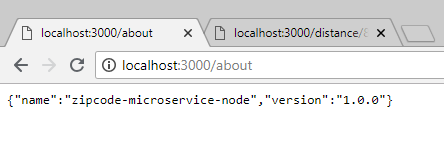
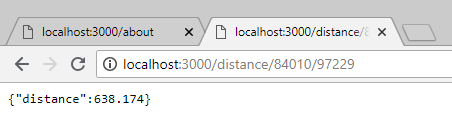
The next step is to define the routes for the server and assign each to a target in our controller object. We’ll build the controller in the next step. We’ll have two endpoints. An about endpoint returns information about the application. A distance endpoint includes two path parameters, both Zip Codes. This endpoint returns the distance, in miles, between these two Zip Codes.
The ‘use strict’ directive at the top of the file is used by new versions of Javascript to enforce secure coding practices. (You can learn more about that here.) The first thing we’ll do is to create a controller object which we’ll define in the next step. Because we declare this outside of any functions in the file, it is accessible by all of them.
Module.exports allows us to declare functions inside a module, and have them available for use in another file. This file constitutes the routes module, which we imported into our primary server.js file and used it to define the routes for our express app.
This function adds two routes to the app. The first route listens for GET requests on the /about endpoint. These requests are handled by the about function in the controller. The second route listens for GET requests on the /distance endpoint. The get_distance function in the controller handles these requests. Two parameters are also specified. These are labeled zipcode1 and zipcode2 respectively.
Let’s build the controller to handle those requests.
Adding Controller Logic
One of the aspects of Javascript and Node.js which I find interesting is that functions are objects. Within the controller file, we’re going to create a controller object with two properties. Those properties are the functions to handle the requests we defined in the routes module.
We have two distinct parts to our controller. We’ll go through the code for the about functionality first. At the top, we create an object called properties which references the package.json file which NPM created when it bootstrapped the project. This file is in JavaScript Object Notation or JSON for short. This format affords us the ability to import and use the information it contains.
Within the controllers object, we define a property called about. This property is a function which accepts request and response objects. We’ll only use the response object for this function. Using the name and version information from the package.json file, we’ll build a new object and return it as the response.
For the get_distance functionality, we’ll start by bringing in the distance module. We’ll pass the request and response objects to the find function within this module. This function also includes a callback function. This function accepts an error object (err) and a distance object (dist). If there is an error in the response, we return that with our response; otherwise, we send back the results of the find function.
Making the External Call
We’re ready for the final piece of the puzzle. This file handles the call to a third-party API. We’ll use the distance API provided by ZipCodeAPI.com. (You need an API key to use this, and it is free if you register. You can also use the key from the example if you want to test your service, but this key frequently expires during the day.)
I set my key as an environment variable on my system and named it ZIPCODE_API_KEY. The default key in the code is an expired test key from the ZipCodeAPI website.
We’re using the request package to execute the external HTTP request, and we already discussed the api Key above. Ensure that you update it unless you want to start by testing the error conditions.
The find function accepts request, response and next objects as parameters. The request object accepts the URL of the service we’re calling and then defines a callback function to handle the response.
If there are no errors, and the status of the response is HTTP Status code 200, then the function parses out the body of the response into an object called response and returns it on the resp object. Since the ZipCodeAPI returns with a JSON response, we could forward this directly. Parsing it out allows us the option of doing more with the response if we choose to.
We log failures to the console, and then a result of -1 is sent on the response object. You may opt to create an error object to return as well.
Finally, we export the distance object, which allows the controller to instantiate it and call its functions as needed.
Execution and Debugging
Assuming there aren’t any typos, your application should be ready to execute. Open a console window and run the following commands—The first ensures that all the packages used by the application are downloaded and up-to-date:
The second command starts your application.
Assuming it starts correctly, and the port you define is 3000, you can now open your browser and navigate to:
http://localhost:3000/distance/84010/97229
The following URL allows you to see the error condition because 92001 is not a recognized Zip Code.
http://localhost:3000/distance/84010/92001
If you run into problems, I’ve found the error messages to generally be helpful in pointing me to the line of code with the offending syntax, missing punctuation, or other problems. The Internet is also a wealth of information for specific problems.
Cloud 66 Overview:
Cloud 66 helpes developers to build, deploy and manage any application on any cloud provider or any server. We deploy apps 2 million times a day for thousands of developers around the world. You can think of us as a PaaS (like Heroku) but on your own servers.
Deploy any application (including Node.js) that has a Dockerfile to any cloud or server. It builds a Kubernetes cluster on your servers, builds your code into Docker images, takes care of databases, firewalls, and network for your applications on any cloud.