
No website user like to remember yet another password. No developer wants to write another user authentication system with account lockouts, password reset and 2 factor authentications. No administrator likes to add a user to a new company system when a new member of the team joins and remember to remove them when they leave.
We all know this, yet many websites used in business still have their own account credentials and compensate for the hassle they cause by imposing sometimes silly password length and “strength” requirements.
Previously I’ve written about using Google Apps as an Active Directory for your Rails / Rack applications. Here I am going to use SAML, a standard for “security assertion” (read Single Sign On - SSO) with a Rails application.
Comparing SAML with using Google Apps for SSO, I can think of the following:
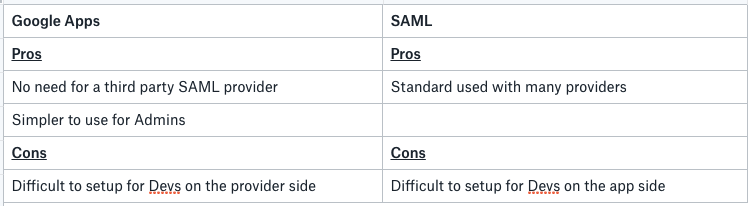
Overall, I think you need to find your own best solution. One thing to note is that Google Apps (now G Suite) supports SAML as well. It is a standard after all!
How does SAML work?
This is a good explanation of how SAML flow works from OneLogin:
SAML SSO works by transferring the user’s identity from one place (the identity provider) to another (the service provider). This is done through an exchange of digitally signed XML documents.
Consider the following scenario: A user is logged into a system that acts as an identity provider. The user wants to log in to a remote application, such as a support or accounting application (the service provider). The following happens:
- The user accesses the remote application using a link on an intranet, a bookmark, or similar and the application loads.
- The application identifies the user’s origin (by application subdomain, user IP address, or similar) and redirects the user back to the identity provider, asking for authentication. This is the authentication request.
- The user either has an existing active browser session with the identity provider or establishes one by logging into the identity provider.
- The identity provider builds the authentication response in the form of an XML-document containing the user’s username or email address, signs it using an X.509 certificate, and posts this information to the service provider.
- The service provider, which already knows the identity provider and has a certificate fingerprint, retrieves the authentication response and validates it using the certificate fingerprint.
- The identity of the user is established and the user is provided with app access.
What do you need?
To enable SAML in your Rails apps, you need an Identity Provider. Think of Identity Provider like Google or Github when you login to a website with your Google or Github. Here, Google and Github act like an Identity Provider (not using SAML necessarily though).
You can write or host your own Identity Provider, but that kind of defeats the purpose of delegating the task of authenticating users to a trusted 3rd party with all the user management tools they come with. There are several hosted Id Providers online, notably OneLogin and Okta. Both of those providers charge per user however both have developer free plans for your own apps with reasonable limits (3 apps and 100 users for free which should suite many devs).
There is more information out there about integrating OneLogin with a Rails app, so here I am going to focus on integrating Okta with a Rails app.
On the Rail app side, you need to have some sort of user management: allow users to be identified, logged in and logged out. Your SAML Id Provider will replace the login and logout pages in your app and will tell you who the authenticated user is alongside other information about them, but your app still needs to know what a “user” is. The easiest way to add that functionality to a Rails app is to use the brilliant Devise gem.
In the examples in this post, I am making the following assumptions:
- You are using Devise
- Your user model is called
User - Your
Usermodel has an attribute calledemail - You are using Okta as your Id Provider. Although this works easily with OneLogin too.
Let’s get started
First, we are going to make Devise work with SAML. For this, we are going to use the aptly named devise_saml_authenticatable gem.
Add this line to your
Gemfilegem 'devise_saml_authenticatable'Add
:saml_authenticatableto your user modeluser.rb:
- Add the following to your
config/initializers/devise.rbfile:
To allow different URLs in development and production (or other environments) I am using a global variable called $callback in this file. In my app I am setting this in an initializer like this:
You can see the aim here is to tell the SAML Id Provider where to find us when it comes back with the authenticated user. Since this is happening in the browser (client redirect), you can use something like localhost in your development environment.
Set yourself up at Okta: Sign up for a free Developer Account.
Once you have your account, create a new Application in Okta: Go to Applications menu and click on the Create a New App button. On the overlay, select Web as platform and SAML 2.0 as the Sign on method.
Next, give you app a name and click Next.
In the form enter the following:
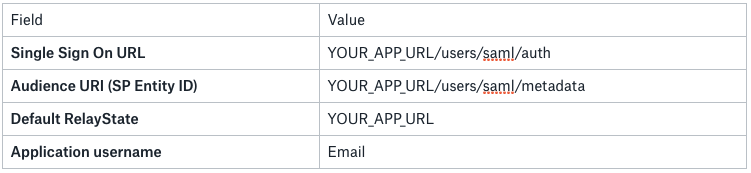
Replace YOUR_APP_URL with your app’s URL and don’t forget the schema (https or http)or http://localhost:3000 if you are running your app in development environment (here I used 3000 as the default Rails port, adjust according your setup).
For production, make sure you use https and have it setup on your app and server.
Click Next and answer the marketing questions on the next page and click Finish.
On the next page, click on the View Setup Instructions. Here you need to copy the Identity Provider Single Sign-On URL and paste its value as
idp_sso_target_urlindevise.rbClick on the Download Certificate button and save the certificate file.
Run the following command to get the fingerprint of the certificate:
This assumes you saved the certificate in ~/Downloads/okta.cert
The last line of the output is a line that says SHA256 Fingerprint= . Copy the value for that and paste in idp_cert_fingerprint of your devise.rb file. It looks like this:
- In your apps
configdirectory, create a file calledattribute-map.ymland put the following in there:
This tells Devise SAML what attributes returned from Id Provider map to which attribute of your User model.
Now you can use /users/saml/sign_in which will redirect to Okta login page and then back to your app after authentication.
In our devise.rb we have configured Devise SAML as such so it creates new users in the app if they have not been seen before. It also updates the mapped attributes when they change on the Id Provider side. These are configured via saml_create_user and saml_update_user parameters.
Sending extra parameters over from Identity Provider
The example above will give you basics of SSO with SAML. However, sometimes you might need to have other parameters sent over from your Id Provider to your app. These could be the user’s timezone or the fact that they are a member of a specific group or the list of the groups they are a member of.
To achieve that, head to your Okta application management dashboard. Under the General tab, click on the Edit button of the SAML settings section. Here you’d have to proceed the wizard’s first step which is annoying. On the second page, use the Attribute Statements to include the attributes you need sent over. You need to read your Id Provider’s documentation to see which attributes are available to use. Once you added the attributes you need, head over to your attribute-map.yml file and add those attributes and how they map to your User model there. It will look something like this:
Here, I have a mixture of basic Okta attributes like lastName , firstName , timezone or organization. I also added another attribute called isEngineering which uses Okta’s expression language to figure out if the user is a member of the Engineering team.
Summary
This should give you the basics of adding SAML to your Rails app. From here you can enforce 2fa or other VPN, IP, group or organisation based restrictions on your app’s users directly from your Id Provider’s side.
Enjoy!