
Last week, I showed you how to build and deploy a Go Web application (or API backend for a frontend framework like React or Vue) to a cloud provider, using Docker as a process manager. In this post, which is part of two of this series, I will show you a second method of deploying a Go Web app or backend to any cloud, using Docker Swarm. The most significant difference here is that, instead of using Docker as a process manager (which can be replaced with any process manager like systemd), this example uses Docker Swarm, a container orchestrator.
Deployment Method 2
Docker Swarm is a container orchestration engine from Docker. It is integrated into Docker, which makes the setup easier than alternatives but lacks many basic functions you would require to host a simple web application.
Examples on this post are similar to the previous post and can be found here on Github (note the branch name). As a result some parts of the post are similar to the last one, including the script to build the required images with a unique tag. Please see the previous post for the build steps.
 Docker Swarm Mode
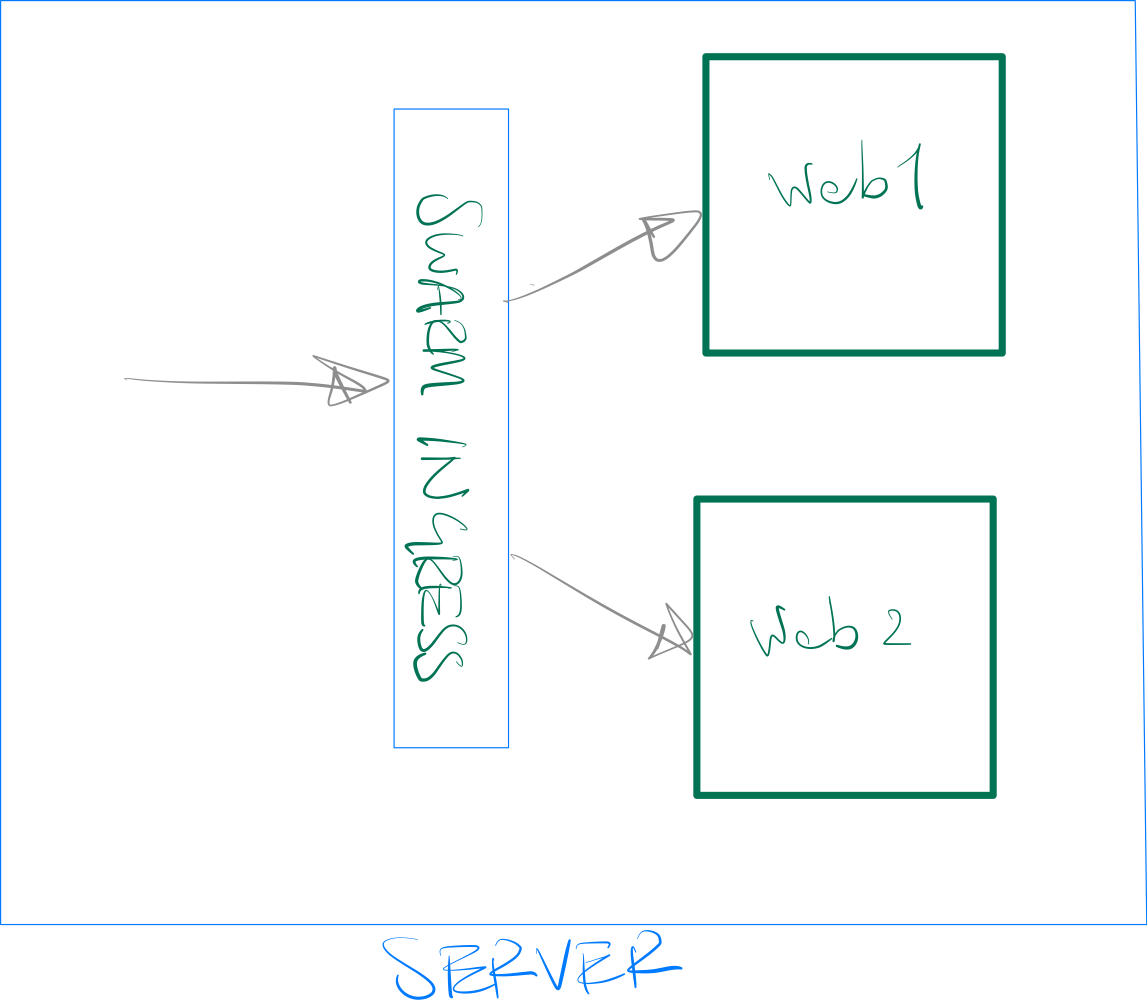
When using Docker Swarm, our app is hosted as a container on Docker and gets a random port assigned to it by Docker. However, instead of us running a reverse proxy like HAProxy in front of our services, Docker Swarm runs an "Ingress Load Balancer" in front of our services. This Ingress Load Balancer does 2 main things:
- It exposes the application on a Published Port (like 80 in our configuration below) to the outside world and sends the inbound traffic to our app.
- It ensures that the traffic reaches a running instance of the application, regardless of the server (node) that receives it.
To clarify the second point above, imagine you have 2 servers in your cluster but only one of them is running the app container. If the external cloud load balancer reaches the server that is not running the app container, there is no one to answer the call. The Ingress Load Balancer runs on all nodes and redirects the traffic to a node that runs the service. In the previous method, we had to make sure our app and HAProxy are running on all nodes, exactly for this reason.
Setup
You can use Docker Compose files to deploy a Docker Swarm stack, albeit with some limitations around building the images. However, since we have our build step, we're going to create a Docker Compose file with the pre-built images.
To use Docker in Swarm mode, you need to initialize it on your machine. Locally this means running the following command:
$ docker swarm init
On a server with multiple IP addresses, you will need to add the ---advertise-add parameter followed by an IP address. This is the IP address Swarm will use to communicate with other Swarm nodes in a cluster. For now, we're going to set up a single node cluster and use the internal IP address of our server for the parameter:
$ docker swarm init --advertise-addr 10.16.0.5
Take note of the swarm token returned by the command and keep it secure. You will need this token to scale up your Swarm cluster size.
Now we can use a compose file to run the service:
version: "3.9"
services:
  web:
    image: cloud66/go-webapp:202206201109
    ports:
      - "80:3000"
docker-compose.yml
As you can see, I'm using a tag for my go-webapp image. I got this tag from my build script. I use this command to deploy the stack:
$ docker stack deploy sample --compose-file docker-compose.yml
This command will create a bridge network and deploy the image as a service, serving it with the traffic from port 80 on the node into its port 3000.
You can visit the app page on http://localhost
 Deployment Method 2 Screenshot
Great! We have a deployed service and can use it. All we have to do is upload our docker-compose.yml file onto the server and run the docker swarm deploy command on it.
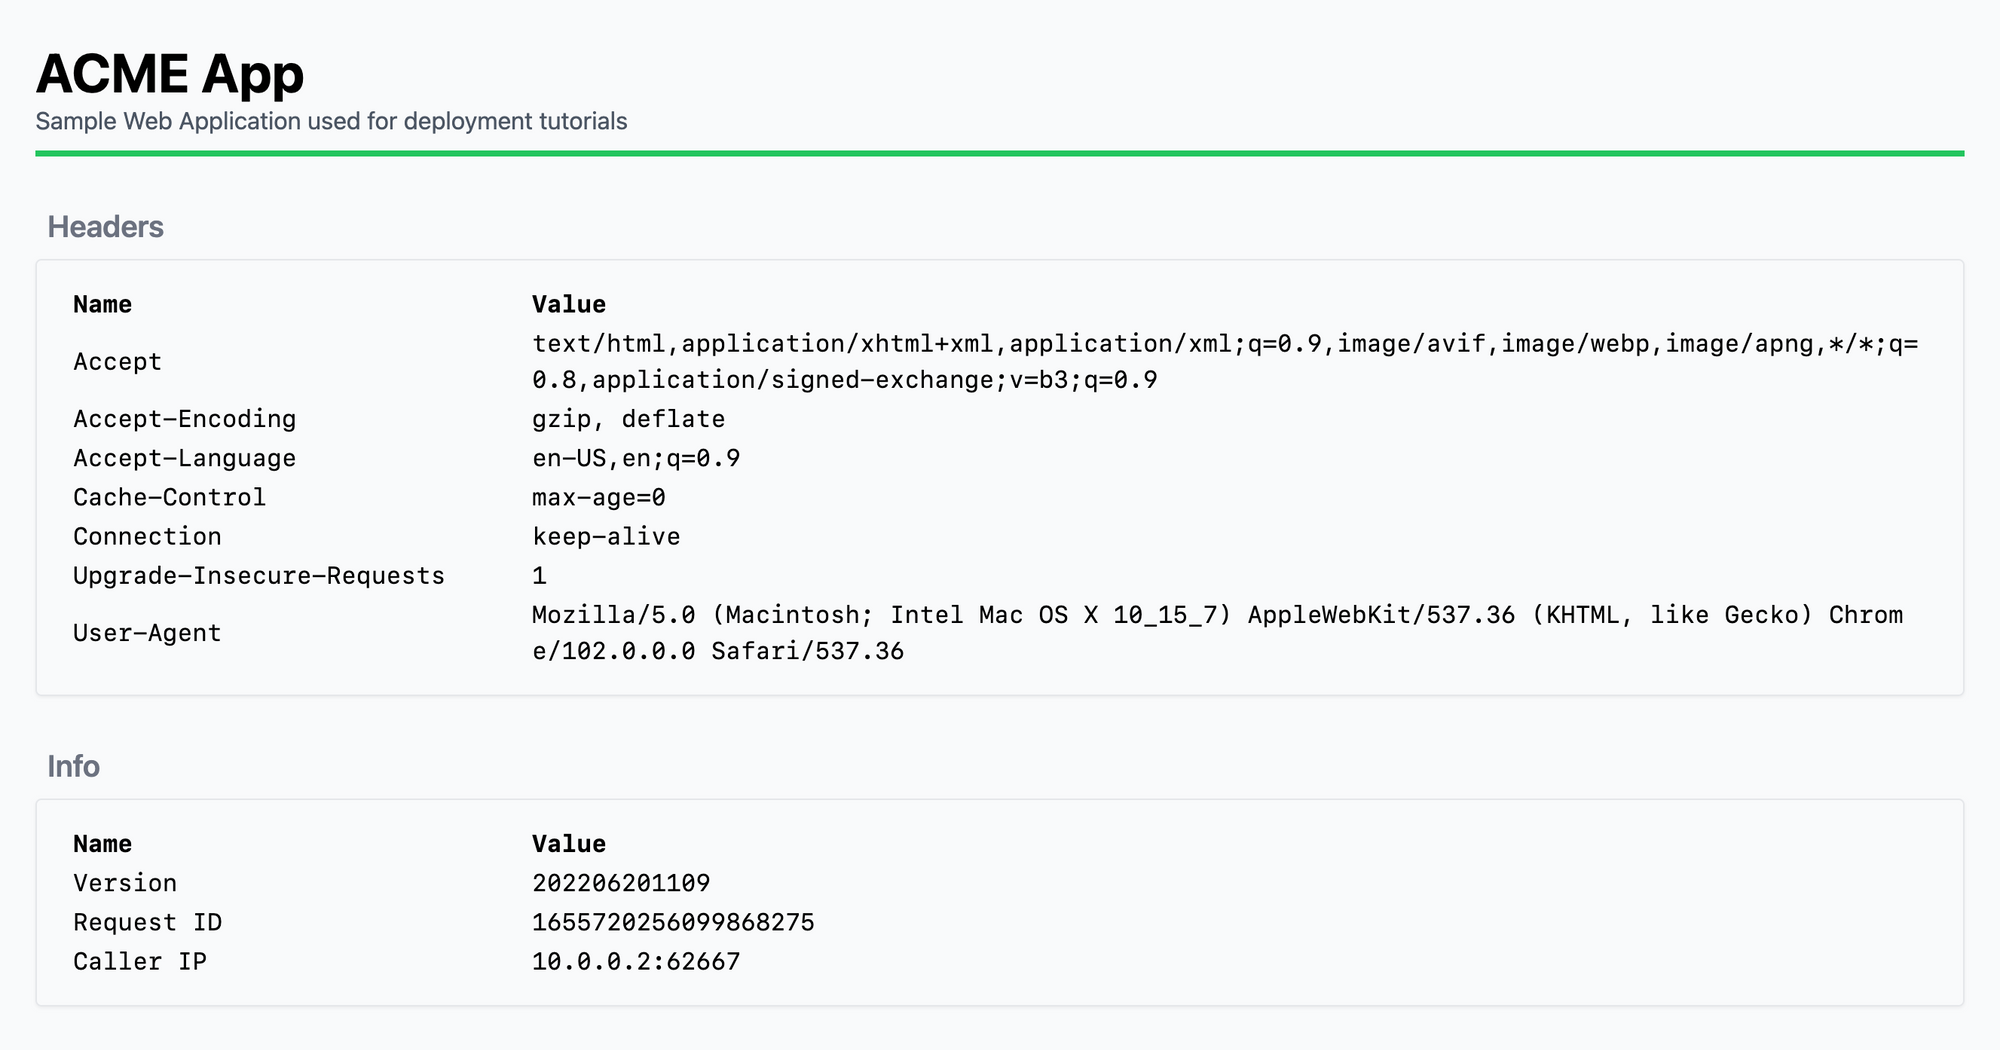
Caller's IP
Looking at this screen, you can see that the caller IP is the internal IP of the docker container (10.0.0.2) without a X-Forwarded-For HTTP header to help our app pickup the real caller IP. This known issue has been open on the Docker project on Github since 2016 (https://github.com/moby/moby/issues/25526).
When traffic jumps between networks, the issue of real IP is always something to consider. When your application serves HTTP traffic, you can use an HTTP header called X-Forwarded-For. This header is added by HTTP load balancers to the traffic and can be used by your app to determine the caller's IP.
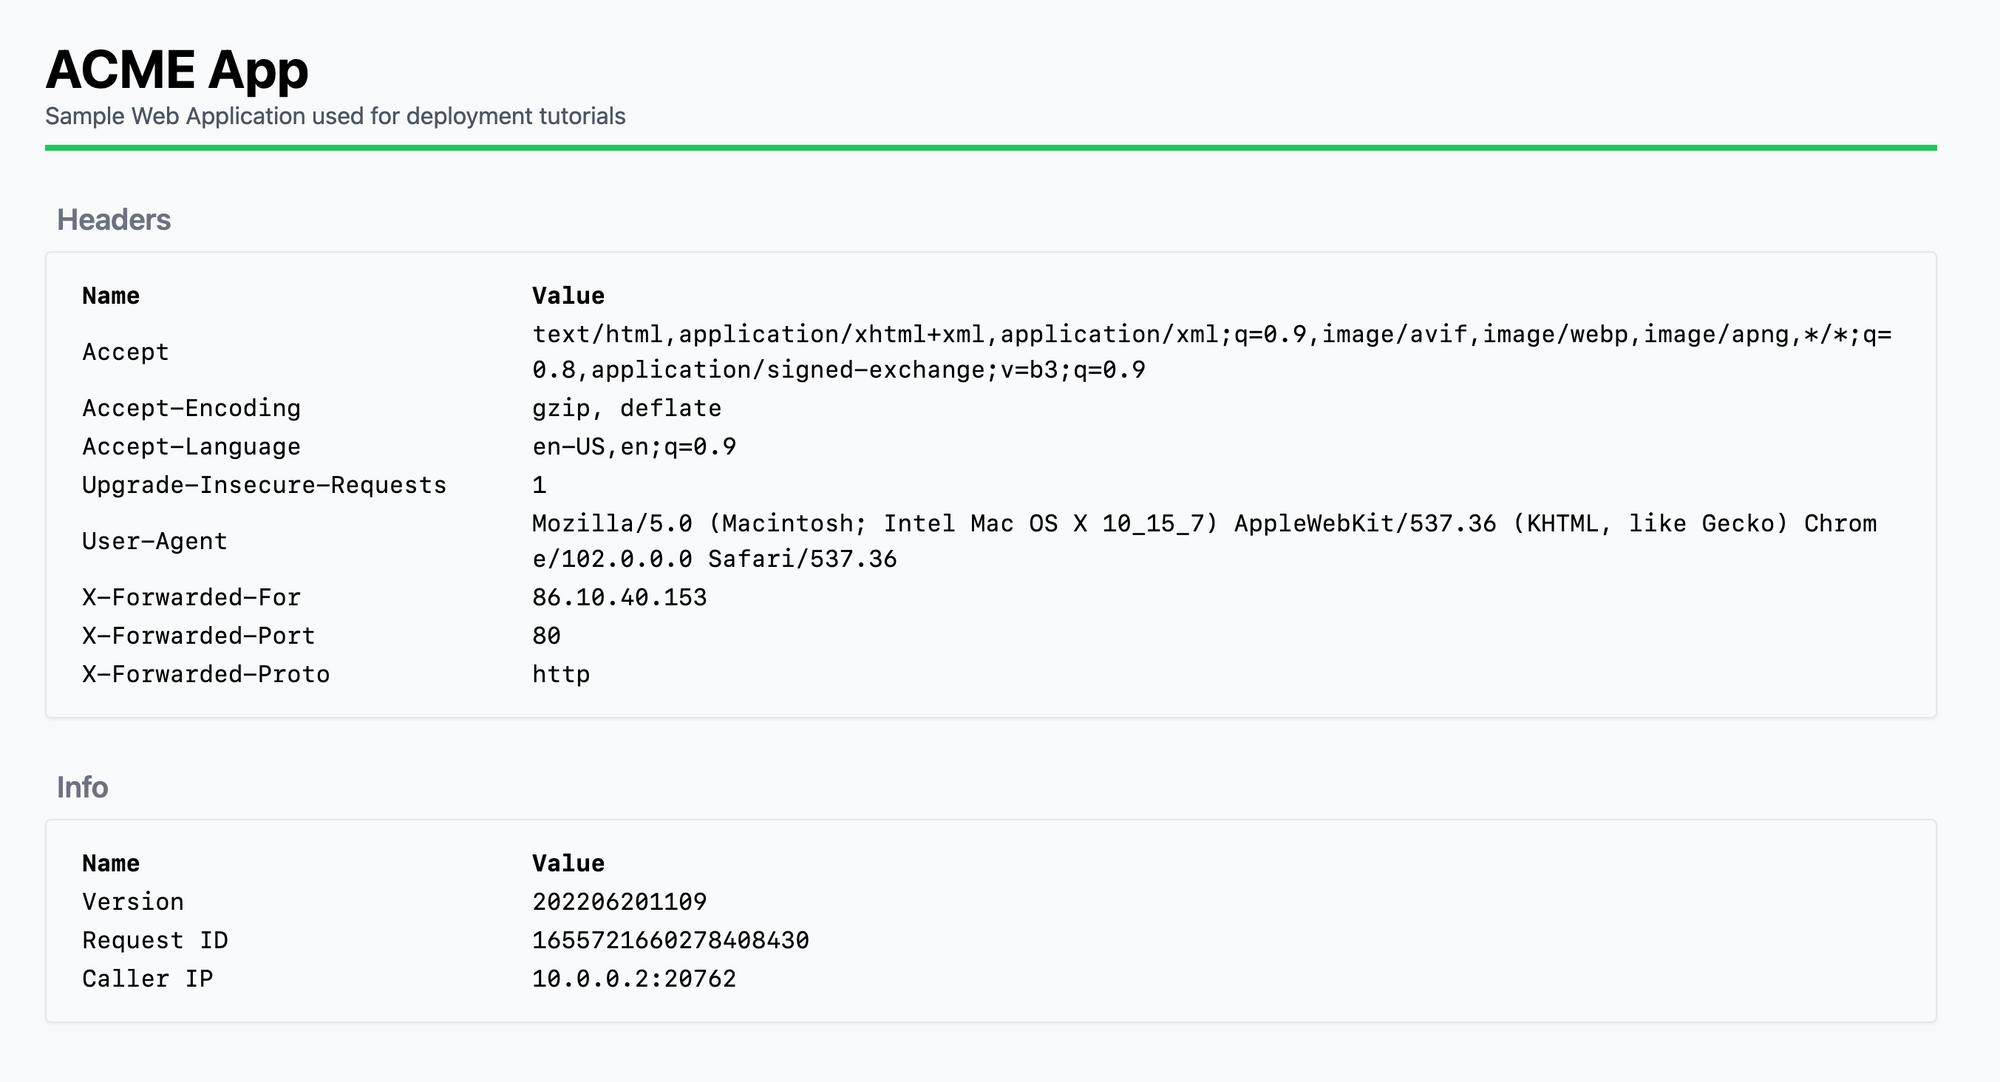
The fix is easy if your cloud provider supports HTTP load balancers (layer 7 load balancers). For example, on DigitalOcean, set up a load balancer in front of your node and visit the IP address of the load balancer instead this time.
 Deployment Method 2 With L7 Load Balancer
Now you can see three X-Forwarded HTTP headers have been added to the traffic, which you can use to determine the real caller's IP.
Note 1: Be careful here. Never trust those headers alone. You should always make sure traffic is coming from a trusted source (your load balancer in this case), before trusting those values. Otherwise, any caller can add the HTTP headers onto their request and trick your app.
Note 2: Depending on the cloud provider's network topology and how traffic reaches your node, the
X-Forwarded-Forheader might contain multiple IPs. In this case, the first IP is the client's and the rest are IP addresses of the load balancers along the way before traffic reached your server.
Note3: Some load balancers add headers with different names like
X-Real-IPor others. Check your load balancer's documentation for details.
SSL Traffic
The approach above works only if:
- Your application serves HTTP traffic and not TCP or UDP.
- You don't require SSL / TLS traffic.
- Your cloud provider supports SSL traffic termination
Let's dive deeper into this.
When HTTP traffic reaches the load balancer on your cloud provider, the load balancer adds the caller's IP to the HTTP header of the call. It can do this because the traffic is not encrypted, so it can detect the HTTP header payload and add value to it. Also, this is only a viable solution if traffic is HTTP. TCP or UDP traffic doesn't have HTTP headers, so there is nothing the load balancer can do except for passing the traffic onto the app and causing the app to take the load balancer's IP address as the client's.
No one wants to serve HTTP traffic without SSL (HTTPS) encryption. This means traffic reaching your load balancer will be encrypted; therefore, it cannot be modified (HTTP headers added) by the load balancer. You can "terminate SSL on the load balancer" to get around this issue. This means HTTPS traffic reaching the load balancer will be decrypted by the load balancer, and the unencrypted HTTP traffic will be forwarded to your app. This requires the SSL certificate to be uploaded to the load balancer or issued to the load balancer (by a service like Let's Encrypt).
On a cloud provider like DigitalOcean, you can terminate SSL certificates on the load balancer.
Scaling
When using a container orchestrator like Swarm, you have two scaling routes: more nodes (servers) and more containers. Let's look at when we should scale the containers and when we will need more nodes.
More Containers or more nodes?
Like any other good question, the answer is "it depends." In this case, it depends on your application behavior, which comes down to how a single traffic session is served.
Here, a single traffic session is a single connection to the server, not a single visitor. For example a browser can open many connections to your server in parallel to download different assets on your site for a single visitor.
In the simplest form, for a single connection to be served to a client, the server needs to get the request (say GET /favicon.ico), fetch the requested resource and send it back to the client. If all goes well and there are no pauses, a single thread will pick up the request, then load the favicon.ico from the disk and send it down to the client. That thread can then serve the subsequent request.
Now imagine your application has only one thread that can handle requests. This means while a request is being served, all other requests have to wait in a queue. The time it takes to serve a single request depends on the request type. Loading a small file, like favicon.ico from the disk is going to be blazingly fast. But not all requests can be handled as quickly. For example, if your app needs to pull data from a database, it might take much longer to fulfill a request.
Now the good news is that most modern web application frameworks, including Go's HTTP handler stack, do a lot of work to speed things up. For example, the thread that picks up a request from the HTTP request stack parses it for URLs, params, and query strings and redirects it to your handler, and is then freed up to handle the next request without waiting for your code. It also fires up Go routines to handle requests meaning many requests can be handled in parallel.
However, the number of parallel requests is not infinite just because there is no theoretical limit on the number of Go routines you can have in code. It is effectively limited by the number of OS threads, CPU cache, and other factors. Sometimes, if the limits are in the code and not on the node, you can speed things up by firing up more containers (scale containers). However, most of the time, at least for Go web applications or backends, a single process scales up very well until it reaches the limits of a node. That's when you need to scale the nodes.
Given all the dependencies here, the best way to assess the scale points for your application is to fire up a single server and run a single container on it (by using a tool like ab). Then start putting stress load on the application until you start seeing the limits on application performance (timeouts, dropped connections).
Add another container to the mix (scale the service container count) and see if you get any performance benefits.
$ docker service scale sample_web=2
Now keep increasing the load and the number of containers until you see performance issues are not improving with more containers. This is when you need to scale up the nodes.
In Swarm, to scale up nodes, you need to fire upa new node, install Docker on it and add it to the same Docker Swarm.
Again, this depends on the application and which code path you are testing. In my experience, running a reasonably well-written Go web application with a web development framework like Echo, a single container will push the limits of the node, and you'll start to see CPU reaching 100% usage. So adding more containers won't improve the overall performance.
HTTP2 protocol uses the same connection to fetch multiple assets in parallel and therefore can have a positive effect on the overall performance of the application. You might want to consider using HTTP2 instead of HTTP if you can. This would mean using HTTP2 throughout the chain: from load balancer all the way to the app.
When your Swarm cluster has more than one server (which it should), Swarm makes decisions about which node a new container should go to. This makes statelessness of the service an important factor but also helps you not to worry about how containers are distributed on the nodes. Essentially, you need to monitor the nodes and add new ones to the cluster once you see their CPU / memory usage is reaching a high level. Remember always to leave headroom for both CPU and memory before scaling. For example, a node with 80% CPU and memory usage can easily reach 100% on both quickly before you have time to scale the cluster!
Deployments
With setup and scaling out of the way, we're ready to deploy. To deploy a new version of our app, we will use the build script (see above, we covered this in Part 1 of this series). Once the new version is built and pushed to our remote Docker image registry, we can take the given tag and use it to deploy the new version.
As we had the tag hardcoded in the docker-compose.yml file, we need to edit the file first to change the tag. You can do this with your favorite text editor on the server, but a better approach is to use environment variables.
Change docker-compose.yml to the following:
version: "3.9"
services:
  web:
    image: cloud66/go-webapp:${TAG}
    ports:
      - "80:3000"
Now you can deploy the app (replace xxxxxxx with the tag returned by the build script).
$ TAG=xxxxxxx docker stack deploy sample --compose-file docker-compose.yml
While this is an improvement, deploying our app like this will result in downtime. That's because Docker will shut down the old version before rolling out the new one, which means an invalid tag will bring the app down. Here is an improved docker-compose.yml document to fix the issue:
version: "3.9"
services:
  web:
    image: cloud66/go-webapp:${TAG}
    ports:
      - "80:3000"
    deploy:
      mode: replicated
      replicas: 2
      update_config:
        order: start-first
        failure_action: rollback
        delay: 5s
We've added a deploy section that tells Swarm to have two replicas of the service and, more importantly, deploy the new version first successfully before taking down the old one (order) and rollback invalid deployments (failure_action).
Private Docker Registry
Our app image is located on a public Docker registry (in this example, cloud66/go-webapp). In a more realistic scenario, your image is built and hosted on a private registry which requires authentication. If you are familiar with Docker registry authentication, you know you can use docker login to log in to a registry. Run this command on each node of the cluster. Also, you'd need to add --with-registry-auth to the docker stack deploy command:
$ docker stack deploy sample --with-registry-auth --compose-file docker-compose.yml
It is always a good practice to add this parameter to the command. --with-registry-auth ensures all nodes in the cluster use the same credential, and nodes will not pull the image independently, resulting in the possibility of running different versions of the app on other nodes.
Summary
Using Docker Swarm to deploy a Go web application is simple and mostly hassle-free, provided you have a stateless web application that can be moved between nodes without issues (no local storage needed for the server to start, for example).
As this post is about hosting a web application, I'm not going to go deep into the intricacies of running a Go TCP stack on Docker and will address those in another post and link back here.
Pros
- Relatively simple to set up and integrated with Docker
- Uses Docker Compose format, allowing production and developer environments to be the same.
Cons
- Requires external load balancer and SSL termination
- It doesn't work with SSL termination on the application
- It doesn't work with non-HTTP traffic
- Might be an overkill for a single web service
Using Docker Swarm to deploy your web app or API backend becomes more useful when you have more than one service and perhaps you want your application services to talk to each other. In the next episode, I'm going to deploy our web app, to a Kubernetes cluster.