
Let's get this out of the way first: I am not a fan of consent popovers on all websites. I think they degrade user experience, don't add anything of value to the privacy landscape and their burden of implementation is disproportionately imposed on small businesses, while the players who actually make money by trading your private data, like Meta and Google, get away with it by either technological means or legal loopholes. Okay, now that I've got that off my chest, let's talk about how to implement Google Tag Manager Consent Mode v2 in React, Gatsby and Next.js in a developer friendly way that is not full of Google Analytics jargon and is not a content marketing ploy to sell you a product and takes care of consent mode for you.
First, the basics:
What is Google Tag Manager Consent Mode v2?
If you are here, then you probably know what Google Tag Manager (GTM from now on) is. So let's focus on Consent Mode v2. Consent Mode v2, is a set of policies and tools by GTM to force you to seek the user's consent before sending tags to GTM. To comply with CMv2, you need to make sure of a few things:
- You need to enable Consent Mode in your GTM container and assign the right consent settings to your tags.
- You need to collect the user's consent and pass it to GTM.
- You need to make sure that your tags are not fired before the user has given their consent.
Sounds simple, right? Ok let's start by enabling Consent Mode in GTM.
Enabling Consent Mode in GTM
- Head to GTM and select the container you want to enable CMv2 for.
- Click on the Admin tab.
- Click on the Container Settings.
- Check the Enable consent overview checkbox.
- Click on the Save button.
Now, on the container, click on Tags. There will now be a new shield icon on top right of your container (next to the New button). Click on that, select your tags and click on the shield with cog icon to set the consent settings for your tags. In most cases, you need to choose the "No additional consent required" option.
Ok, now that we have enabled Consent Mode in GTM, let's move on to the next step.
Collecting the user's consent
This bit is easy for a developer to implement from a UI point of view (the consent popover is usually a sticky footer or a modal), but figuring out the right way to get the timing of the consent right is tricky. This is because you are not supposed to send any tag information to GTM before a consent is given.
Getting this timing right in a vanilla JS application is fairly easy: get the consent, then load GTM JS. However, in a framework like React, Gatsby or Next.js, this is not as straightforward, so I'm going to focus on that in the third step. For now, let's implement a consent popover.
Implementing the consent popover
My consent popover consists of two components: one is a floating banner and a consent form one. You can merge the two, but since I had use for floating banners in other parts of the application, I split them. Also, here I'm using Tailwind CSS for styling, but you can use whatever you like.
If you're looking for the logic that needs to be implemented, look in the ContentForm component.
First, the FloatingBanner component:
There is nothing really interesting here: this is a floating sticky banner, that uses Tailwind CSS to stay on top of other components at the bottom of your page. It has a header, a message and two buttons. The onAccept and onDeny functions are passed from the parent component and are called when the user clicks on the buttons. It also is responsive, so it looks good both on mobile and desktop.
A note on the
colorproperty when using Tailwind CSS: The color name here should be a Tailwind CSS color name, likeblue,red,greenetc. Also, given that Tailwind only generates the used color names and uses string search in files to find the color names, you might need to add the color name to yourtailwind.config.jsfile undersafelistto make sure it is included in the final CSS file. It would look something like this:

Now moving on to the ConsentForm component:
You will need to install universal-cookie to use this component:
Make sure to replace YOUR_DOMAIN with your domain name. If you want the consent to apply to all of your subdomains, you can use .yourdomain.com as the domain. Also replace COOKIE_NAME with a good name for your cookie.
So, what's going on in this component?
This simple components, looks for the cookie. If it finds it, it means the user has made a decision on the consent question. If no cookie is found, it then shows the FloatingBanner component. When the user clicks on the buttons, it sets the cookie and sends the consent to GTM.
The most important note here is that this component sends the consent results to GTM after a user interaction. To be CMv2 compliant, your code needs to set default consent values for your visitors. This means if the user doesn't interact with the consent form GTM knows their default consent. This is done in the next step.
Making sure your tags are not fired before the user has given their consent
This is the part that I spent a few hours on, trying to figure out how it can be done as most of the tutorials and posts I could find at the time of writing were out dated and didn't work with CMv2. Also, all cookie consent, GTM and Google Analytics plugins for Gatsby (if you're using that) are not CMv2 compliant and have no way for you to set the default consent values.
Setting the consent default values, is not done in your code, but inside of the GTM itself. Here is how it works:
Enabling CMv2 on GTM, lets you create a new trigger type: "Consent Initialization". This tag is guaranteed to be fired before any other tag, so it's perfect for setting the default consent values.
What we need then is a tag that is triggered by this "Consent Initialization" trigger, that sets the default consent values. To create this tag type, we are going to create a GTM Template and then use this template to cerate a tag. (I told you it's not straightforward!).
What we want our tag to do is simple however: look for our cookie, if you find it, use its content as the default consent values, if not, set some default values we want. Here is the thing with tag templates: they are sent to the visitor's browser and run there. Knowing this makes understanding the whole thing a lot easier!
Let's create our tag template:
First the template fields:
- Head to your GTM container.
- Click on Templates
- Under Tag Templates, click on New
- Name your template, for example "Consent Default Values"
- Click on Fields tab.
- Add a "ParamTable" field and call it
defaultSettings. - Expand the
defaultSettingsfield and add the following text fields:grantedanddenied. Make sure to enter a description as well, as you won't see the field name when you want to use it. - Under
defaultSettingsfield, add a text field calledregionand make it mandatory.
Now, let's grant this template the right permissions:
First, click on the Permissions tab. Now under Access Consent State, add the following permissions: ad_storage, ad_user_data, ad_personalization, analytics_storage, functionality_storage, personalization_storage and security_storage and give all of the read and write permissions.
Then add a Read Cookies access permission to the template: choose "Specific" and enter the name of the cookie you are using in your ConsentForm component.
Now it's time for our template's code (this is a modified version of the code provided by Google here, which I fixed and made work)
Click on the Code tab and enter the following code:
Make sure to use the same cookie name you used in your ConsentForm component in the COOKIE_NAME variable.
Okay! Now click Save and you're done with the template part. The rest is easy, I promise! But before that, let's quickly go over what this code does.
Okay, so this code uses a few of GTM APIs. It starts by setting the default consent value to data.defaultSettings and then checks if the cookie is set. If it is, then it updates the consent state with the values from the cookie. So the question becomes, where does data come from. That's what the next step is.
For that, we need to create a tag that uses this template.
- Head to your GTM container.
- Click on Tags
- Click on New
- On the Tag Configuration part, click on the "Choose a tag type to begin setup" and choose our new template under the "Custom" section. This will open a configuration page, with our
defaultSettingsfield and its subfields. - Click on "Add Row" and enter the following values (leave the rest empty)
denied:ad_storage,ad_user_data,ad_personalization,analytics_storage,functionality_storage, personalization_storage,security_storage
- Save this part and click on the Triggering part.
- Select "Consent Initialization - All Pages" as the trigger.
- Give your tag a meaningful name and save it.
You're done! But what were those values we just entered?
The denied value is the default consent values we want to set for our visitors. This is the default consent value for all of our visitors. If the user doesn't interact with the consent form, this is the value that GTM will use. If you want to set some consent value as granted, move it from the denied field to the granted field. region is a field that is used to set the consent values for a specific region. If you leave it empty, it means it applies to all regions. You can find some more information about this in the Google documentation.
By adding this tag and trigger, you have set the default consent values for your visitors. Now, if the user doesn't interact with the consent form, GTM knows what their default consent is.
What's left now is to run our app locally and test it. Once your app is started, in GTM, click on Preview and then open your app. In GTM preview page, you should see a Consent step right after Consent Initialization and before any other steps. Click on the Consent tab and you should see something like this, albeit with all permissions set to "denied" (unless you have setup different default values):
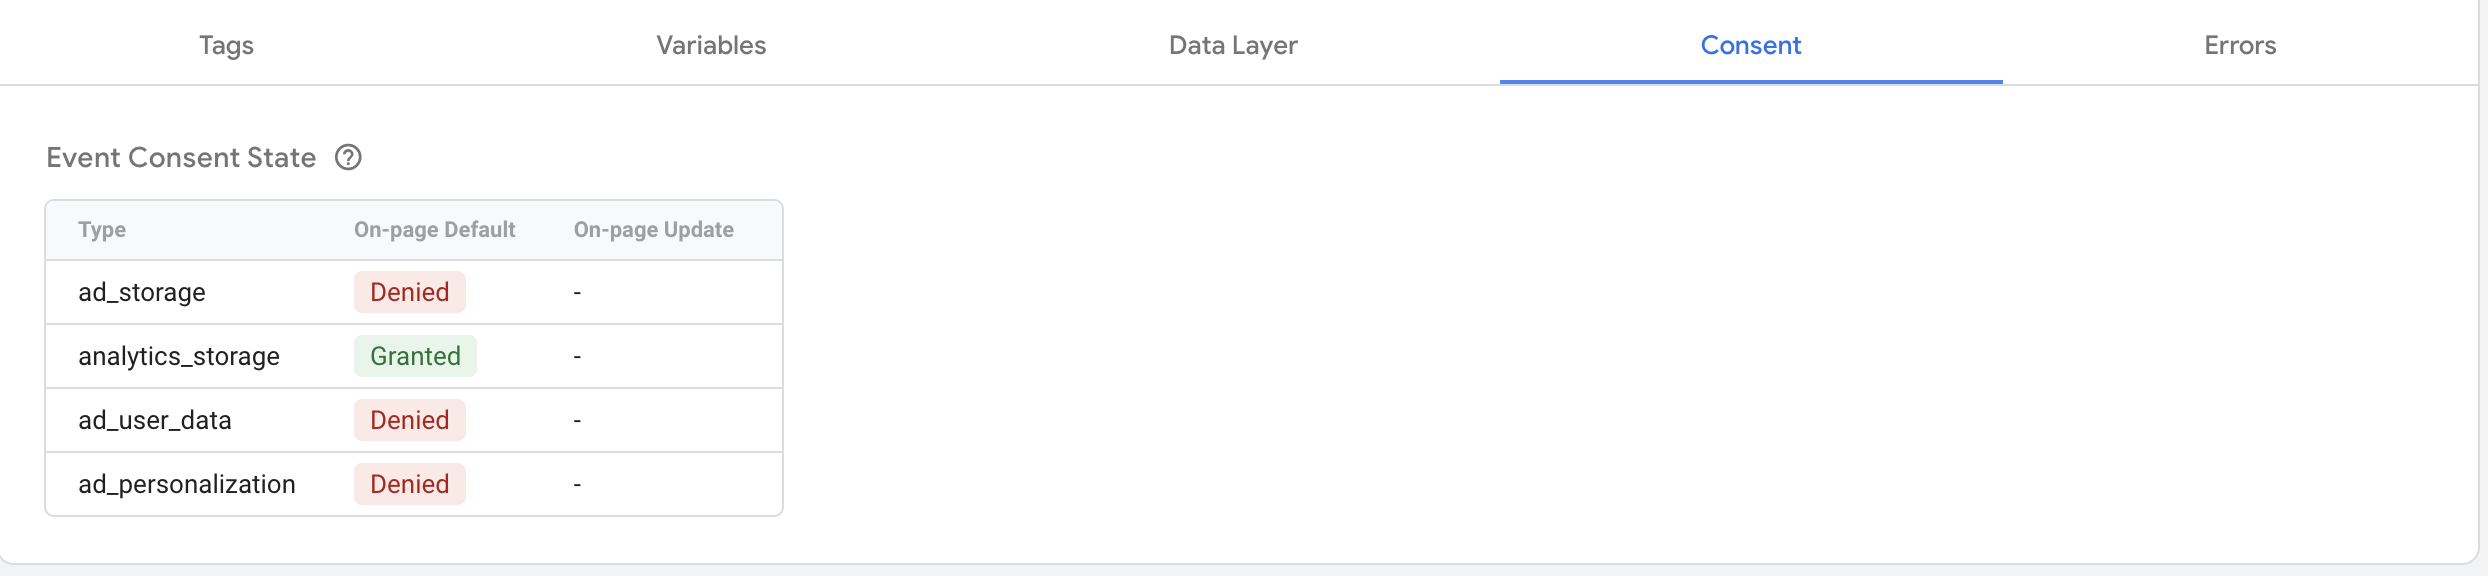
If you click on the "yes" button on the consent form, you will see a new step showing up which sets the consent according to your choice. This click action, saves your choices in a cookie. So if you refresh the page, the preview page will show a new Consent step right after the Consent Initialization step, showing your choices as the new defaults. Remember, in our GTM template, we always set the default to denied first and then read the cookies, so you will see 2 Consent steps in the preview page.
Conclusion
This method for Consent Mode v2 compliance is not as simple as downloading an NPM package and plugging it in. Perhaps there will be solutions soon like that. However I think is a fully compliant way to achieve CMv2 compliance that works with all existing Gatsby and NextJS plugins without any changes.